Skip to content
-
Subscribe to our newsletter & never miss our best posts. Subscribe Now!
Work Management Hub Work Management Hub

Expert Reviews, Comparisons & Guides for Smartsheet, Monday.com, Asana, ClickUp & More

Work Management Hub Work Management Hub

Expert Reviews, Comparisons & Guides for Smartsheet, Monday.com, Asana, ClickUp & More

  • Airtable
  • Asana
  • ClickUp
  • Jira
  • Monday.com
  • Notion
  • Smartsheet
  • Wrike
  • About
  • Contact
  • Airtable
  • Asana
  • ClickUp
  • Jira
  • Monday.com
  • Notion
  • Smartsheet
  • Wrike
  • About
  • Contact
Close

Search

  • https://www.facebook.com/
  • https://twitter.com/
  • https://t.me/
  • https://www.instagram.com/
  • https://youtube.com/
How-To GuidesSmartsheet

Smartsheet Data Shuttle 2026: Automate Data Import and Export Between Any Source

By Shaik KB
May 23, 2026 25 Min Read
0
⚡ Key Takeaways

  • Smartsheet Data Shuttle is a premium add-on accessed at datashuttle.smartsheet.com — it must be enabled by a System Admin in Admin Center before any user can access it.
  • Two workflow types exist: Upload (import CSV or XLSX data into a Smartsheet sheet) and Offload (export a sheet to a CSV or XLSX file for external systems).
  • Business plan supports basic file import from sheet attachments; Enterprise plan unlocks full cloud storage connectivity — Google Drive, OneDrive, SharePoint, and Box.
  • Source and target column names do not need to match — Data Shuttle auto-maps matching names and allows fully custom mappings for any others.
  • Workflows can trigger on a recurring schedule (automatic polling) or fire immediately when a new attachment matching specific criteria is added to a sheet.
  • Data Shuttle can append new rows, update existing rows by a unique key column, or completely replace all sheet data on each run — the right mode depends on whether your source is additive or a full daily snapshot.
  • The most impactful use case is automating a recurring ERP or database export — teams eliminate hours of weekly manual CSV import work in a single afternoon of configuration.
Quick Answer:

Smartsheet Data Shuttle is a premium automation add-on that imports CSV or XLSX files from cloud storage (Google Drive, OneDrive, SharePoint, Box) or sheet attachments into Smartsheet — and exports sheets back out — on a schedule or attachment trigger. It eliminates manual data entry for operations, finance, and project teams on Business and Enterprise plans.

Table of Contents

  1. Why Data Shuttle Exists and Who Needs It
  2. Plan Requirements and Admin Enablement
  3. Upload vs. Offload: Understanding the Two Workflow Types
  4. Supported Sources, File Formats, and Connections
  5. Step-by-Step: Set Up an Upload Workflow
  6. Step-by-Step: Set Up an Offload Workflow
  7. Column Mapping: Auto-Map and Custom Mapping Explained
  8. Triggers and Scheduling: Recurring vs. On-Attachment
  9. Data Merge Modes: Append, Update, or Replace
  10. Real-World Use Cases and Enterprise Patterns
  11. Troubleshooting Common Data Shuttle Issues
  12. Verdict
  13. FAQ

Smartsheet Data Shuttle 2026: Automate Data Import and Export Between Any Source

Your finance team spends three hours every Monday manually copying ERP exports into Smartsheet. Someone downloads the CSV, opens the sheet, pastes the rows, fixes the column headers, checks for duplicates, and then wonders whether they missed any rows. It happens again the following Monday, and the Monday after that. Data Shuttle ends that.

Smartsheet Data Shuttle is the platform’s dedicated data pipeline tool — a separate premium application that automates the movement of structured data between external files and Smartsheet sheets, in both directions, on a schedule you control. In practice, it is the difference between a sheet that someone manually updates and a sheet that updates itself. That difference matters enormously at scale: for finance teams running weekly budget reconciliations, operations teams ingesting daily warehouse reports, or IT teams syncing user data from HR systems, Data Shuttle is not a convenience feature — it is a structural change to how data flows through an organization.

This guide covers everything you need to configure, operate, and optimize Data Shuttle in 2026: both workflow types, all trigger options, column mapping logic, data merge modes, and the plan-level requirements that catch most teams off guard before they even get to configuration.

Why Data Shuttle Exists and Who Needs It

Smartsheet is excellent at structured project and work management. What it is not natively designed to do is ingest data continuously from external systems. For small teams with modest data volumes, manual import via CSV upload is workable. For any team processing data on a recurring schedule — daily, weekly, or triggered by an event — manual import is a source of error, delay, and wasted analyst time.

Data Shuttle was built for the use case that sits between full API integration and manual work. It requires no developer involvement, no webhook configuration, and no code. A Smartsheet user with Owner or Admin permissions on a sheet can configure a fully automated data pipeline in under 30 minutes. The external system simply drops a CSV or XLSX file into a shared folder — SharePoint, Google Drive, OneDrive, Box, or directly as a sheet attachment — and Data Shuttle picks it up, maps the columns, and populates or updates the Smartsheet rows automatically.

The three most common profiles who get immediate value from Data Shuttle:

  • Finance teams running weekly ERP or accounting system exports. The ERP team generates the file; Data Shuttle imports it into a Smartsheet tracker that feeds dashboards, formulas, and approval workflows without anyone touching a keyboard between export and report.
  • Operations and supply chain teams receiving daily inventory, fulfillment, or logistics data from warehouse systems that export CSV. Data Shuttle ingests the file automatically overnight so planners arrive to a current sheet each morning.
  • IT and HR teams maintaining Smartsheet-based directories or onboarding trackers that need to stay in sync with a source-of-truth HR system. A daily CSV export from the HRIS lands in SharePoint; Data Shuttle imports it and keeps the Smartsheet roster current.

If your organization also uses Smartsheet automations to act on data once it arrives, the combination becomes particularly powerful — see our Smartsheet automations setup guide for how to chain automations to rows that Data Shuttle creates or updates.

Plan Requirements and Admin Enablement

This is where most teams hit their first wall. Data Shuttle is a premium add-on, not a standard Smartsheet feature, and it requires explicit enablement before any workflow can be created. Understanding the requirements upfront saves frustration during setup.

Who Can Use Data Shuttle

  • Available plans: Business and Enterprise. Data Shuttle is not available on Pro or Free plans.
  • Required permissions on target sheet: Owner, Admin, or Editor. Viewer-only users cannot create workflows that write to a sheet.
  • Admin Center enablement: A System Admin must enable Data Shuttle in Admin Center before any licensed user can access it. If you navigate to datashuttle.smartsheet.com and see an access error, this is almost always the cause. Contact your Smartsheet System Admin to enable the app for your organization.

Plan Differences That Matter

Both Business and Enterprise support Data Shuttle, but there is a meaningful capability gap when it comes to source connectivity:

  • Business plan: Upload workflows can use files attached directly to Smartsheet rows or sheets (sheet attachments as the data source). This is functional for smaller teams where someone can email or drag-and-drop a file as an attachment to a specific row on the sheet.
  • Enterprise plan: Full cloud storage connectivity — Google Drive, Microsoft OneDrive, Microsoft SharePoint, and Box. This is the configuration that enables genuinely hands-off automation, where an external system writes to a shared folder and Data Shuttle reads from it on schedule. For most enterprise use cases, this is the required tier.

If your team is on Business and hitting the attachment-only limitation, this is the primary argument for upgrading to Enterprise — particularly if the source data comes from a system that can be configured to write to SharePoint or Google Drive.

Accessing Data Shuttle

Once enabled by your Admin, access Data Shuttle at datashuttle.smartsheet.com. You can also reach it via the Smartsheet product launcher (the grid icon in the top-left of Smartsheet) under “More Smartsheet Products.” The Data Shuttle interface is entirely separate from the main Smartsheet grid — it is a standalone application with its own workflow management dashboard.

Upload vs. Offload: Understanding the Two Workflow Types

Data Shuttle has exactly two workflow types. Understanding the distinction is the foundation of everything else in the tool.

Upload Workflows

An Upload workflow moves data into Smartsheet. The source is a file (CSV or XLSX) stored either as a sheet attachment or in a connected cloud storage location. The destination is a Smartsheet sheet. The workflow reads the file, maps the columns, and creates or updates rows according to the merge mode you configure.

Use an Upload workflow when: an external system generates a recurring file that needs to populate or update a Smartsheet sheet.

Offload Workflows

An Offload workflow moves data out of Smartsheet. The source is a Smartsheet sheet (or a filtered view of it). The destination is a file (CSV or XLSX) written to a connected cloud storage location. Use an Offload workflow when another system — an ERP, BI tool, or legacy database — needs to consume Smartsheet data as a file it can ingest on a schedule.

Use an Offload workflow when: a downstream system cannot connect to Smartsheet directly but can read from a shared folder, and you need to keep that system current with your Smartsheet data.

The two workflow types can be combined to create multi-step pipelines. A common pattern: System A exports data to SharePoint, Data Shuttle Upload imports to Smartsheet, the team reviews and updates in Smartsheet, Data Shuttle Offload writes the updated data back to SharePoint, and System B reads from SharePoint. This is not true real-time bidirectional sync, but for daily or weekly cadences, it is an effective and code-free pipeline.

Supported Sources, File Formats, and Connections

File Formats

Data Shuttle supports exactly two file formats: CSV and XLSX. No other formats are accepted. If your source system exports XLS (the older Excel format), XLSM, JSON, XML, or any other format, the file must be converted before Data Shuttle can process it. In practice, this is rarely a problem — virtually every modern business system can export CSV or XLSX — but it is worth confirming before designing your pipeline.

Source Locations for Upload Workflows

  • Smartsheet Attachment (sheet or row): Available on Business and Enterprise. The source file is attached to a specific row or to the sheet itself. This is useful for smaller, more manual workflows where someone uploads the file as an attachment to trigger the import.
  • Google Drive: Enterprise only. Connect a Google Drive account; Data Shuttle monitors a specified folder or file path.
  • Microsoft OneDrive: Enterprise only. Connect personal or organizational OneDrive; specify the folder to monitor.
  • Microsoft SharePoint: Enterprise only. Connect to a SharePoint site and document library; specify the folder path within the library.
  • Box: Enterprise only. Connect a Box account and specify the folder to monitor.

For the full list of supported connections and authentication requirements, see the official Data Shuttle overview on Smartsheet Help.

Destination Locations for Offload Workflows

Offload workflows write to the same cloud storage locations listed above (Google Drive, OneDrive, SharePoint, Box) — again with Enterprise required for cloud destinations. Offload outputs are always fresh files, written to the specified path on each run. The file is overwritten on every execution, not appended to.

Step-by-Step: Set Up an Upload Workflow

The following steps walk through a complete Upload workflow setup — the most common configuration. The example scenario is a weekly finance team report: an ERP system drops a CSV into a SharePoint folder every Sunday night, and Data Shuttle imports it into a Smartsheet budget tracker every Monday morning at 6:00 AM.

Before starting, confirm: (1) Data Shuttle is enabled in Admin Center, (2) you have Owner or Admin access to the destination sheet, and (3) the destination sheet’s columns are already set up to match the incoming data structure.

  1. Navigate to datashuttle.smartsheet.com — Log in with your Smartsheet credentials. You land on the Data Shuttle workflow dashboard, which shows all existing workflows you have created or have access to.
  2. Click “Create New Workflow” — The button appears in the top-right of the dashboard. A workflow type selection screen appears.
  3. Select “Upload” — Click the Upload option. This configures the workflow as an inbound data import (file to sheet). Click Next.
  4. Name your workflow — Enter a descriptive name, such as “Weekly ERP Budget Import – Finance.” Clear naming is important when you eventually have dozens of workflows in the dashboard. Click Next.
  5. Connect your source — Under “Source Location,” select the storage type. For SharePoint: click “Microsoft SharePoint,” authenticate with your Microsoft 365 credentials, select the SharePoint site, then the document library, then navigate to and select the specific folder or file. For Google Drive: click “Google Drive,” authenticate with your Google account, and navigate to the folder or file. For Smartsheet Attachment: select “Smartsheet Attachment,” then specify whether the attachment is on a specific row or on the sheet itself. Once connected, if you selected a folder rather than a specific file, configure the file name filter by entering a partial name or pattern (e.g., “budget_export”) so Data Shuttle only processes files whose names contain that string. This prevents accidentally importing an unrelated file that lands in the same folder.
  6. Select the file format — Choose CSV or XLSX. If CSV, confirm the delimiter (comma is default; some systems export semicolon-delimited files). For XLSX, specify which sheet tab contains the data if the workbook has multiple tabs.
  7. Confirm the header row — Data Shuttle previews the first few rows of the source file. Verify that row 1 contains column headers, not data. If your file has metadata rows above the headers (e.g., a report title in row 1, headers in row 2), adjust the header row setting accordingly.
  8. Select the destination sheet — Under “Destination,” click “Select Sheet.” A sheet picker opens — navigate to and select the Smartsheet sheet that will receive the data. You must have Owner, Admin, or Editor permissions on this sheet.
  9. Configure column mapping — Data Shuttle displays a mapping interface showing source columns (from the file) on the left and destination columns (from your Smartsheet sheet) on the right. Columns with identical names auto-map. For any that did not auto-map, use the dropdown on each destination column row to manually select the corresponding source column. Unmapped destination columns are left unchanged on each run. See the Column Mapping section below for detailed guidance.
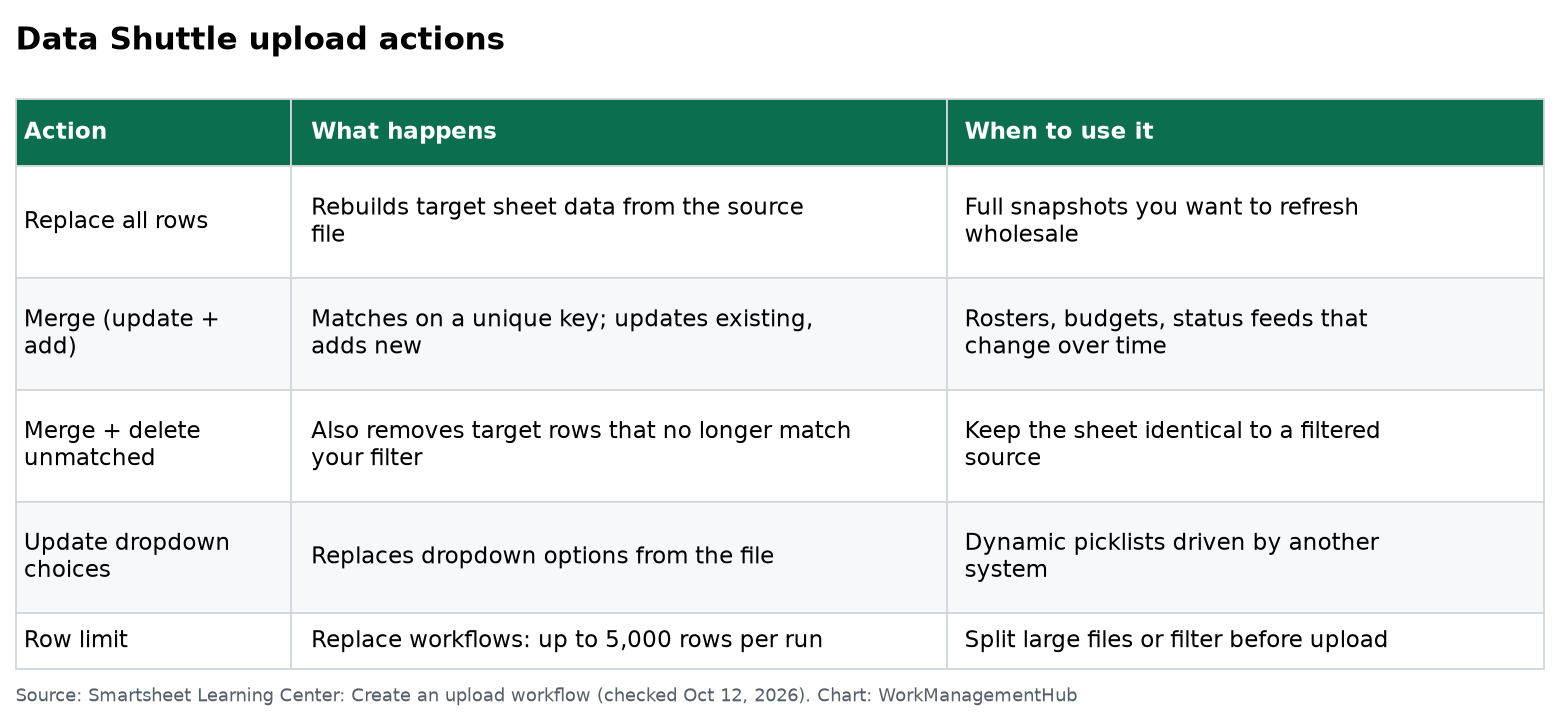
  10. Choose the merge mode — Select how Data Shuttle handles existing sheet data on each run. “Add new rows only” appends rows not already in the sheet (requires a key column for deduplication). “Update existing rows / Add new rows” updates matches and inserts new rows — the most common mode for full-snapshot sources. “Replace all rows” deletes all existing rows and replaces them with the import file contents — use only for read-only data display sheets.
  11. Set the key column (if updating) — If you selected any merge mode that checks for existing rows, specify the key column — the column whose value uniquely identifies each row (e.g., Project ID, Employee ID, or Invoice Number). Data Shuttle matches incoming rows to existing sheet rows using this column’s value.
  12. Configure the trigger — Under “Trigger,” select Scheduled (set the frequency, day, time of day, and time zone — for the Monday morning finance import, select Weekly, Monday, 06:00 AM, your local time zone) or On Attachment (fires when a new attachment matching the file name filter is added to the specified sheet or row).
  13. Review and save — Data Shuttle shows a summary of the entire workflow configuration. Review source, destination, mapping, merge mode, and trigger. Click Save Workflow. The workflow is now active and will run on the configured trigger.
  14. Run a manual test — After saving, click the Run Now button on the workflow card in the dashboard. Verify that data appears correctly in the destination sheet. Check that mapped columns populated correctly, that no columns are blank that should have data, and that the row count matches the source file.

For additional configuration options and advanced settings, the Smartsheet Help documentation on Upload workflows covers edge cases including multi-tab XLSX handling and attachment-specific trigger behavior.

Step-by-Step: Set Up an Offload Workflow

An Offload workflow is the mirror image of an Upload — it reads data from a Smartsheet sheet and writes it to an external file. The setup is simpler because there is no column mapping complexity: Smartsheet columns map directly to output file columns. The primary configuration decisions are which sheet data to export, where to write the file, and when to run.

  1. Navigate to datashuttle.smartsheet.com — From the workflow dashboard, click Create New Workflow.
  2. Select “Offload” — Choose the Offload workflow type. Click Next.
  3. Name your workflow — Use a naming convention that identifies the source sheet and the destination system, such as “Weekly Project Status Offload – SharePoint BI Feed.” Click Next.
  4. Select the source sheet — Under “Source,” click “Select Sheet” and choose the Smartsheet sheet you want to export. You must have at least Owner or Admin access to this sheet.
  5. Choose which data to export — By default, Offload exports all rows visible in the sheet’s primary grid view. You can also select a specific saved filter on the sheet to export only rows matching that filter — for example, only rows where Status equals “Complete” or Project equals “Q3 Rollout.” This is useful when the same sheet feeds multiple downstream systems with different data scope requirements.
  6. Select the destination location — Choose the cloud storage target (Google Drive, OneDrive, SharePoint, Box). Authenticate and navigate to the destination folder. Specify the output file name — use a static name (the file is overwritten each run) or configure a dynamic name using a date variable so each export creates a new timestamped file (e.g., “project_status_2026-05-24.csv”).
  7. Choose the output file format — Select CSV or XLSX. For most downstream system integrations, CSV is the safer choice for compatibility. XLSX is preferable when the file will be opened directly by business users who expect formatted Excel output.
  8. Select which columns to include — Data Shuttle lists all columns from the source sheet. Deselect any columns that should not be included in the export — internal tracking columns, formula columns, or columns containing sensitive data not relevant to the receiving system.
  9. Configure the trigger — As with Upload workflows, choose Scheduled (set frequency, day, time, time zone) or On Attachment. For Offload workflows, Scheduled is by far the more common trigger. Set the schedule to align with the downstream system’s ingestion window — for example, if the BI tool refreshes at 7:00 AM, schedule the Offload for 6:30 AM.
  10. Review and save — Review the full configuration. Click Save Workflow. Run a manual test using Run Now and verify the output file appears in the destination folder with the correct data and file name.

If you are piping Smartsheet data into a BI dashboard or analytics platform, consider pairing an Offload workflow with a well-structured Smartsheet dashboard as the internal reporting layer — teams can consume data in Smartsheet’s native dashboard while the Offload feeds external tools on the same cadence.

Column Mapping: Auto-Map and Custom Mapping Explained

Column mapping is the step that makes or breaks an Upload workflow. Getting it right the first time prevents silent data errors — rows that appear to import correctly but populate the wrong columns.

How Auto-Mapping Works

When you connect a source file and a destination sheet, Data Shuttle compares column header names from the file against column names in the Smartsheet sheet. Where the names match exactly (case-insensitive), Data Shuttle automatically creates the mapping. You will see a green “Mapped” indicator next to those columns.

Auto-mapping is convenient but fragile. If the source file uses “Proj ID” and the Smartsheet column is named “Project ID,” those will not auto-map. If a source file column name changes because someone edited the ERP report template, the auto-mapping silently breaks on the next run. Build a convention: agree on canonical column names between the source system team and the Smartsheet team, and document them. This is the most common cause of Data Shuttle workflows that “worked for three months and then stopped working.”

Custom Column Mapping

For any source column that did not auto-map, or for deliberate remapping (source file uses “Dept Code” but the sheet column is named “Department”), use the manual mapping dropdown on each destination column row. Click the dropdown under “Source Column” next to the destination column name and select the corresponding source column from the list.

Key rules for custom mapping:

  • A single source column can only map to one destination column. You cannot fan one source column into multiple sheet columns through the Data Shuttle UI alone.
  • Destination columns that are left unmapped are simply not updated on each run — existing cell values are preserved.
  • Formula columns in Smartsheet cannot be mapped as destinations. Data Shuttle cannot overwrite a cell that contains a formula. Use helper columns (plain text or number columns) as import targets if you need formula columns to reference the imported data.
  • System columns (Created By, Modified By, Modified Date) also cannot be mapped as destinations.

If your Smartsheet sheet uses formulas extensively, see our Smartsheet formulas and functions guide for how to structure formula columns that reference data imported by Data Shuttle without creating circular dependencies.

Mapping for Google Sheets Sources

When using Google Drive as the source and the source file is a Google Sheets document, Data Shuttle reads the Google Sheet as if it were an XLSX export — it processes the first sheet tab unless you specify otherwise. Column header mapping works identically to standard XLSX files. For teams using Google Sheets as an intermediate staging layer before Smartsheet, this is a common pattern — see our Smartsheet and Google Sheets integration guide for the full picture of how these tools connect.

Triggers and Scheduling: Recurring vs. On-Attachment

The trigger is what separates a workflow you have to remember to run from one that runs itself. Data Shuttle offers two trigger types, and the right choice depends on how the source data arrives.

Recurring Schedule Trigger

The scheduled trigger polls the source location at a configured interval. You set the frequency (daily, weekly on specific days, or a custom interval), the time of day at which the workflow executes, and the time zone — always set this explicitly to the time zone your team operates in. A 6:00 AM import configured in UTC becomes a 1:00 AM or 2:00 AM import in US Eastern time.

On each scheduled run, Data Shuttle checks whether the source file exists at the configured path. If the file exists, it imports. If no file is present (because the source system did not generate one that cycle), the workflow logs a “no file found” status and does nothing — it does not error out or clear the sheet.

Best practice: schedule Upload workflows to run slightly after the source system’s export completes. If the ERP generates its weekly CSV by 5:00 AM, set Data Shuttle to run at 5:30 AM to ensure the file is fully written before ingestion begins.

On-Attachment Trigger

The on-attachment trigger fires when a new file is attached to the specified Smartsheet sheet or row that matches the file name filter you configured. This is an event-driven trigger: instead of polling on a clock, Data Shuttle watches for the attachment event and runs immediately when it occurs.

This trigger is most useful when: the data import is manual but you want the import processing to be automatic (a team member attaches the file and Data Shuttle handles the rest), the external system can be configured to attach a file to a Smartsheet row via the Smartsheet API as part of its export process, or imports are ad-hoc and the schedule is unpredictable because the source data does not arrive on a fixed cadence.

The on-attachment trigger combined with Smartsheet’s built-in automation capabilities creates a powerful pattern: when Data Shuttle finishes importing, subsequent automations (notifications, row moves, approval requests) can fire automatically on the newly imported data. See our automation guide for how to chain these triggers effectively.

Data Merge Modes: Append, Update, or Replace

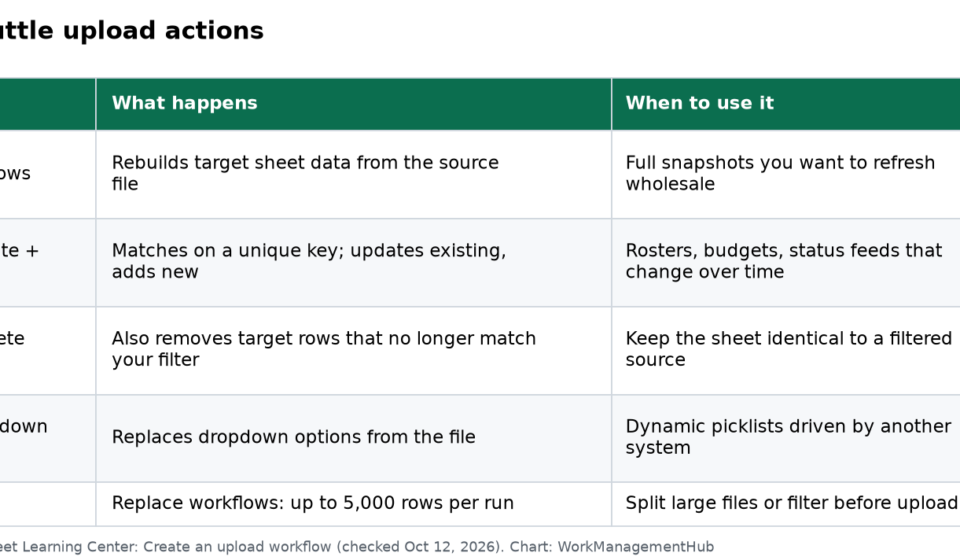
The merge mode is one of the most consequential configuration decisions in an Upload workflow. Choosing the wrong mode can result in duplicate rows, lost data, or a sheet that no longer reflects reality. Here is how to think about each option.

Add New Rows Only (Append)

Data Shuttle compares incoming rows against existing sheet rows using the key column. If a row with the same key value already exists in the sheet, it is skipped. Only rows with key values not already present in the sheet are added.

Use when: The source file contains transactional records that are additive — new invoices, new service tickets, new orders. Each import adds new records without touching historical data. The source file may be a daily delta (only new records since the last export) rather than a full snapshot.

Risk: If a record changes in the source system, the existing row in Smartsheet is not updated. This mode is for append-only data, not for data that changes over time.

Update Existing Rows / Add New Rows (Upsert)

The most commonly appropriate mode for recurring imports. Data Shuttle compares incoming rows to existing rows using the key column. Where a match is found, the existing row is updated with the new values from the source file. Where no match exists, a new row is added.

Use when: The source file is a full snapshot — all current records, including ones that may have changed since the last export. Weekly budget reports, employee directories, project status lists, inventory counts — any dataset where records are updated over time and you want the sheet to reflect the current state of all records.

Risk: If a record is deleted from the source system (the row disappears from the file), the corresponding Smartsheet row is not deleted in this mode — it simply is not updated. Stale rows accumulate over time. If this is a concern, consider Replace mode instead.

Replace All Rows

Every row in the sheet is deleted and replaced with the full contents of the source file on each run. The sheet will always exactly mirror the current source file after each execution.

Use when: The sheet is purely a read-only data display that should always reflect exactly what is in the source system. Dashboard-feeding lookup sheets, reference data sheets, or reporting feeds where the Smartsheet sheet itself is not edited by users are good candidates.

Risk: This mode is destructive. Any manual edits, comments, or attachments on existing rows are deleted on every run. Never use Replace mode on a sheet where users enter data or annotate rows manually. It also interacts poorly with cross-sheet references and cell links — those references break when the rows are deleted and recreated.

For sheets that feed into Smartsheet-Jira integrations or other connected systems, confirm how your integration handles row deletion before enabling Replace mode.

Real-World Use Cases and Enterprise Patterns

Weekly Finance Data Import from ERP

This is the canonical Data Shuttle use case. Configuration: ERP system generates a CSV weekly on Sunday night with all active budget lines, the file lands in a SharePoint document library folder, Data Shuttle Upload workflow runs Monday at 6:00 AM, the sheet updates with current period actuals, and the downstream dashboard shows updated charts by 7:00 AM when the finance director logs in.

Merge mode: Update existing / add new rows, with Budget Line ID as the key column. Finance analysts can annotate rows with comments and add internal notes in helper columns — those are preserved across imports because the upsert mode only overwrites mapped columns. The columns that Data Shuttle writes to are the raw data columns; formula columns computing variances, YTD totals, and percent-of-budget remain intact because they reference the import columns rather than containing their own data.

Project Status Export to SharePoint for Reporting

A program management team maintains a Smartsheet sheet with all active projects, statuses, RAG ratings, and milestone dates. A legacy executive reporting tool reads from a SharePoint folder. Configuration: Offload workflow runs every weekday at 6:30 AM, exports the sheet filtered to active projects only using a saved filter, writes to a CSV in SharePoint, and the reporting tool ingests the fresh file for executive dashboards.

The Smartsheet sheet remains the team’s live working document; the Offload workflow makes it a data source for the reporting infrastructure without any manual export steps. No one has to remember to download and upload a file before the Monday morning executive review.

Daily Inventory Update from Warehouse System

A warehouse management system exports a full daily inventory CSV to a Box folder. Data Shuttle runs at 2:00 AM, replaces all rows in a Smartsheet inventory sheet, and automations fire on rows where stock level is below threshold — alerts go to the procurement team before business hours. Replace mode is appropriate here because the sheet is purely a system-generated view and no manual editing occurs on it. The automation layer on top of the import is what makes this operationally useful rather than just informational.

HR Directory Sync from HRIS

A company’s HR information system exports a full employee directory CSV to OneDrive each night. Data Shuttle runs at 1:00 AM using the upsert merge mode with Employee ID as the key column. New hires appear in the Smartsheet directory the next morning; terminated employees remain in the sheet (not deleted, because the upsert mode does not delete rows absent from the source file) until a quarterly cleanup automation archives rows where Status has been set to “Inactive” for more than 30 days. This layered approach handles both the automated import and the manual governance step cleanly.

Bi-Directional Sync Pattern

True bidirectional sync is not a native Data Shuttle capability, but a practical approximation works for daily cadence use cases. An Upload workflow imports the source file into Smartsheet at 6:00 AM; the team reviews and makes decisions in Smartsheet throughout the day; an Offload workflow exports the updated sheet back to SharePoint at 6:00 PM; the source system reads the file overnight and processes decisions. The sync happens at file-drop boundaries, not in real time. For genuine real-time sync, the Smartsheet API or a dedicated integration platform is required — Data Shuttle is a file-based pipeline, not an event-driven integration bus.

Troubleshooting Common Data Shuttle Issues

Workflow Shows “Access Denied” or Cannot Be Created

Most common cause: Data Shuttle has not been enabled in Admin Center. Have your System Admin log into Admin Center, navigate to Apps & Integrations, and confirm Data Shuttle is enabled for your organization. If it is enabled and you still see access errors, verify you are on a Business or Enterprise plan — Pro plan users cannot access Data Shuttle regardless of Admin Center settings.

Source File Not Found on Scheduled Run

Data Shuttle logs a “no source file” result and takes no action. Verify the file exists in the exact path configured, that the file name matches the filter string, and that the connection credentials have not expired. Cloud storage connections (Google Drive, SharePoint, Box) use OAuth tokens that may need to be refreshed periodically — re-authenticate the connection from the workflow settings if the token has lapsed. This is the most common cause of workflows that ran reliably for months and then silently stopped importing.

Columns Not Populating After Import

The most common cause is a failed column mapping. Open the workflow, navigate to the mapping step, and verify each destination column shows the correct source column. If column names changed in the source file (common when IT or the source system team updates an export template), the previously configured mappings break silently. Also check whether the destination columns are formula columns — those cannot receive Data Shuttle writes. See the official Data Shuttle troubleshooting documentation for additional diagnostic steps.

Duplicate Rows Appearing After Each Run

This occurs when the merge mode is set to “Add new rows only” but the key column does not contain truly unique values in the source file, or when no key column is configured and Data Shuttle cannot identify existing rows to skip. Open the workflow and verify the key column is set to a field that uniquely identifies each record (Project ID, Invoice Number, Employee ID). If multiple rows share the same key value in the source file, Data Shuttle cannot deduplicate them — resolve duplicates in the source file or change the key column to a genuinely unique field.

On-Attachment Trigger Not Firing

Verify that the file being attached matches the file name filter exactly (partial match, case-insensitive). Also confirm the attachment is being added to the correct sheet or row that the trigger is monitoring. If the attachment is added to a row when the trigger is set to monitor the sheet-level attachment area, it will not fire — and vice versa. Additionally, confirm the workflow is in Active status in the Data Shuttle dashboard — workflows can be paused accidentally during editing.

Replace Mode Deleting Data That Should Be Preserved

If you switched from upsert to replace mode and lost annotated rows, comments, or manually entered data, the Replace mode is working as designed — it deletes all existing rows before importing. This data cannot be recovered from Data Shuttle. Restore from a Smartsheet backup if one exists, or switch back to upsert mode going forward. Use Replace mode only on sheets where the entire data set is generated by the import and no human editing occurs.

🏆 Verdict

Smartsheet Data Shuttle is the right tool for any Business or Enterprise team that moves structured data between an external system and Smartsheet on a recurring schedule. If your team does this manually — even once a week — the configuration investment pays for itself within the first month. The Enterprise plan upgrade is worth pursuing specifically for cloud storage connectivity (SharePoint, Google Drive, OneDrive, Box): the attachment-only limitation on Business is workable for very small teams but becomes a bottleneck the moment the data source is not a human uploading a file. For finance imports, operations data feeds, HR directory syncs, or any pipeline where a CSV or XLSX file is the data handoff format, Data Shuttle is the lowest-friction, lowest-maintenance solution available in the Smartsheet ecosystem — and it requires no developer involvement to configure or maintain.

FAQ

Does Data Shuttle work with Google Sheets files directly?

Data Shuttle can read from Google Drive, and if the file in Google Drive is a native Google Sheets document, it can process it similarly to an XLSX file — reading the default first tab as the data source. However, the officially supported file formats are CSV and XLSX. For the most reliable results, configure the source system (or a Google Sheets automation) to export data as a CSV to Google Drive, then point Data Shuttle to that CSV. For the full picture of how Smartsheet and Google Sheets work together, see our Smartsheet and Google Sheets integration guide.

Can Data Shuttle update rows in a sheet that already has formula columns?

Yes, but with an important constraint: Data Shuttle cannot overwrite cells that contain formulas. You must map import data to plain (non-formula) columns. A common design pattern is to use a “raw import” column set for Data Shuttle to write into, and then have formula columns in the same sheet reference those raw columns using standard Smartsheet formulas. This way the formulas remain intact across every import run, and the imported data is always current. Our Smartsheet formulas and functions guide covers how to structure cross-column references in this pattern.

What happens if the source file is missing when a scheduled workflow runs?

Data Shuttle logs the run as “No source file found” and takes no action on the destination sheet. The sheet is left exactly as it was before the scheduled run — no rows are deleted, no rows are added, and no error notification is sent to the workflow owner by default. If you need an alert when a scheduled file fails to arrive, set up a Smartsheet automation that monitors a “Last Updated” date column on the sheet and sends a notification if that column has not been updated within the expected window.

Is Data Shuttle the same as the Smartsheet API? When should I use one vs. the other?

They are entirely different tools. The Smartsheet API is a REST API that requires developer expertise — you write code that calls API endpoints to read, write, and manipulate Smartsheet data programmatically in real time. Data Shuttle is a no-code application designed for scheduled or event-driven file-based data movement. Use Data Shuttle when your integration source is a file (CSV or XLSX) generated by an external system on a schedule and no developer is available to build a custom integration. Use the API when you need real-time sync, complex conditional logic, or integration with a system that cannot generate files. For tool-specific integration patterns, see our Smartsheet Jira integration guide for a comparison of file-based and API-based approaches.

Can I use Data Shuttle on the Smartsheet Pro plan?

No. Data Shuttle is not available on the Pro plan. It requires a Business or Enterprise plan, and additionally requires a System Admin to enable the app in Admin Center before any user can access datashuttle.smartsheet.com. Business plan users have access to Data Shuttle with Smartsheet file attachments as the source (not cloud storage). Enterprise plan users have full cloud storage connectivity including Google Drive, OneDrive, SharePoint, and Box. If you are on Pro and need recurring data import, the practical alternatives are manual CSV upload each cycle or using the Smartsheet API with developer support.

Author

Shaik KB

Follow Me
Other Articles
Previous

Linear vs Asana 2026: Which Is Better for Engineering Teams?

Next

Notion Automations Not Working? 7 Fixes for Database and Button Triggers in 2026

No Comment! Be the first one.

    Leave a Reply Cancel reply

    Your email address will not be published. Required fields are marked *

    Sponsored Smartsheet Expert Services – Implementation, Automation, Training
    Sponsored Power BI & Tableau Analytics – Dashboards, Reporting, Insights
    Sponsored AI Agents for Work Management – Automate Tasks, Integrate Tools

    Categories

    • Airtable (10)
    • Alternatives (12)
    • Asana (32)
    • ClickUp (38)
    • How-To Guides (125)
    • Integrations (16)
    • Jira (25)
    • Monday.com (37)
    • Notion (24)
    • Pricing Guides (11)
    • Project Management (73)
    • Smartsheet (27)
    • Tool Comparisons (42)
    • Wrike (10)

    Recent Post

    • ClickUp Notifications Not Working? 7 Fixes for the Most Common Issues in 2026
    • Notion Charts 2026: How to Add Charts to Any Database View and Visualize Your Data
    • Linear vs ClickUp 2026: Which Is Better for Product and Dev Teams?
    • How to Use Smartsheet Dynamic View in 2026: Secure Data Sharing Without Exposing Your Sheet
    • How to Use Asana Forms for Project Intake in 2026: Complete Setup Guide
    Work Management Hub

    Independent expert reviews & comparisons of work management tools — helping 50,000+ teams choose the right software.

    Tools We Cover

    • Smartsheet
    • Monday.com
    • ClickUp
    • Asana
    • Notion
    • Jira
    • Wrike
    • Airtable

    Company

    • About Us
    • Contact Us
    • Privacy Policy
    Copyright 2026 — Work Management Hub. All rights reserved. Blogsy WordPress Theme