ClickUp Notifications Not Working? 7 Fixes for the Most Common Issues in 2026
Key Takeaways
- ClickUp has three separate notification channels — in-app bell, email, and browser push — each with its own settings that must be configured independently.
- The single most common cause of missing notifications is browser push permissions being blocked at the OS or browser level, not inside ClickUp itself.
- Email notifications are batched every 15 minutes by default; switch to “Immediately” if you need real-time alerts.
- Every ClickUp member controls their own notification preferences — workspace admins cannot override individual settings.
- ClickUp 4.0 introduced per-task muting, which silently suppresses alerts if accidentally enabled on a task.
- Focus Mode (the lightning bolt icon) silences all notifications globally and is an often-overlooked culprit.
Quick Answer
If ClickUp notifications are not working, start by checking browser push permissions in Chrome (Settings → Privacy and Security → Site Settings → Notifications), then verify that browser push is toggled on inside ClickUp Settings → Notifications. These two mismatches account for the majority of missed alerts in 2026.
Table of Contents
- Understanding ClickUp’s three notification channels
- Diagnostic table: symptom → cause → fix
- Fix 1: Browser push permissions blocked
- Fix 2: Browser push not enabled inside ClickUp
- Fix 3: Email notification delays (batching)
- Fix 4: @mention notifications not arriving
- Fix 5: Automation “Notify” actions not triggering
- Fix 6: Mobile push notifications not working
- Fix 7: Focus Mode accidentally enabled
- Bonus: Per-task notification muting (ClickUp 4.0)
- Verdict
- FAQ
ClickUp notifications going silent is one of the most disruptive things that can happen to a team running its entire workflow inside the platform. You miss an @mention on a client deliverable, a due date alert never fires, or a teammate marks a task complete and nobody finds out for three hours. I’ve debugged this across dozens of team setups — enterprise workspaces, agency accounts, solo operators — and the same seven failure points come up every time. This guide covers all of them with exact UI paths so you can resolve the issue in under ten minutes.
Understanding ClickUp’s three notification channels
Before jumping into fixes, you need to understand how ClickUp’s notification architecture actually works. There are three completely separate delivery channels, each with its own settings stack:
- In-app bell (⚓) — Notifications that appear inside ClickUp when you have the app open. These almost never fail because they don’t depend on the browser or OS. If in-app notifications are working but others aren’t, the problem is downstream.
- Browser push — OS-level pop-up alerts that appear even when ClickUp is minimized or in a background tab. Requires permission at three layers: the browser, the OS, and ClickUp’s own settings. All three must be enabled simultaneously.
- Email — Notification digests sent to your registered email. Configurable by frequency and event type. Subject to batching delays by default.
The critical insight: these three channels are independent. A setting that fixes email notifications does nothing for browser push, and vice versa. When a user says “notifications aren’t working,” the first question is always which channel they’re referring to.
For teams running complex workflows, notifications are closely tied to automation behavior. If you’re using automations to trigger alerts, read our complete ClickUp automations guide for 2026 alongside this post — Fix 5 below won’t make complete sense without that context.
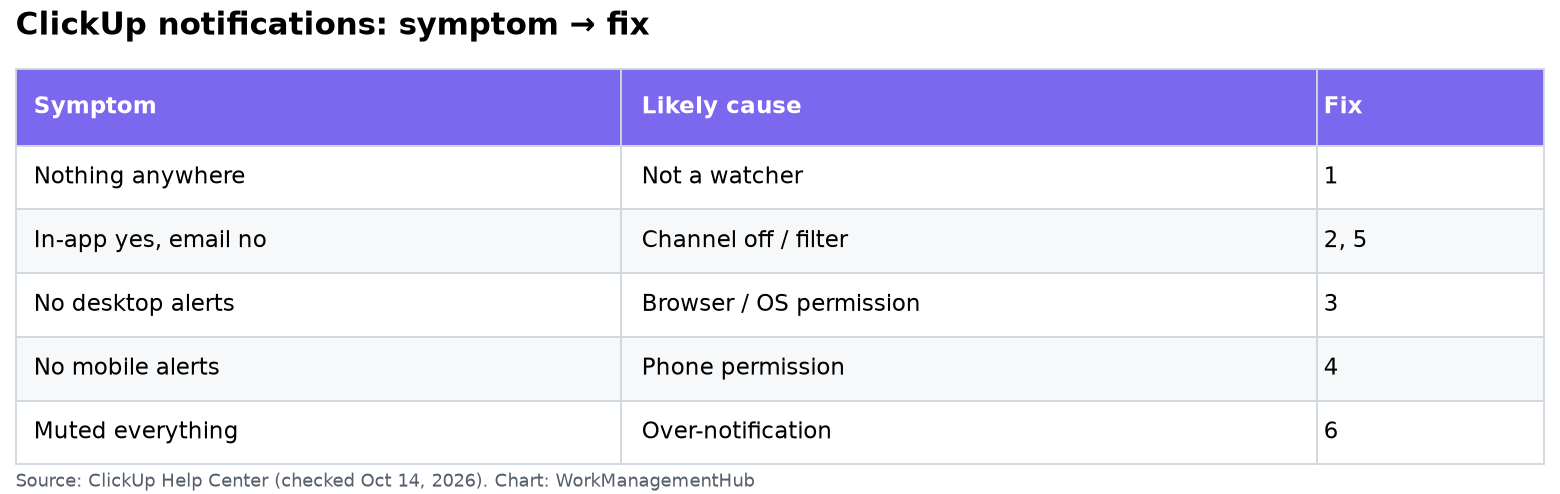
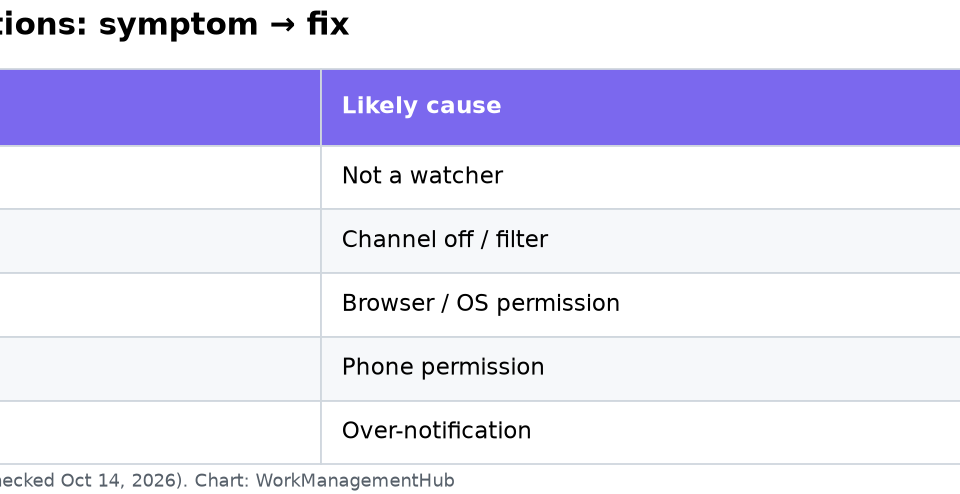
Diagnostic table: symptom → cause → fix
Use this table to identify your specific scenario before working through the fixes.
| Symptom | Likely cause | Fix |
|---|---|---|
| Bell icon shows notifications but no browser pop-ups appear | Browser push permissions blocked | Fix 1 or Fix 2 |
| Email alerts arrive 15–30 minutes late | Default email batching (15-minute digest) | Fix 3 |
| @mentions never trigger a notification for the recipient | User has “Mentions” toggled off in personal settings | Fix 4 |
| Automation sends a notification action but recipient gets nothing | Workspace muted or automation misconfigured | Fix 5 |
| No push notifications on iPhone or Android despite app being installed | OS-level or battery saver blocking mobile push | Fix 6 |
| All notifications suddenly stopped across the board | Focus Mode accidentally enabled | Fix 7 |
| Notifications work on all tasks except one specific task | Per-task notification muting (ClickUp 4.0) | Bonus |
| Browser push works on HTTPS but not on a custom domain | HTTP (non-secure) context blocks Web Push API | Fix 1 (HTTPS note) |
Fix 1: Check browser push notification permissions
This is where roughly 60% of browser push failures originate. The browser itself is blocking ClickUp from sending OS-level alerts, and no amount of toggling inside ClickUp will override a browser-level block. The fix must happen at the browser first.
Chrome (most common)
- Open Chrome and click the three-dot menu in the top-right corner.
- Go to Settings → Privacy and Security → Site Settings.
- Under “Permissions,” click Notifications.
- Scroll to the “Not allowed to send notifications” section.
- If
app.clickup.comappears there, click the trash icon to remove it from the blocked list. - Return to ClickUp and click the bell icon → you should be prompted to allow notifications. Click Allow.
- Verify that
app.clickup.comnow appears in the “Allowed to send notifications” list.
Firefox
- Go to Settings → Privacy and Security → Permissions.
- Next to “Notifications,” click Settings.
- Find
app.clickup.comin the list. If it shows “Block,” change the dropdown to Allow. - Click Save Changes.
Safari (macOS)
- Open System Settings → Notifications.
- Find Safari in the list and click it.
- Ensure “Allow Notifications” is toggled on for Safari overall.
- In Safari, go to Settings → Websites → Notifications.
- Find
app.clickup.comand set it to Allow.
Important: HTTPS requirement
A known limitation in 2026: the Web Push API used by ClickUp requires a secure (HTTPS) context. If you’re accessing ClickUp via any non-standard URL or a self-hosted proxy serving over HTTP, browser push will be silently disabled regardless of permissions. Always access ClickUp via https://app.clickup.com.
Fix 2: Enable browser push inside ClickUp’s notification settings
Even with browser permissions granted, ClickUp’s internal notification toggles must be configured separately. Many users fix the browser permission and then wonder why push still isn’t working — this is the second layer they miss.
- Click your avatar or profile photo in the top-right corner of ClickUp.
- Select Settings from the dropdown menu.
- In the left sidebar, click Notifications.
- At the top of the notifications settings page, you will see three column headers: In-App, Email, and Browser Push. Confirm the Browser Push column is visible — if it’s grayed out entirely, your browser permission from Fix 1 is not yet registering.
- Work through each event category and toggle on Browser Push for the events you care about. The most critical ones to enable:
- Assigned to me — fires when a task is assigned to you
- Mentions — fires on @mention in comments or task descriptions
- Due date reminders — fires at your configured reminder window
- New comments — fires when anyone comments on a task you’re watching
- Click Save if prompted (some ClickUp versions auto-save; others require an explicit save action).
- Test by having a teammate assign a test task to you and verify the browser push appears within 30 seconds.
Note: Each user controls their own notification settings. As a workspace admin, you cannot push these settings onto teammates — they must each complete this step themselves. Direct your team to this exact path: avatar → Settings → Notifications → Browser Push column.
Fix 3: Fix email notification delays caused by batching
ClickUp batches email notifications into digest-style summaries on a 15-minute cycle by default. This means if someone assigns you a task at 9:01 AM, you may not receive the email until 9:15 AM at the earliest — or later if your mail server has its own queuing delay. For teams that use email as their primary alert channel, this delay is operationally significant.
- Click your avatar in the top-right corner → Settings.
- Navigate to Notifications in the left sidebar.
- Click the Email tab at the top of the notifications panel.
- Look for the Email Frequency setting. The default value is “Every 15 minutes.”
- Open the frequency dropdown and select Immediately to receive email notifications as events occur.
- Alternatively, select Every 1 hour or Daily digest depending on your preferred cadence — these are valid choices if you want reduced inbox noise at the cost of latency.
- Save the setting.
- Check your spam or promotions folder in your email client. ClickUp’s notification emails occasionally get caught by aggressive spam filters — add
notify@clickup.comto your contacts or safe-sender list.
If you’re using ClickUp alongside other tools, delayed notifications can compound into serious workflow gaps. See our guide on fixing ClickUp integrations not syncing for related timing and sync issues that affect notification pipelines.
Fix 4: @mention notifications not arriving for recipients
This is the most common complaint I see in team environments. User A mentions User B with @username in a task comment. User B never receives a notification. The cause is almost always that User B has the “Mentions” event type toggled off in their personal notification settings.
- The affected user (User B, the one not receiving mentions) must log into ClickUp.
- Click their avatar → Settings → Notifications.
- In the notification events list, locate the Mentions row (it may be labeled “Someone @mentions me” depending on your ClickUp version).
- Verify that at least one column — In-App, Email, or Browser Push — has the toggle enabled for this event. If all three are off, mentions will be completely silent.
- Enable the preferred channel(s) and save.
- Test: have User A post a new comment with @UserB in a task. User B should receive the notification within the channel’s delivery window.
Additional mention troubleshooting checks
- Confirm the @mention was typed correctly and ClickUp displayed a blue highlight around the name when selected from the autocomplete dropdown. Typed text that looks like a mention but wasn’t selected from the dropdown does not trigger a notification.
- Check whether the user has muted the specific task (ClickUp 4.0 feature — see the Bonus section). A muted task suppresses all notifications including mentions.
- Confirm the user is a member of the workspace or has at least guest access to the Space where the task lives. External guests with restricted access may not receive mention alerts depending on their permission tier.
For distributed teams where @mention reliability is critical, our ClickUp remote teams setup guide covers notification best practices alongside the broader communication workflow setup.
Fix 5: Automation “Notify” actions not triggering
ClickUp automations can include a “Send notification” action that pushes an alert to specified users when a trigger fires. When this silently fails, the problem usually isn’t the automation logic — it’s either the recipient’s workspace mute status or a misconfigured recipient list in the automation itself.
- Navigate to the Space, Folder, or List where the automation lives. Click Automations in the top toolbar (the lightning bolt icon).
- Open the automation in question and click the Notify action step.
- Verify that the recipient field contains the correct user(s). If the automation was built by a different user, the recipient may be pointing at a role (e.g., “Assignee”) rather than a specific person — confirm the role resolves correctly for your task structure.
- Check whether the notification type in the action is set to In-App, Email, or both. If only in-app is selected and the recipient has ClickUp closed, they may not notice it.
- Ask the recipient to check whether they have muted the workspace. A muted workspace suppresses all automation-triggered notifications. To unmute: click the workspace name in the left sidebar → Mute workspace toggle → turn off.
- Run the automation manually by triggering its condition deliberately on a test task. Open the automation run log (Automations → History tab) and confirm the notification action shows a green checkmark status. If it shows an error, note the error code — common causes are permission scoping issues where the automation bot doesn’t have access to notify external guests.
- If the automation is sending notifications as part of a multi-step sequence, ensure the notification step comes after any status-change or assignment steps and not before them — order matters in ClickUp automation chains.
For a comprehensive look at how ClickUp automations interact with the notification system, including advanced trigger configurations, see our ClickUp automations deep-dive guide.
Fix 6: Mobile push notifications not working
Mobile push for ClickUp involves three separate permission layers that must all be active simultaneously. Missing any one of them results in complete silence on the device.
iOS (iPhone / iPad)
- Open your iPhone’s Settings app → scroll down to ClickUp → tap Notifications.
- Ensure Allow Notifications is toggled on.
- Under alert style, select Banners or Alerts (not “None”).
- Ensure Sounds and Badges are toggled on if you want those indicators.
- Open the ClickUp app → tap your avatar in the bottom-left → Notifications.
- Confirm the event types you want (assignments, mentions, due dates, comments) are enabled for mobile push.
- Check Settings → Battery → Low Power Mode. If Low Power Mode is on, background app refresh is suspended and push delivery can be delayed or dropped entirely. Turn it off for testing.
- If notifications still don’t appear, go to Settings → ClickUp → Background App Refresh and ensure it’s set to Wi-Fi & Cellular Data.
Android
- Go to Settings → Apps → ClickUp → Notifications. Enable notifications and set importance to High.
- Check Settings → Battery → Battery Saver. If battery saver is active, it aggressively restricts background processes including push notification delivery.
- On Samsung and Xiaomi devices specifically: go to Settings → Battery → App Power Management (or “App Battery Usage”) and set ClickUp to Unrestricted. These manufacturers apply aggressive background-kill policies that intercept push notifications before they reach the app.
- In the ClickUp app, tap avatar → Notifications and verify the in-app mobile notification toggles mirror what you want to receive.
- Force-close the app and reopen it. Push notification tokens occasionally expire during app updates — a fresh app launch regenerates the token with Firebase Cloud Messaging.
Fix 7: Disable Focus Mode if all notifications have stopped
If you or a teammate suddenly can’t receive any notifications — not just one type, but all channels going silent simultaneously — Focus Mode is the most likely culprit. It’s easy to enable accidentally because the toggle is a single click on a prominent sidebar icon.
- Look at the ClickUp left sidebar. Near the bottom, find the lightning bolt icon.
- If the lightning bolt icon is highlighted or filled (indicating it is active), click it once to disable Focus Mode.
- You should immediately see a confirmation message that Focus Mode has been turned off and notifications are re-enabled.
- To verify: ask a teammate to assign a test task to you. You should receive the in-app bell notification within seconds.
- If the lightning bolt icon is not visible in your sidebar, it may have been removed from view. Access Focus Mode alternatively via: avatar → Settings → Notifications → Focus Mode toggle at the top of the page.
- If your team uses Focus Mode intentionally during deep-work blocks, create a shared understanding of when it gets enabled and disabled. Consider setting a calendar reminder to disable it at the end of focus blocks so it doesn’t carry over into the rest of the workday.
Bonus: Per-task notification muting in ClickUp 4.0
ClickUp 4.0 introduced granular per-task notification control — the ability to mute notifications for individual tasks without affecting anything else. This is genuinely useful for tasks you’re watching passively but don’t want constant alerts on. However, it’s also an easy source of confusion when a task was accidentally muted.
How to check if a task is muted
- Open the task where notifications seem missing.
- Click the three-dot menu (…) in the top-right corner of the task panel.
- Look for Notification preferences in the dropdown menu.
- In the notification preferences panel, check whether “Mute this task” is enabled. If it is, toggle it off.
- You can also set per-task overrides here — for example, receiving email notifications for this specific task even if your global settings only send in-app alerts.
This per-task muting is separate from the workspace-level mute mentioned in Fix 5. A muted task suppresses all notification channels for that task regardless of your global settings. If your team uses ClickUp Brain AI for task summarization, note that AI-generated task updates also respect per-task mute preferences.
Verdict
The overwhelming majority of ClickUp notification failures in 2026 trace back to one of three root causes: browser push permissions blocked at the OS or browser level (Fix 1), event types not toggled on inside ClickUp’s notification settings (Fix 2), or Focus Mode silently enabled (Fix 7). Start with those three before investigating the others.
The most important thing to communicate to your team: every user controls their own notification settings. Workspace admins cannot force-enable notifications for members. The most effective approach for teams is to share this guide during onboarding and have each member walk through their personal Settings → Notifications page on day one of using the workspace.