Skip to content
-
Subscribe to our newsletter & never miss our best posts. Subscribe Now!
Work Management Hub Work Management Hub

Expert Reviews, Comparisons & Guides for Smartsheet, Monday.com, Asana, ClickUp & More

Work Management Hub Work Management Hub

Expert Reviews, Comparisons & Guides for Smartsheet, Monday.com, Asana, ClickUp & More

  • Airtable
  • Asana
  • ClickUp
  • Jira
  • Monday.com
  • Notion
  • Smartsheet
  • Wrike
  • About
  • Contact
  • Airtable
  • Asana
  • ClickUp
  • Jira
  • Monday.com
  • Notion
  • Smartsheet
  • Wrike
  • About
  • Contact
Close

Search

  • https://www.facebook.com/
  • https://twitter.com/
  • https://t.me/
  • https://www.instagram.com/
  • https://youtube.com/
AsanaHow-To Guides

Asana Custom Fields: Complete Setup Guide for 2026

By Shaik KB
May 27, 2026 19 Min Read
0
⚡ Key Takeaways

  • Asana custom fields are locked behind paid plans — Premium, Business, and Enterprise only. Free plan users have no access whatsoever.
  • There are 7 field types: text, number, date, single select, multi-select, people, and formula. Formula fields are read-only and number-based only.
  • Each project supports up to 100 custom fields — a limit most teams never approach, but enterprise deployments can hit it fast without a field audit strategy.
  • The custom field library lets you create a field once and reuse it across every project in your organization — this is the feature most guides ignore and most teams underuse.
  • Field locking lets designated admins control who can edit field definitions, preventing configuration drift in shared workflows.
  • Custom fields power Asana’s automation rules, reporting dashboards, and workload views — they are the data layer the entire platform depends on.

Asana Custom Fields: Complete Setup Guide for 2026

Quick Answer:

Asana custom fields are additional data columns you add to tasks beyond the built-in fields like assignee and due date. Available on paid plans only, they let teams track project-specific data — priority tiers, budget amounts, client names, approval status — and use that data to filter views, trigger automations, and build reports.

Table of Contents

  1. What Are Asana Custom Fields and Why They Change How Teams Track Work
  2. Which Plans Include Custom Fields (And What Free Users Are Missing)
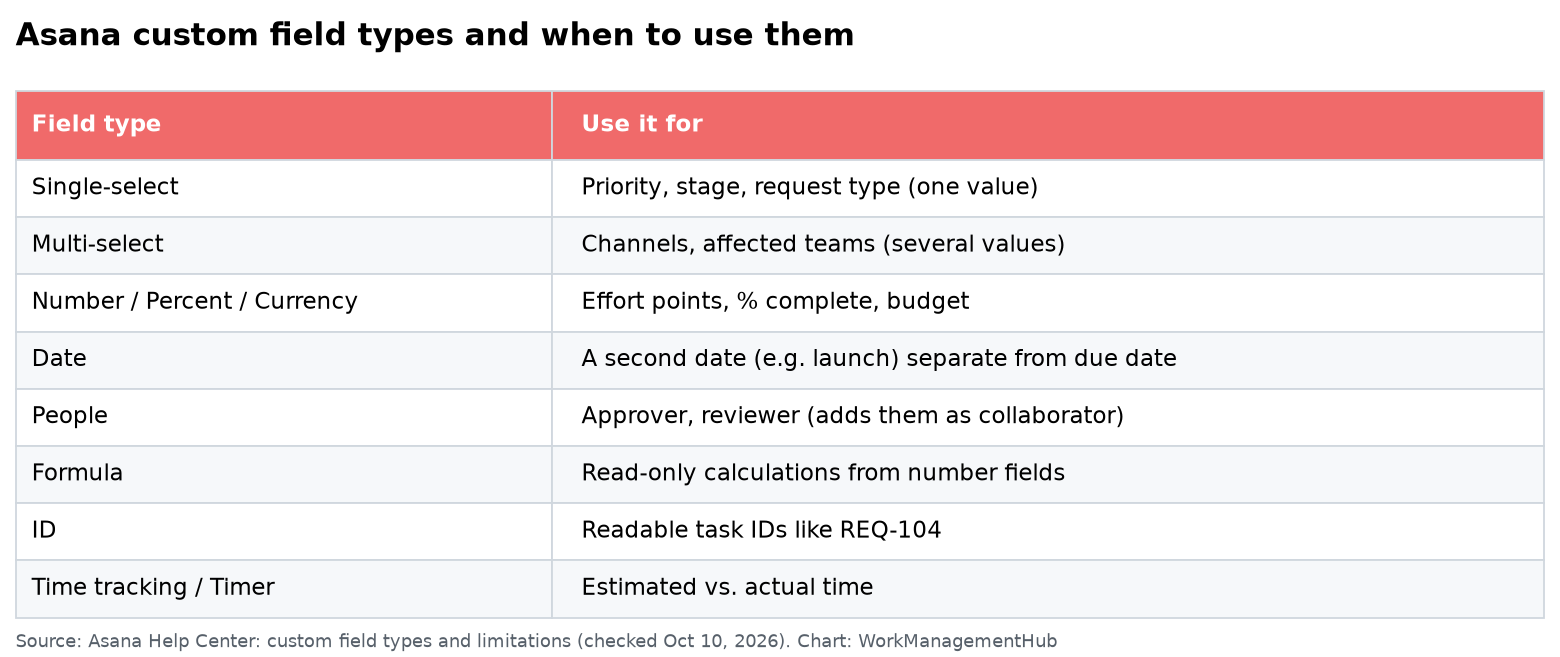
  3. The 7 Custom Field Types Explained (With Real Use Cases)
  4. How to Create a Custom Field in Asana Step-by-Step
  5. How to Add Custom Fields to a Project
  6. The Custom Field Library: Reuse Fields Across Every Project
  7. Custom Field Permissions and Locking: Who Controls Your Data
  8. Formula Fields: What They Can (and Can’t) Do
  9. Using Custom Fields in Asana Rules and Automations
  10. Custom Fields in Reports and Dashboards
  11. Common Custom Field Mistakes (and How to Avoid Them)
  12. Verdict
  13. FAQ

What Are Asana Custom Fields and Why They Change How Teams Track Work

Asana custom fields are the feature that transforms task tracking from a simple checklist into a structured data system your entire team can query, automate, and report on. Every task in Asana ships with a fixed set of built-in fields: assignee, due date, description, subtasks, attachments. For simple personal to-do lists, that’s fine. For real project teams — a product squad tracking sprint points, a marketing team logging campaign budgets, an agency managing client deliverables across dozens of accounts — those defaults run out fast.

Custom fields solve this by letting you define exactly what data matters to your team’s work. A software team adds a “Story Points” number field and suddenly every task has effort data that rolls up into sprint planning. A legal team adds a “Contract Value” number field and their project dashboards start reflecting business impact, not just task completion rates. An ops team adds a “Region” single-select field and now they can filter any project view by geography in two clicks.

This is not a cosmetic feature. Custom fields are the data layer that makes the rest of Asana’s power features work. Automation rules can trigger on field values. Reports can group, filter, and sum by field. Workload views can use number fields to measure capacity in meaningful units. Forms can collect structured field data at intake. Without custom fields, you’re tracking tasks. With them, you’re tracking work in context — and that distinction is the difference between a tool your team checks and a system your team relies on.

The practical impact shows up immediately in search and filtering. Once you’ve added a “Priority” single-select field with values like High, Medium, and Low, you can filter any project list or board to show only High-priority tasks assigned to a specific person due this week. That’s a report that would take minutes to build in a spreadsheet and takes seconds in Asana — but only if the underlying field data exists.

According to Asana’s official documentation, custom fields also support the organization-wide field library, meaning fields you define once become available across every project in your workspace. That’s the architecture that makes Asana scale from a single team’s tool to a company-wide operating system.

Which Plans Include Custom Fields (And What Free Users Are Missing)

Custom fields are not available on Asana’s free plan. Full stop. Free plan users see the option in the UI but hit a paywall when they attempt to create or add fields. This is one of the sharpest feature cliffs in Asana’s pricing structure, and it’s worth understanding exactly what it means before you build workflows that depend on it.

Here’s the breakdown by plan as of 2026:

  • Free (Personal): No custom fields. Zero. You cannot create them, add them from the library, or use them in any view.
  • Starter (formerly Premium): Full access to custom fields, the field library, and field-based filtering and sorting. This is the entry point for the feature.
  • Advanced (formerly Business): Everything in Starter, plus formula fields — the computed field type that performs math across other number fields on a task.
  • Enterprise and Enterprise+: Everything in Advanced, plus enhanced admin controls over field locking and governance at scale.

The 100-field-per-project limit applies at all paid tiers. In practice, most project teams use 5 to 15 fields. The limit becomes relevant when you’re building heavily structured project templates that pull from a large shared library, or when multiple teams inherit project templates stacked with pre-built fields. At that scale, a deliberate field audit process becomes necessary.

If your team is on the free plan and you’re evaluating whether to upgrade specifically for custom fields, the honest answer is yes — it’s worth it if your team coordinates more than one concurrent project. The automation rules, reporting, and workload features that make custom fields most powerful are all paid-tier features too, so the upgrade compounds in value quickly. See Asana’s pricing page for current plan details.

The 7 Asana Custom Field Types Explained (With Real Use Cases)

Choosing the wrong field type is the most common setup mistake. A team that creates a text field for “Priority” instead of a single-select can’t sort or filter by that value. A team that uses a single-select for “Budget” instead of a number field can’t sum or calculate. Here’s what each type does and when to use it.

1. Text

Free-form string input. Use this for fields that don’t need filtering, sorting, or computation — internal notes, reference IDs, external system links, ad-hoc context. Do not use text fields for anything you’ll want to group or sort by. If you catch yourself typing the same values repeatedly (like “approved” or “rejected”), switch to single select.

2. Number

Numeric input that supports decimal values. Use for story points, budget amounts, hours estimated, revenue impact, unit counts, or any value you’ll want to sum, average, or use in a formula field. This is also the field type you’ll need for capacity planning in Asana’s workload view — workload calculates effort by summing number field values across tasks.

3. Date

A dedicated date picker separate from the built-in due date. Use for contract dates, review deadlines, go-live dates, or any secondary date that isn’t the task’s main due date. Date custom fields can drive timeline planning — see how they integrate with Asana’s Timeline view for dependency and milestone tracking.

4. Single Select (Enum)

A dropdown with one permitted selection. The workhorse field type. Use for status labels beyond Asana’s built-in status, priority tiers (Critical / High / Medium / Low), approval state (Pending / Approved / Rejected), department ownership, or any categorical value where exactly one option applies at a time. Filterable, sortable, and groupable in Board view.

5. Multi-Select (Multi_Enum)

Same as single select but allows multiple simultaneous selections. Use for tags, skill requirements, applicable regions, linked product areas, or any attribute where more than one value can be true at once. Be careful with multi-select in automations — triggering a rule when “any of these values is set” vs. “all of these values are set” produces very different behavior.

6. People

A field that maps to Asana user accounts. Use for stakeholders, reviewers, approvers, or collaborators who aren’t the primary task assignee. People fields are distinct from the assignee field — a task can have one assignee but many stakeholders captured in a People field. Useful for intake workflows where you need to record the requestor separate from the person doing the work. This pairs naturally with Asana intake forms that capture requester identity at submission.

7. Formula (Advanced Plan and Above)

A read-only computed field that performs arithmetic on other number fields within the same task. Use for auto-calculating margin percentages from revenue and cost fields, computing weighted scores, or deriving totals that would otherwise require manual updates. Formula fields cannot reference fields from other tasks or projects — their scope is strictly the task they live on. Full discussion in the Formula Fields section below.

How to Create Asana Custom Fields Step-by-Step

There are two entry points for creating custom fields: from within a project, or from the organization-wide field library. Creating from a project is faster for one-off fields. Creating from the library is the right move for any field you’ll reuse. Both flows are covered below.

Creating a Field From Within a Project (List View)

  1. Open the target project and switch to List view using the view switcher at the top of the project.
  2. Click the “+” button at the far right of the column headers row — this is the “Add field” button. It appears as a plus icon after your last visible column.
  3. Select “Add custom field” from the dropdown that appears. If you want to add an existing field from the library, select “Add from library” instead — covered in the library section below.
  4. Choose your field type from the type selector: Text, Number, Date, Single Select, Multi-Select, People, or Formula.
  5. Enter a field name in the “Field name” input. Be specific — “Priority” is fine for a single team; “Marketing Priority” is better if multiple teams share the library and have their own priority scales.
  6. Configure type-specific settings. For Single Select and Multi-Select, click “Add option” to create your dropdown values. For Number, optionally set a unit prefix or suffix (like “$” or “pts”). For Formula, select the math operation and source fields.
  7. Toggle “Add to library” if you want this field saved organization-wide for reuse. Leave it off for purely project-specific fields.
  8. Click “Create field” to confirm. The field appears immediately as a new column in your project list.

Creating a Field From the Admin Console (Library-First Approach)

  1. Click your organization name or profile photo in the top-left sidebar to open the Admin Console.
  2. Navigate to “Custom fields” in the left admin navigation.
  3. Click “New field” in the upper right of the custom fields library page.
  4. Fill in field name, type, and configuration using the same options as the project-level creation flow.
  5. Set field permissions — decide whether the field is editable by all members or locked to specific people. This step is only available from the Admin Console and is the key reason to use the library-first approach for shared fields.
  6. Click “Create field” to save it to the library. It’s now available for any project in the organization to add.

How to Add Custom Fields to a Project

Creating a field and adding it to a project are separate steps when working from the library. Here’s how to add any existing field to a project, and how to manage which fields are visible in which views.

  1. Open the target project in List view (fields are managed from List view; they apply to all views once added).
  2. Click the “+” button at the end of the column headers row.
  3. Select “Add from library” to see all fields saved to your organization’s library.
  4. Search or scroll to find the field you want. The library shows field name, type, and creator.
  5. Click the field name to add it. It appears immediately as a new column. Repeat for any additional fields.
  6. Reorder columns by dragging column headers left or right. Column order is project-specific — it doesn’t affect the library definition.
  7. Hide fields from view using the “Fields” or “Customize” panel (accessible from the toolbar at the top of the project). Hiding a field doesn’t remove it from the project — tasks retain their field data, it just isn’t visible in the current view. This is useful for fields that are important for automation but don’t need to clutter the day-to-day view.

In Board view, custom fields appear on task cards if you enable them from the card customization settings. Not all fields display well on cards — single-select fields with color-coded options (like priority) are the most useful at a glance. In Timeline view, custom fields can appear in the left-side task list column panel. Fields added to a project are accessible in all views — the choice is just about visibility.

The Custom Field Library: Reuse Fields Across Every Project

The custom field library is the feature that separates teams using Asana as a collection of disconnected projects from teams using Asana as a unified operating system. Yet it’s the section of Asana documentation that gets the least coverage in guides, and the feature most teams set up reactively rather than intentionally.

Here’s the core value proposition: when a field is saved to the library, any project in the organization can add it. When that shared field is updated — say, you add a new option to a Priority dropdown — that change propagates to every project using the field. You don’t have to update 30 projects manually. This is a fundamentally different model from creating the “same” field independently in each project, which results in 30 separate field definitions that diverge over time.

How to Access and Manage the Field Library

  1. Open the Admin Console by clicking your organization name in the top-left sidebar, then selecting “Admin Console.”
  2. Click “Custom fields” in the left navigation panel. This shows all fields currently saved to the organization library.
  3. Use the search bar and type/creator filters to find specific fields in large organizations with many shared fields.
  4. Click any field name to open its settings — you can rename it, add or edit options (for select fields), change its description, or modify its lock settings.
  5. See project usage by opening a field’s details — Asana shows which projects are currently using the field, which is valuable for impact assessment before making changes.

Library Governance — The Part Nobody Talks About

The library only stays useful if it stays clean. Without governance, you end up with dozens of near-duplicate fields: “Priority,” “Task Priority,” “Priority Level,” “Urgency,” all created independently by different team members who didn’t know the shared field existed. The fix is structural, not technical:

  • Designate one or two people as field library owners, responsible for approving new library fields and auditing for duplicates quarterly.
  • Use the field description field in the library to document what each field is for and which teams use it — this reduces duplicate creation significantly.
  • Establish a naming convention before you have more than a handful of shared fields. Department-prefixed names (“Marketing: Campaign Type,” “Engineering: Story Points”) scale better than flat names as the library grows.

Custom Field Permissions and Locking: Who Controls Your Data

Field locking is another capability that most guides skip entirely — and it’s the one that matters most for teams where data integrity is critical. Without locking, any project member can edit a custom field’s definition: rename it, add or remove dropdown options, change its type. In a small, trusted team, that’s fine. In a 200-person organization where shared fields drive automations, reports, and cross-team workflows, uncontrolled field editing is a data governance problem.

How Field Locking Works

When a field is locked, only users designated as field editors can modify the field’s configuration. Other users can still set values on the field — they just can’t change what the field is or what options it contains. The lock applies to the field definition, not to task-level data entry.

How to Lock a Custom Field

  1. Open the Admin Console and navigate to “Custom fields.”
  2. Click the field you want to lock to open its settings panel.
  3. Locate the “Lock field” or “Permissions” toggle in the field settings. Toggle it on.
  4. Specify who can edit the field — you can designate specific users or limit editing to organization admins only.
  5. Save the changes. The field now shows a lock icon in the library, indicating it’s protected.

A practical rule: any field that is referenced in an automation rule should be locked. If someone removes an option from a single-select field that a rule depends on, the automation silently stops matching and tasks fall through the cracks. Locking those fields — and documenting in the field description that it’s used in automation — prevents that failure mode.

For teams building intake workflows, People fields that capture submitter identity should also be locked. Changing a People field’s definition can break the data trail back to the original requestor. See how this connects to structured intake form design in Asana for the full picture.

Formula Fields: What They Can (and Can’t) Do

Formula fields are Asana’s attempt at spreadsheet-style computation, and they’re useful within a specific scope — but that scope is narrower than most people expect when they first encounter the feature. Understanding the constraints upfront saves a lot of frustration.

What Formula Fields Can Do

  • Perform arithmetic (add, subtract, multiply, divide) across two or more number fields on the same task.
  • Display a computed read-only value that updates automatically when the source fields change.
  • Participate in reporting — you can sum or average formula field values across tasks in a report, just like any other number field.
  • Appear in workload calculations alongside manually entered number fields.

A practical example: a project has a “Budgeted Hours” number field and an “Actual Hours” number field. A formula field called “Hours Variance” subtracts Actual from Budgeted, instantly showing overage or surplus on every task without manual calculation.

What Formula Fields Cannot Do

  • They cannot reference fields from other tasks or projects. Every formula is strictly scoped to the task it lives on. No cross-task aggregation.
  • They cannot use text, date, people, or select field values. Formula fields only operate on number inputs.
  • They cannot be manually edited. The field is entirely read-only — values are computed, never entered.
  • They are not available on Starter plan. You need Advanced (formerly Business) or above.
  • They don’t support conditional logic. There’s no IF/THEN capability — it’s pure arithmetic only.

If you need cross-task aggregation or conditional computation, that work happens in reporting dashboards rather than formula fields. Asana’s reporting layer can sum, group, and compare field values across tasks, which covers most of the scenarios where teams wish formula fields were more powerful. See how to build those views in the Asana reporting and dashboards guide.

Using Custom Fields in Asana Rules and Automations

Custom fields become significantly more powerful the moment you connect them to Asana’s automation rules engine. A field value by itself is data. A field value that triggers an action is a workflow.

The two primary ways custom fields integrate with rules:

  • As triggers: A rule fires when a field value changes — for example, when the “Approval Status” single-select field is set to “Approved,” the rule automatically moves the task to a specific project section and assigns it to the next owner.
  • As conditions: A rule only executes if a field meets a specific condition — for example, only move a task to “Ready for Review” if the “Story Points” field is greater than zero (meaning effort has been estimated).

Setting Up a Field-Based Automation Rule

  1. Open the project where you want to create the rule and click “Customize” in the top toolbar.
  2. Click “Rules” in the Customize panel, then click “Add rule.”
  3. Select “Field value changes” as the trigger type, then select your target custom field from the dropdown.
  4. Set the trigger condition — you can trigger on any change to the field, or only when it changes to a specific value (e.g., “when Priority changes to Critical”).
  5. Add your action — assign to a person, move to a section, add a collaborator, set another field value, send a notification, or any combination of actions.
  6. Name and save the rule. It activates immediately for all tasks in the project.

One important nuance: if your field is used in a rule and someone removes the option that triggers the rule (e.g., deletes “Critical” from the Priority field options), the rule becomes orphaned. It won’t error visibly — it just never fires. This is exactly the scenario where field locking pays for itself. The full rules setup guide covers Asana automation rules in depth including multi-condition logic and cross-project triggers.

Custom Fields in Reports and Dashboards

Custom fields are the primary lens through which Asana’s reporting becomes useful. Without them, reports tell you how many tasks are complete or incomplete. With them, reports tell you how much budget has been allocated, which team owns what, and where your highest-priority work is stalling.

In Asana’s reporting layer (Dashboards and the universal reporting builder), custom fields can be used to:

  • Group tasks by single-select field values — for example, group all project tasks by “Department” to see workload distribution at a glance.
  • Filter report scope — show only tasks where “Priority” equals “High” across multiple projects simultaneously.
  • Sum and average number fields — total up “Budgeted Hours” across all tasks in a portfolio, or average “Story Points” by assignee to spot capacity imbalances.
  • Chart over time — plot how many tasks in the “Critical” priority tier exist each week to track whether your team is reducing or accumulating high-stakes work.

The most impactful reports are built on fields that exist consistently across multiple projects — which is exactly the argument for building shared fields through the library rather than creating one-off project-specific fields. A “Campaign Type” field used in 12 marketing projects becomes a reporting dimension across all 12 simultaneously. The same field created independently in each project produces 12 separate data silos.

For teams managing portfolios, custom fields surface in the portfolio view as summary columns, letting leadership see project-level field values side by side without opening individual projects. See the full breakdown of Asana reporting and dashboard setup for the complete configuration walkthrough.

Common Custom Field Mistakes (and How to Avoid Them)

After watching teams set up and inevitably rebuild their custom field configurations, the failure patterns are predictable. Here are the ones worth avoiding from the start.

Mistake 1: Using Text Fields for Structured Data

Teams create a “Status” text field and start typing values like “In Review,” “Blocked,” “Waiting on client.” Three months later, they have 40 variations of the same five concepts and no way to filter or report accurately. Fix: use single select for any value with a defined set of options. If you can list the valid values, it’s a select field, not a text field.

Mistake 2: Creating Duplicate Library Fields

Without a search habit, team members create “Priority” independently in each project rather than pulling from the library. Reporting across projects becomes impossible because each project’s “Priority” is a separate field definition. Fix: always search the library before creating a new field. Make this a team policy, not just a guideline.

Mistake 3: Overloading Single Projects With Fields

The 100-field limit per project sounds generous until a team inherits a template with 40 pre-built fields and then adds project-specific ones on top. Unused fields add visual noise in every task pane and confuse new team members. Fix: audit fields quarterly and archive any field that hasn’t had a value set in the past 90 days.

Mistake 4: Skipping Field Locking for Automation-Dependent Fields

A rule triggers on “Approval Status = Approved.” A team member deletes the “Approved” option and replaces it with “Accepted.” Every approval automation in the project silently breaks. Fix: lock any field referenced in a rule. Document the dependency in the field description.

Mistake 5: Building Formula Fields When Reporting Does the Job Better

Teams reach for formula fields to aggregate data across tasks, then hit the wall of the per-task scope limitation. Formula fields compute within a task; they don’t aggregate across tasks. For cross-task sums and averages, Asana’s reporting dashboards are the right tool — not formula fields.

Mistake 6: Forgetting That Field Changes Affect Every Project Using the Library Field

Editing a shared library field — renaming an option, removing a value — affects every project that uses it. A change that seems minor in one project can break filters, automations, and reports in 20 others. Fix: before editing a shared field, check its usage in the Admin Console and notify affected project owners.

🏆 Verdict

Asana custom fields are non-negotiable for any team serious about tracking work with precision — but their value scales directly with how deliberately you set them up. The teams that get the most out of this feature are not the ones who add the most fields; they’re the ones who build a shared library with consistent naming conventions, lock fields that power automation, and use the reporting layer to turn field data into decisions. Start with 5 to 8 core fields per project type, save every reusable field to the library from day one, lock anything referenced in a rule, and build your reports around fields that exist across multiple projects. That’s the setup that pays compound returns as your Asana footprint grows. Teams that skip the library and field governance end up rebuilding their configuration every 12 to 18 months — which is expensive and avoidable.

FAQ

Can I use custom fields on Asana’s free plan?

No. Custom fields are exclusively available on paid plans — Starter, Advanced, Enterprise, and Enterprise+. Free plan users have no access to create, view, or add custom fields to any project. This is one of the primary functional differences between Asana’s free and paid tiers, and it’s a hard limit with no workaround.

How many custom fields can I add to a single Asana project?

Each project supports up to 100 custom fields. In practice, most teams use far fewer — typically 5 to 20. The limit becomes a concern in enterprise environments where projects inherit large shared templates and then accumulate project-specific fields on top. A periodic field audit helps prevent hitting the ceiling.

What is the difference between a project-specific custom field and a library field?

A project-specific field exists only in the project where it was created. A library field is saved to the organization-wide field library and can be added to any project in the workspace. The critical difference is that library fields stay in sync — edit the field definition once, and every project using it reflects the change automatically. Project-specific fields are isolated and cannot be shared or centrally managed.

Can formula fields reference data from other tasks or projects?

No. Formula fields are strictly scoped to the individual task they live on. They can only perform arithmetic across number fields on that same task. There is no way to aggregate values from multiple tasks or pull data from other projects into a formula field. For cross-task aggregation, use Asana’s reporting dashboards, which can sum and average number fields across tasks in one or more projects.

What happens to my custom field data if I remove a field from a project?

Removing a field from a project hides it from view, but does not delete the underlying data. If you re-add the same field (or re-add it from the library), the previously entered values are restored. Permanently deleting a library field from the Admin Console is a different action — this destroys the field definition and all associated data across every project that used it, and it cannot be undone. Always check usage before deleting a library field.

Author

Shaik KB

Follow Me
Other Articles
Previous

Airtable Formulas Not Working? 8 Fixes for Common Formula Errors in 2026

Next

Smartsheet WorkApps: How to Build No-Code Apps in 2026

No Comment! Be the first one.

    Leave a Reply Cancel reply

    Your email address will not be published. Required fields are marked *

    Sponsored Smartsheet Expert Services – Implementation, Automation, Training
    Sponsored Power BI & Tableau Analytics – Dashboards, Reporting, Insights
    Sponsored AI Agents for Work Management – Automate Tasks, Integrate Tools

    Categories

    • Airtable (12)
    • Alternatives (12)
    • Asana (33)
    • ClickUp (39)
    • How-To Guides (133)
    • Integrations (16)
    • Jira (27)
    • Monday.com (38)
    • Notion (25)
    • Pricing Guides (11)
    • Project Management (74)
    • Smartsheet (28)
    • Tool Comparisons (44)
    • Wrike (11)

    Recent Post

    • ClickUp Sprints Not Working? Here’s How to Fix It (2026)
    • Notion Formulas 2.0: The Complete Guide to Functions and Syntax (2026)
    • Linear vs GitHub Issues: Which Should Your Team Use in 2026?
    • Smartsheet WorkApps: How to Build No-Code Apps in 2026
    • Asana Custom Fields: Complete Setup Guide for 2026
    Work Management Hub

    Independent expert reviews & comparisons of work management tools — helping 50,000+ teams choose the right software.

    Tools We Cover

    • Smartsheet
    • Monday.com
    • ClickUp
    • Asana
    • Notion
    • Jira
    • Wrike
    • Airtable

    Company

    • About Us
    • Contact Us
    • Privacy Policy
    Copyright 2026 — Work Management Hub. All rights reserved. Blogsy WordPress Theme