Asana Custom Fields Setup Guide 2026: 12 Proven Examples + Exact Click Paths
To set up custom fields in Asana, open your project, click Customize in the top-right, go to Fields > + Add field, pick a type (text, number, date, single-select, multi-select, people, or formula), name it, and save. Custom fields require the Starter plan ($10.99/user/month) or higher, with a cap of 100 fields per project.
Imagine a marketing team juggling multiple campaigns with tight deadlines, each demanding precise coordination. Asana’s Custom Fields can transform this chaos into clarity by allowing you to tag tasks with specific data like urgency level and budget allocation. I’ve seen teams double their efficiency by integrating Custom Fields effectively, yet there’s a catch: the allure of over-customization. Setting up 100 fields sounds powerful, but it can drown teams in minutiae. The sweet spot often lies around 10 to 15 essential fields. Recognize that Real Value comes from smarter, not more, data. When fields align with true project needs, your team remains laser-focused, not lost in admin overhead.
Introduction to Asana Custom Fields
Asana’s Custom Fields are transformative for teams that need to go beyond basic task tracking, offering a tailored approach to project management. Their inclusion in all plans from Starter to Enterprise+ means even small teams can leverage enhanced data organization without a high barrier to entry. However, before diving in, consider your team’s specific needs and the potential impact on workflow efficiency.
Custom Fields allow you to embed critical data directly within tasks, such as priority levels, project stages, or estimated costs. This capability turns Asana from a simple task list into a comprehensive project management tool. But it’s essential to approach their setup with a strategic mindset. Overloading a project with too many fields can lead to complexity and user confusion. A key trade-off here is balancing the amount of information captured against the clarity of the task view.
While Asana allows up to 100 Custom Fields per project, a best practice is to start with the most essential fields and expand based on actual needs. This approach minimizes clutter and helps users adapt to new processes without overwhelm. For those managing cross-functional projects, understand the distinction between Global and Local Custom Fields. Global fields are invaluable for maintaining consistency across projects, but they require careful governance to avoid conflicts and redundancy.
Remember, Custom Fields are not automatically inherited by subtasks beyond the first level. If your workflow heavily relies on nested tasks, you may need to manually adjust them to ensure data integrity. Finally, leverage the new AI-recommended fields to streamline setup and ensure alignment with project goals. Asana’s documentation provides an in-depth guide, which is worth reviewing to fully harness the potential of Custom Fields (source).
Plan Availability and Pricing
| Plan | Monthly Cost (Annual Billing) | Custom Fields | AI Studio Basic |
|---|---|---|---|
| Starter | $10.99/user | Yes | 50,000 credits |
| Advanced | Contact Sales | Yes | Included |
| Enterprise | Contact Sales | Yes | Included |
| Enterprise+ | Contact Sales | Yes | Included |
The Starter plan at $10.99 per user per month (annual billing) offers enough for small teams to leverage Custom Fields, but watch out for the AI Studio Basic’s 50,000 credit limit; it’s easy to underestimate usage in data-heavy projects. Scaling up, the Advanced plan and beyond include more AI capabilities and require direct engagement with Asana for pricing, signaling a shift towards larger teams needing extensive customization and automation. For teams considering the Starter plan, ensure you evaluate the AI credit usage meticulously to avoid unforeseen limitations. More on pricing can be found on Asana’s official pricing page.
Setting Up Custom Fields: Step-by-Step Guide
Implementing Custom Fields in Asana can be transformative for task organization, but only if set up correctly. Here’s how to navigate the process with precision:
- Open Your Project — Begin by navigating to the specific project where you want to add Custom Fields. The setup is project-specific, so ensure you’re in the correct context to avoid unnecessary adjustments later.
- Customize Button — Locate the “Customize” button in the top-right corner. This is your gateway to all customizations, including Custom Fields.
- Fields Section — Within the customization panel, find the “Fields” section. Click on “+ Add field” to proceed with adding a new Custom Field. This is where you decide between creating a new field or selecting from existing fields in your organization’s library.
- Field Type Selection — Choose a field type that aligns with your data needs: Text, Number, Date, Single Select, Multi-Select, People, or Formula. For example, use Multi-Select for a task with multiple priority levels. Be mindful that certain field types might not be reversible once data is input.
- Define Field Attributes — Clearly label your field, and if applicable, set default values. Consistency here ensures data reliability across projects. Remember, Global Fields are accessible across projects, whereas Local Fields are confined to a single project.
- Save and Review — Save your new field and check its appearance in your task list. Ensure that the field populates as expected. If issues arise, verify permissions and field lock status, as these can restrict edits (source).
By mastering these steps, you can effectively leverage Asana’s Custom Fields to enhance project visibility and data management. Whether you’re a small team on the Starter plan or an enterprise utilizing advanced features, understanding these nuances is critical for optimal results.
Exploring Field Types and Limits
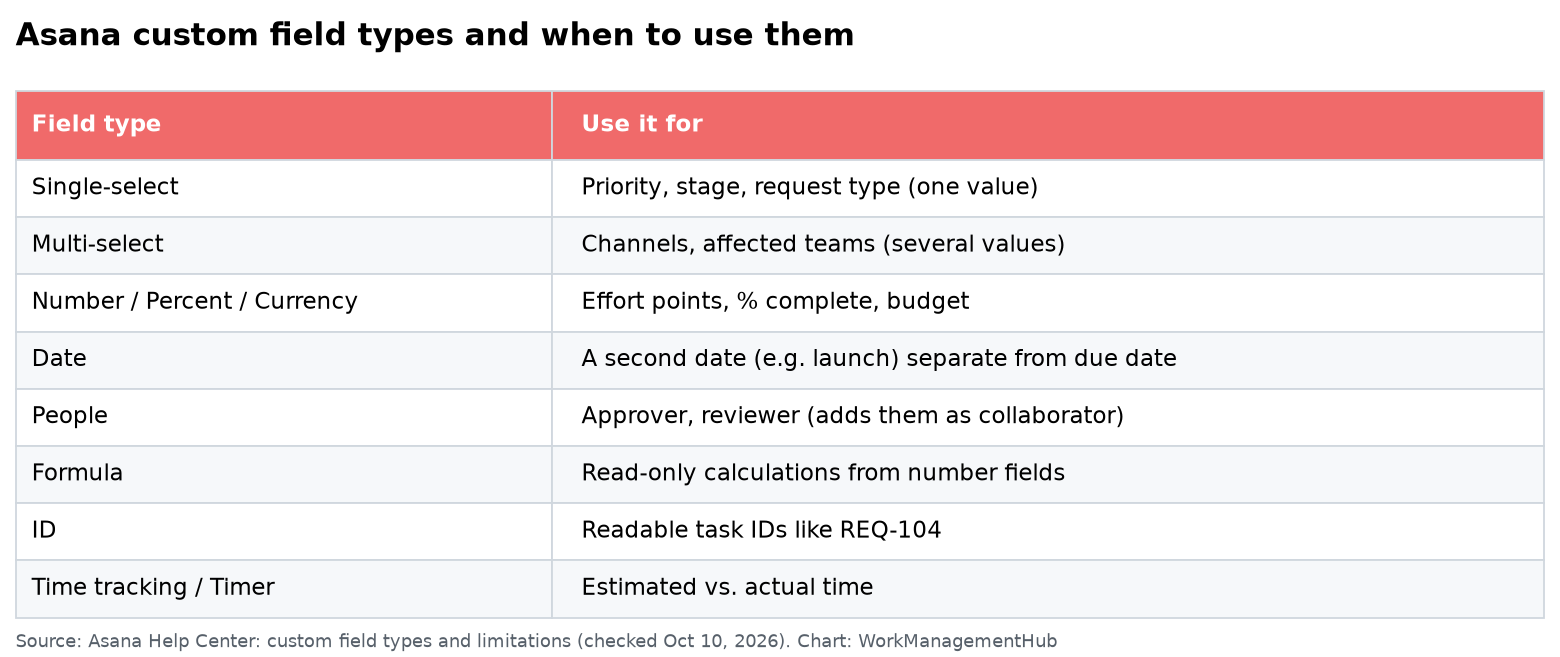
Diving into Asana’s Custom Field options, it’s crucial to select the right field type for your project’s needs. As of 2026, Asana offers seven field types: Text, Number, Date, Single Select, Multi-Select, People, and Formula. Each type serves a distinct purpose, enhancing task organization and clarity. For instance, Single Select and Multi-Select fields are ideal for categorizing tasks by status or department, enabling quick filtering and reporting.
Here is how the seven field types compare in practice, and where each one earns its place:
| Field type | Best for | Concrete example | Watch out for |
|---|---|---|---|
| Single Select | One-of-many states you filter and chart by | Priority: Low / Medium / High / Critical, each with its own color | Renaming options later rewrites historical reports — add new options instead |
| Multi-Select | Tags where several values apply at once | Channels: Email + Paid + Social on one campaign task | Harder to chart cleanly in dashboards than single select |
| Text | Short free-form references | Client PO number, ticket ID from your help desk | No validation — typos fragment your reporting |
| Number | Anything you want to sum or average | Estimated hours, budget in USD (set decimal precision and units) | Use it instead of text whenever you will ever total the value |
| Date | Secondary dates beyond the due date | “Client review by” alongside the real deadline | Does not trigger due-date notifications |
| People | Secondary owners beyond the assignee | “Approver” or “QA reviewer” on launch tasks | The person is not notified the way an assignee is — pair with a rule |
| Formula | Calculated values from other fields | Effort × Impact score for prioritization, or Budget − Actual | Requires precise field references; edits can silently break dependent dashboards |
A key limitation is the cap of 100 Custom Fields per project, which can be restrictive for complex projects requiring granular data tracking. When approaching this limit, prioritize fields that drive decision-making and leave out those that could be considered redundant. Remember, Global Custom Fields can be reused across projects, reducing redundancy and ensuring consistency.
Asana’s Formula fields, a standout feature, allow for calculations using other fields. However, be cautious: they require precise referencing and are best used by teams familiar with formula syntax. For example, calculating total costs from unit price and quantity fields can streamline project budgeting, but errors in setup can lead to misleading data.
Another common pitfall is misunderstanding Subtask Inheritance. Only the first level of subtasks inherits Custom Fields, so for deeper hierarchies, manually add fields to each subtask level to maintain data visibility. Failing to do so can obscure critical task information, disrupting workflows.
Strategically implementing Custom Fields enhances project management efficiency, but it requires thoughtful configuration. Leverage Asana’s official resources to understand advanced field configurations and troubleshooting.
AI-Recommended Fields and New 2026 Features
The 2026 update to Asana introduces a significant enhancement with AI-recommended fields, designed to streamline the setup process by suggesting relevant Custom Fields based on the context of your project. This feature is particularly useful for teams that are onboarding new projects and may not have predefined workflows or field structures. The AI’s recommendations are context-sensitive, which means it learns from similar projects you’ve set up in the past, potentially reducing setup time by up to 30%.
To leverage this feature effectively, ensure your project descriptions and task details are comprehensive, as the AI uses this data to make its recommendations. This functionality is integrated into the Customize feature within Asana. Here’s how you can access it:
- Open the project — Navigate to the project where you want to add AI-recommended fields.
- Click “Customize” — Located in the top-right corner of your project view.
- Under “Fields,” click “+ Add field” — Select “AI-recommended” from the options provided.
The AI Studio Basic, included in the Starter plan, provides 50,000 credits per billing account monthly. This can be a deciding factor if your team is evaluating the cost-effectiveness of AI features. If your project management strategy involves frequent field adjustments or you handle diverse projects, these credits can diminish quickly, suggesting a potential upgrade to a higher plan might be necessary.
While AI-recommended fields offer convenience, they might not always fit specialized projects. In scenarios where your tasks require highly customized data entry, relying solely on AI recommendations could lead to inefficiencies. Always cross-reference the AI suggestions with your project needs to ensure alignment. For more detailed guidance, refer to Asana’s Custom Fields Guide.
Real UI Paths for Custom Field Setup
Setting up Custom Fields in Asana requires precision and understanding of your project needs. Here’s a detailed guide to navigate the UI effectively:
- Open the Project — Navigate to the project where you want to add or modify Custom Fields. The projects can be accessed from your dashboard or the sidebar.
- Customize Button — In the top-right corner, locate and click the “Customize” button. This button opens up the project’s customization options, central to managing fields.
- Add Field — Under the “Fields” section, select “+ Add field.” Here, you decide whether to create a new field or use an existing one from your organization’s field library. [source]
- Field Type Selection — Choose the field type that best represents your data: Text, Number, Date, Single Select, Multi-Select, People, or Formula. Remember, each field type serves different purposes. For instance, ‘Single Select’ is ideal for task prioritization.
- Define Field Settings — Specify the details such as field name and options. If using a ‘Single Select’ or ‘Multi-Select’, define the options clearly. Ensure the field aligns with your data requirements to avoid downstream confusion.
- Save and Implement — After configuring the field, save your changes. Ensure the field is visible to all team members by checking the visibility settings. This step avoids the common pitfall of fields not appearing in tasks.
Navigating these steps with accuracy is crucial for leveraging Asana’s Custom Fields to their fullest potential. It’s important to periodically review and update your Custom Fields setup as project requirements evolve. This ensures that your data tracking remains relevant and actionable.
Common Issues and How to Fix Them
When working with Asana Custom Fields, a couple of issues tend to crop up that can derail productivity if not swiftly addressed. Let’s tackle the most common ones and how to resolve them.
One frequent issue is Custom Field values not appearing in tasks. This usually happens when the Custom Field hasn’t been correctly added to the project. To fix this, ensure the field is associated with the project. More than once, I’ve seen teams overlook this simple step, leading to hours wasted. Double-check by navigating to the project and selecting “Customize” in the top-right corner. Under “Fields,” verify that the Custom Field is present.
Another hiccup is the inability to edit a Custom Field. This often stems from permissions issues, especially if the field is locked. Only users with the right permissions can make changes. If you’re hitting a wall, have a project admin check the field settings to unlock it if necessary. Always confirm edit permissions on both the project and organizational level.
A subtle problem worth mentioning is the subtask inheritance issue. Subtasks don’t inherit Custom Fields beyond the first level. This can be a surprise for teams that heavily rely on nested tasks. If deep subtask layers are essential for your workflow, plan for manual field replication or reconsider your task structuring. This can be mitigated by flattening your task hierarchy or consistently applying fields at the top level.
A fourth trap is fields missing from dashboards and portfolio reporting. Only fields saved to your organization’s field library can be charted across projects — a local field lives and dies inside one project. The fix takes ten seconds at creation time: in the Customize > Fields > + Add field dialog, tick “Add to library” before saving. If the field already exists as local-only, recreate it as a library field, migrate values in list view, then delete the orphan.
Finally, watch for duplicate near-identical fields — the classic symptom is “Priority”, “priority level”, and “PRIORITY!” all coexisting, which quietly splits your reports three ways. Before creating any field, type its name into the search bar of the + Add field panel and reuse the library version if one appears. Make one admin the owner of the field library and the duplicates stop.
For more detailed guidance on these resolutions, refer to Asana’s official documentation. Staying ahead of these issues means smoother project execution and less downtime.
Understanding Global vs. Local Fields
When integrating Asana’s Custom Fields into your workflow, distinguishing between Global and Local fields is crucial for optimizing data consistency and project management efficiency. Global Custom Fields are designed to be reusable across various projects within your organization. This feature is particularly useful for standardizing data points like “Priority” or “Status” across multiple teams, ensuring a unified approach to task management. For example, if your organization uses a consistent set of stages for project tracking, setting these as Global Fields allows for seamless integration across projects, eliminating the need to recreate fields and reducing the chance of discrepancies.
On the other hand, Local Custom Fields are confined to individual projects or portfolios. These are ideal for project-specific data that doesn’t require organization-wide standardization. For instance, if a project needs a field for a unique metric like “Client Feedback Score,” using a Local Field prevents unnecessary clutter in the organization’s field library.
A common oversight is assuming that removing a field from a project deletes it entirely. In reality, deleting a Global Field requires administrative privileges and careful consideration of its impact across the organization. To manage Global Fields effectively:
- Asana sidebar — Navigate to the “Admin Console.”
- Custom Fields tab — View all Global Fields.
- Field options — Edit or delete fields as needed.
Remember, only the first level of subtasks inherits Custom Fields from parent tasks, so plan your data structure accordingly. Mismanagement of Global vs. Local Fields can lead to data fragmentation, so evaluate the scope and scale before deciding which type to implement. For more on managing Custom Fields, refer to Asana’s official guide.
12 Real Examples of Custom Field Usage
To truly harness the power of Asana’s Custom Fields, applying them strategically to your projects is vital. Here are 12 practical examples I’ve seen drive efficiency and clarity:
1. **Priority Levels**: Create a Single Select field with options like High, Medium, and Low to prioritize tasks effectively. This helps teams manage workload and focus on critical tasks first.
2. **Project Stage**: Use a Multi-Select field to track stages such as Planning, Execution, and Review. This is particularly useful for projects with overlapping phases.
3. **Budget Tracking**: Implement a Number field to monitor task-specific costs. This is essential for project managers aiming to keep projects within budget constraints.
4. **Client Name**: For agencies, a Text field capturing the client’s name ensures tasks are easily associated with the right client, streamlining account management.
5. **Due Date Adjustments**: Utilize a Date field to track when due dates are modified, providing transparency and accountability within the team.
6. **Resource Allocation**: A People field can assign responsibility to specific team members, making it clear who is accountable for each task.
7. **Risk Assessment**: Implement a Single Select field to categorize risks as Low, Medium, or High, facilitating proactive risk management.
8. **Approval Status**: Use a Single Select field to track task approval stages, such as Pending, Approved, or Rejected, streamlining communication with stakeholders.
9. **Location Tracking**: For distributed teams, a Text field indicating the location can assist in coordinating activities across time zones.
10. **Time Spent**: A Number field can log hours spent on tasks, providing data for productivity analysis and future time estimations.
11. **Feedback Loop**: Capture stakeholder feedback with a Text field, enabling continuous improvement and better alignment with client expectations.
12. **Custom Formulas**: For advanced users, Formula fields can calculate metrics like cost per hour or project duration, delivering insights directly within Asana.
Implement these examples by navigating to your project, selecting the Customize button, and adding fields through the + Add field option. Each field type can significantly enhance your workflow, but remember to periodically review their relevance and impact. For deep dives, refer to the official Asana guide.
Frequently Asked Questions
How can I ensure Custom Fields are visible in all my tasks?
To ensure visibility, confirm that your Custom Field is added to the project. Navigate to the project, click “Customize,” and under “Fields,” verify the field is listed. Remember, tasks must be part of this project for the field to appear.
Why can’t I edit a Custom Field?
Editing restrictions often occur if the field is locked. Check the field’s status in the project settings. Only users with the necessary permissions can edit locked fields, so ensure your access levels are adequate.
What’s the difference between Global and Local Custom Fields?
Global Custom Fields are accessible across your organization, while Local Custom Fields are confined to a specific project or portfolio. Use Global Fields for consistency across projects and Local Fields for project-specific requirements.
How do I remove a Custom Field from a project?
To remove a field, go to the project, click “Customize,” find the field under “Fields,” and click the trash icon. This action detaches the field from the project but doesn’t delete it from your organization’s library.
Do subtasks automatically inherit Custom Fields?
Subtasks only inherit Custom Fields from the parent task at the first subtask level. For deeper subtask levels, you’ll need to manually add the fields. Plan your task structure accordingly to avoid unnecessary manual work.