Smartsheet Forms Conditional Logic in 2026: When/Then Rules, Nested Reveals & 9 Pro Setup Tips
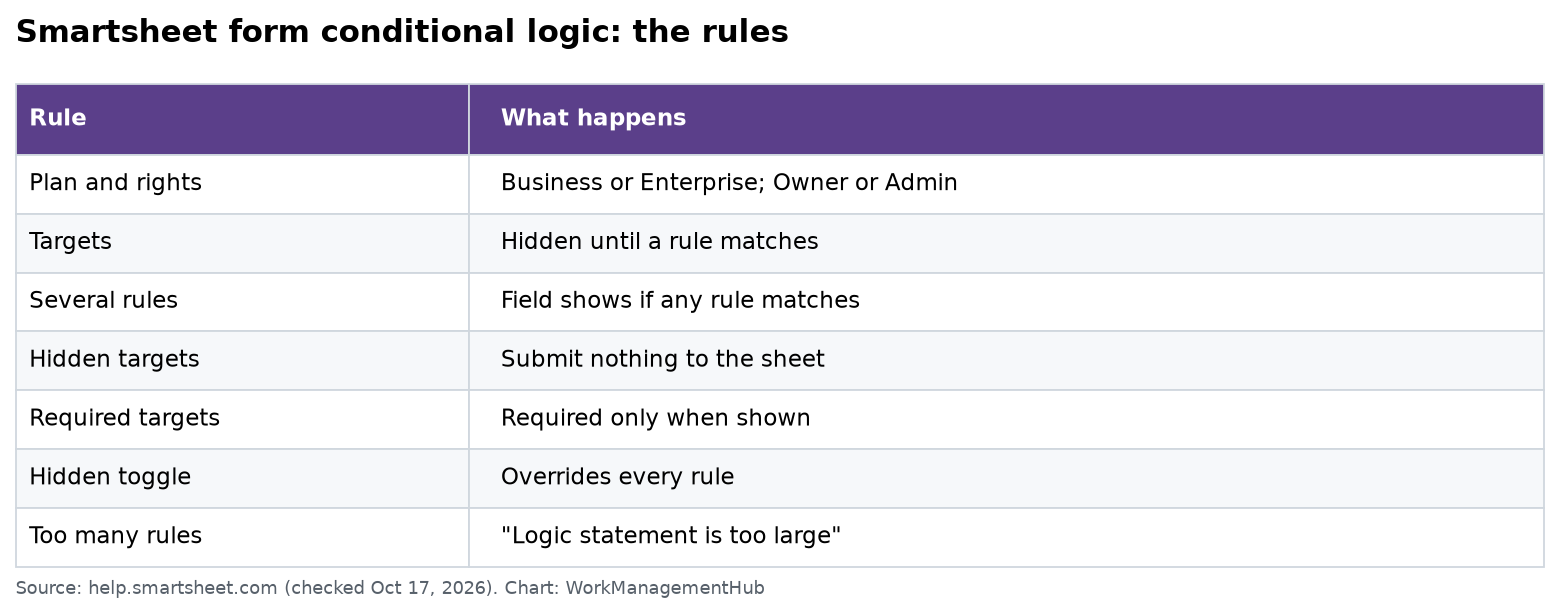
- Smartsheet forms conditional logic is configured per field: select the source field in the form builder, open Field Settings > Logic > + Add Logic, and define When/Then rules that show or hide other fields.
- Nested logic is fully supported — a field revealed by one rule can itself be a source that reveals more fields, so one form can branch into multiple intake paths.
- Rules can reveal non-field elements too: headings, dividers, and the attachment prompt — use them to guide submitters through long branches.
- Renaming columns, editing dropdown values, or deleting-and-recreating columns can silently break your logic rules — always retest the live form after any sheet schema change.
- June 2026 releases sharpen the intake stack: AI workspace generation (June 18) scaffolds an entire intake workspace from a prompt, and sheet webhooks now support custom-header authentication (June 29) for secure downstream integrations.
To add conditional logic to a Smartsheet form, open the form builder, click the field that should control visibility, open the Logic tab in Field Settings, and select + Add Logic. Define a When condition and a Then action (which fields or elements to show). Revealed fields can trigger further reveals, enabling nested, multi-path forms.
- Why Smartsheet Forms Conditional Logic Separates Clean Data From Chaos
- Prep the Sheet First: Column Types Decide What Logic Can Do
- How to Build a Smartsheet Form: Step by Step
- How to Add Smartsheet Forms Conditional Logic (When/Then Rules)
- Nested Logic: Chaining Reveals for Multi-Path Forms
- Revealing Headings, Dividers, and Attachment Prompts With Rules
- 9 Pro Setup Tips From Real Deployments
- Gotchas the Official Docs Don’t Cover
- Pair Forms With Approvals, Webhooks, and AI Workspaces
- Frequently Asked Questions
Why Smartsheet Forms Conditional Logic Separates Clean Data From Chaos
Smartsheet forms conditional logic is the feature that turns a 30-field intake nightmare into a form people actually finish. Instead of showing every possible field to every submitter, When/Then rules reveal only the fields that matter for that person’s answer path — an IT request form shows hardware fields only when someone picks “Hardware,” a marketing intake shows budget fields only when the campaign type demands them. The payoff shows up downstream: fewer blank cells, fewer “N/A” entries polluting your reports, and fewer follow-up emails asking submitters what they actually meant.
I’ve rebuilt intake processes for teams from 8-person creative studios to 400-seat PMOs, and the pattern is consistent: teams that deploy conditional logic see completion rates climb because a form that looks like 6 questions gets finished, even if it can expand to 25 for edge cases. Teams that don’t end up maintaining five near-duplicate forms feeding five sheets, then burning hours consolidating them.
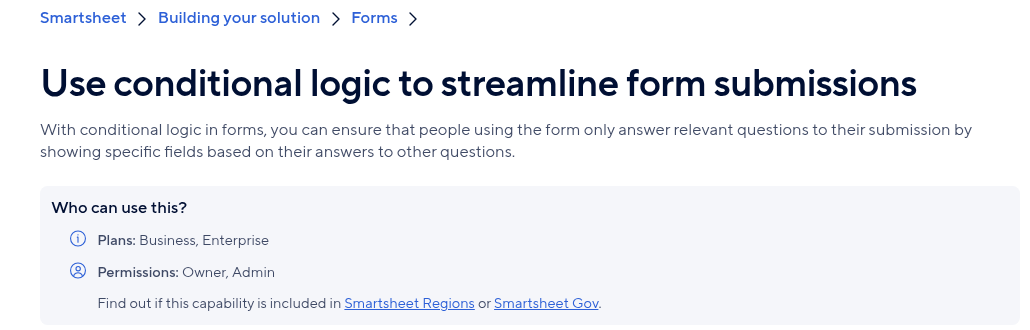
Since Smartsheet rolled out its modern form builder with conditional logic across every environment — including Smartsheet Gov, which historically lagged commercial releases — there is no plan or region where you’re stuck with flat forms. Conditional logic is included in every paid plan with no feature gate, so if you’re paying for Smartsheet at all (see our full Smartsheet pricing breakdown for 2026 for what each tier actually costs), you already own everything in this guide.
Prep the Sheet First: Column Types Decide What Logic Can Do
Here’s the thing the form builder won’t tell you until you’re deep into configuration: your logic options are determined by your column types, not by anything you do inside the form. Conditional logic keys off selection-style answers — Dropdown, Checkbox, and Symbol columns make reliable When sources because Smartsheet can match their discrete values exactly. A free-text field can’t meaningfully drive a “When this equals X” rule, because submitters will type “hardware,” “Hardware,” and “hard ware” in the same afternoon.
So before you touch the form builder, design the sheet:
- Column Properties — Right-click any column header and select Edit Column Properties. Set every field you plan to use as a logic source to Dropdown (Single Select), Checkbox, or Symbol.
- Dropdown Values — In the same dialog, enter your answer options one per line. Keep them short and mutually exclusive; these exact strings become your When conditions, and editing them later can orphan your rules (more on that in the gotchas section).
- Restrict to dropdown values only — Check this box so sheet-side edits can’t introduce values your logic has never heard of.
- System columns — Add a Created (Date) and Created By system column now. Forms don’t populate them — Smartsheet does automatically — and every approval automation you build later will want them.
If your dropdowns need to stay in sync with a master list (office locations, product SKUs, client names), pair this setup with the techniques in our guide to Smartsheet smart columns and dynamic dropdowns so you’re not hand-editing values across ten sheets.
How to Build a Smartsheet Form: Step by Step
With the sheet ready, the form itself takes about five minutes. Every form is bound to exactly one sheet — each submission creates one new row.
- Forms > Create Form — Open your sheet and select Forms on the top menu bar, then Create Form. Smartsheet generates a draft form containing every column in the sheet as a field.
- Remove unneeded fields — Hover over any field and click the X, or drag it back to the left-hand field panel. Anything used only for internal tracking (status, approval columns, formulas) should come out — formula columns shouldn’t be on forms at all, since a form-submitted value overwrites the formula in that row.
- Drag to reorder — Drag fields into a logical top-to-bottom flow. Put your future logic source fields (the routing questions) near the top so the form branches early.
- Field Settings (right panel) — Click any field to open its settings. Set the Label (what submitters see — this can differ from the column name), Help Text, whether it’s Required, and any Default Value.
- Form elements — From the left panel, drag in a Heading, Divider, or Attachment element where needed. These become important later: all three can be shown conditionally.
- Settings (gear icon) — Configure form-level behavior: Security (allow anyone with the link, or require Smartsheet login), Confirmation (message, redirect URL, or reload-for-next-entry, which is ideal for kiosk-style repeated entry), and whether submitters can send themselves a copy of their responses.
- Save > Open Form — Save, then open the live URL in an incognito window to test as an anonymous submitter before you share anything.
New to the platform entirely? Start with our Smartsheet beginners setup guide and come back — this article assumes you can already build a basic sheet.
How to Add Smartsheet Forms Conditional Logic (When/Then Rules)
Now the part that matters. In Smartsheet’s model, logic lives on the source field — the field whose answer controls visibility — not on the fields being shown or hidden. That trips up people coming from tools that configure visibility on the target. Here’s the exact sequence, confirmed against Smartsheet’s official conditional logic help article:
- Select the source field — In the form builder, click the field whose answer should determine what appears next (e.g., a “Request Type” dropdown). Its Field Settings panel opens on the right.
- Logic tab — In Field Settings, switch from the default settings view to the Logic tab.
- + Add Logic — Click + Add Logic to create your first rule. Each rule has two halves: a When condition and a Then action.
- When (condition) — Choose the operator and value(s). For a single-select dropdown, that’s typically “is exactly” or “is any of,” then tick the values that should trigger the reveal — e.g., When Request Type is any of: Hardware, Peripheral.
- Then show (targets) — Select every field and form element that should appear when the condition is met — e.g., show: Device Model, Operating System, Asset Tag. Target fields are hidden by default and only render when a rule fires.
- Add more rules — Click + Add Logic again on the same source for each additional branch (When Request Type is Software → show License Type, Vendor). Fields carrying logic display small logic icons next to their names in the builder, so you can spot sources and targets at a glance.
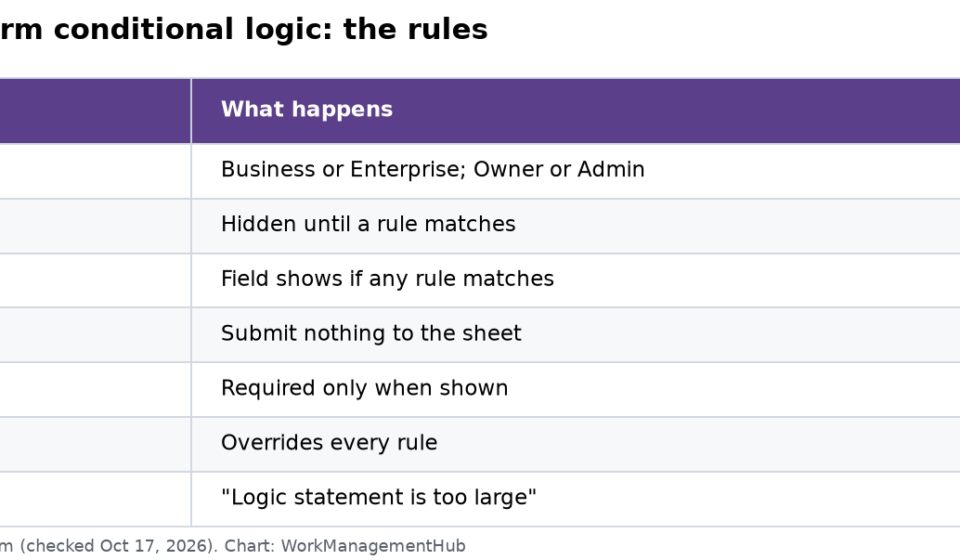
- Save and test every branch — Open the live form and walk each answer path. Two behaviors to verify: a target governed by multiple rules appears when any rule is satisfied (rules combine as OR, not AND), and a target that never appeared submits no data — even if it has a default value.
That last point is a genuine data-integrity feature: hidden-by-logic fields can’t sneak stale defaults into your sheet. But it also means any downstream formula referencing those cells needs to tolerate blanks — IFERROR and blank-handling patterns are your friend here.
Nested Logic: Chaining Reveals for Multi-Path Forms
The most underused capability in the form builder: a target field can itself be a source. Question 1 reveals Question 2, and Question 2’s answer reveals Question 3. Smartsheet supports this chaining natively, which means one form can replace an entire family of near-duplicate forms.
A pattern I deploy constantly for 20–200 person operations teams — the triage funnel:
- Level 1 — Category dropdown — “What do you need?” (Hardware / Software / Access / Other). Add logic on this field so each answer reveals one level-2 field.
- Level 2 — Sub-type dropdown — E.g., picking “Access” reveals an “Access Type” dropdown (New account / Permission change / Offboarding). Select that revealed field, open its own Logic tab > + Add Logic, and build level-3 rules on it.
- Level 3 — Detail fields — “Offboarding” reveals Last Working Day (date), Manager (contact), and Equipment Return checkbox. Each branch terminates in exactly the fields that branch needs.
- Map it before you build it — Past two levels, sketch the tree in a doc first: source → condition → targets, one line per rule. The builder shows logic icons but no consolidated rule map, so your sketch becomes the only complete documentation of the form’s behavior.
Nesting is also the workaround for AND conditions. Since multiple rules on one target combine as OR, the way to require “show field C only when A = X and B = Y” is to chain: A = X reveals B, and B = Y reveals C. The submitter experiences it as an AND even though each rule is a single condition.
Revealing Headings, Dividers, and Attachment Prompts With Rules
When/Then rules aren’t limited to data fields. In the Then show picker, you can also select layout elements — and this is where good forms start feeling like guided experiences rather than spreadsheets with a skin:
- Heading elements — Reveal a section heading like “Hardware Details” together with its fields, so a long branch reads as a labeled section instead of orphaned questions appearing out of nowhere.
- Divider elements — Show a divider above each conditional section to visually separate the always-visible core questions from branch-specific ones.
- Attachment element — This is the sleeper feature. Reveal the file-upload prompt only when it’s relevant: When “Do you have a quote from the vendor?” is Yes → show Attachment. You’ll stop getting blurry screenshots attached to requests that never needed files, and stop missing files on requests that did.
For an expense form, that combination looks like: “Amount over $500?” checkbox → reveals a divider, a heading (“Supporting Documentation — required over $500”), the attachment prompt, and a Justification text field. Four reveals, one rule.
9 Pro Setup Tips From Real Deployments
- Design the sheet schema before the form, always — Every form redesign that starts with “we’ll just add a column later” ends with broken logic and misrouted automations. Column types and dropdown values are your logic vocabulary; finalize them first.
- Route with dropdowns, never free text — Any question that drives logic or automation must be a restricted dropdown, checkbox, or symbol. Free text is for detail, not for routing.
- Use hidden fields with default values for source tracking — Add a “Source” field to the form, set a default value like Intranet, and mark it hidden (not logic-hidden — builder-hidden, which does submit its default). Create one form per channel or use query strings to stamp where each submission came from.
- One form, many paths beats many forms — Five request types should be five logic branches on one sheet, not five forms on five sheets. Your reports, dashboards, and automations all get simpler. If leadership wants per-team views of the intake sheet without exposing everything, that’s a job for filtered reports or Dynamic View rather than more forms.
- Reveal headings with their fields — Conditional fields appearing without context confuse submitters. Bundle a heading into every Then action that reveals three or more fields.
- Match the security setting to the audience — Public link for external intake; Require Smartsheet login for internal forms so Created By is a real identity your approval automations can route on.
- Test in incognito and on a phone — Logic behaves identically, but long nested branches feel very different on a 6-inch screen. Walk every branch anonymously before launch, and again after any sheet change.
- Use “reload for another entry” for kiosk and event scenarios — In form Settings > Confirmation, the reload option turns a tablet into a check-in station. Pair with a redirect URL when the form is one step in a bigger journey.
- Duplicate the form before major edits — Right-click the form in the Forms manager and duplicate it as a working copy. There’s no version history for form logic; the duplicate is your rollback plan.
Gotchas the Official Docs Don’t Cover
The official forms FAQ covers mechanics; it doesn’t cover the ways real deployments quietly break. These are the failure modes I check first when a client says “the form stopped working”:
- Schema changes can break logic silently — Renaming a column, deleting and recreating it, or reworking dropdown values can leave rules pointing at conditions that no longer match anything. The form won’t error — the branch just never appears, and submissions arrive missing entire sections. After any column rename or option edit, open the form builder, review each source field’s Logic tab, and re-test every branch live.
- Edited dropdown values orphan When conditions — If a rule says When Type is “Hardware” and someone edits the option to “Hardware Request,” the rule’s condition no longer matches the new value. Fix the rule, not just the dropdown.
- OR-only rule stacking surprises people — Multiple rules targeting the same field combine as OR. If a field is appearing “too often,” you almost certainly have two rules revealing it. Use nested chaining to simulate AND.
- Hidden-by-logic fields submit nothing — hidden-by-builder fields submit defaults — Two different kinds of “hidden.” Logic-hidden targets that never appeared contribute no data at all; builder-hidden fields submit their default value every time. Confusing the two corrupts routing columns.
- Forms don’t protect the sheet — Logic governs the form only. Anyone with editor access to the sheet can type values that violate every rule you built. Restrict dropdowns to their values and use column locking for anything automation-critical.
- Formula columns on forms get overwritten — A form field mapped to a formula column replaces the formula in that row with the submitted value. Keep calculated columns off the form entirely; column formulas (set via Convert to Column Formula) are immune and the safer pattern.
Pair Forms With Approvals, Webhooks, and AI Workspaces
A form that just fills a sheet is half a workflow. The reason Smartsheet intake beats standalone form tools is what fires the moment the row lands.
Approval automations. The canonical pairing: submissions above a threshold, or of a certain type, trigger an approval request without anyone watching the sheet.
- Automation > Create workflow — From your intake sheet, open the Automation menu and choose Create workflow from scratch (or start from the Request an approval template).
- Trigger: When rows are added — This fires on every form submission. Keep it “when triggered” (run immediately) for intake workflows.
- Condition blocks — Add conditions mirroring your form logic: where Request Type is Hardware and Amount is greater than 500. This is where clean dropdown routing pays off — conditions match restricted values reliably.
- Request an approval — Choose the approver (a fixed person, or a Contact column value submitted through the form), and select the Approval status column the workflow will stamp with Approved or Declined.
- Chain the outcome — Add a second workflow triggered by the status column changing to Approved — assign an owner, move the row to an active sheet, or send a confirmation. Full walkthrough in our Smartsheet automations setup guide; if a workflow ever goes quiet, our automations-not-triggering fixes covers the seven usual suspects.
Two June 2026 releases that upgrade this stack. Per Smartsheet’s official release notes: on June 18, 2026, Smartsheet shipped AI workspace generation for Pro plan members and above — describe your intake process in plain language and it scaffolds the workspace: sheets, reports, dashboards, and starter automations. It won’t write your conditional logic (that’s still yours to design in the form builder), but it collapses the day-one setup from hours to minutes. Then on June 29, 2026, sheet webhooks gained custom header support for authenticating webhook payloads — matching what report webhooks already had. If your form submissions push to middleware, an ITSM tool, or a custom endpoint, you can now sign those calls with your own auth headers instead of relying on the shared-secret challenge alone. For intake pipelines feeding external systems, that’s the difference between a webhook your security team tolerates and one they approve.
🏆 Verdict
If your team collects any structured request through Smartsheet, conditional logic isn’t optional polish — it’s the difference between one maintainable intake form and a sprawl of duplicates. Build the sheet schema first, route every branch through restricted dropdowns, add When/Then rules on source fields via Field Settings > Logic > + Add Logic, and wire an approval automation to the submission. Budget two hours for a production-grade intake form; you’ll recover that in the first week of not chasing incomplete submissions.
Frequently Asked Questions
Can a field be both a target and a source in Smartsheet form logic?
Yes. Nested logic is natively supported: a field revealed by one rule can carry its own rules that reveal further fields. Question 1 can display Question 2, and Question 2’s answer can display Question 3. This chaining is also the standard workaround for AND conditions, since multiple rules on one target combine as OR.
What happens to conditional fields that never appeared when the form is submitted?
They submit no data at all — even if a default value is set. Only fields that were actually displayed at submission time write to the sheet. Note the contrast with builder-hidden fields (hidden via field settings, not logic), which do submit their default values on every submission.
Does renaming a column break my form’s conditional logic?
It can. Renaming columns, editing dropdown option text, or deleting and recreating a column can leave rules referencing conditions that no longer match — and the form fails silently, with branches simply never appearing. After any schema change, open the form builder, check each source field’s Logic tab, and test every branch in a live incognito session.
What Smartsheet plan do I need for forms with conditional logic?
Every paid plan includes forms with full conditional logic — there’s no gate between Pro, Business, and Enterprise for this feature. The modern form builder with conditional logic is available across all environments, including Smartsheet Gov, which received it after the commercial rollout.
Do conditional logic rules work on public, anonymous forms and mobile?
Yes. Logic executes identically whether the form is public or login-required, and on desktop or mobile browsers. Just test long nested branches on a phone before launch — the logic works, but a 25-field branch is a very different experience on a small screen.