Skip to content
-
Subscribe to our newsletter & never miss our best posts. Subscribe Now!
Work Management Hub Work Management Hub

Expert Reviews, Comparisons & Guides for Smartsheet, Monday.com, Asana, ClickUp & More

Work Management Hub Work Management Hub

Expert Reviews, Comparisons & Guides for Smartsheet, Monday.com, Asana, ClickUp & More

  • Airtable
  • Asana
  • ClickUp
  • Jira
  • Monday.com
  • Notion
  • Smartsheet
  • Wrike
  • About
  • Contact
  • Airtable
  • Asana
  • ClickUp
  • Jira
  • Monday.com
  • Notion
  • Smartsheet
  • Wrike
  • About
  • Contact
Close

Search

  • https://www.facebook.com/
  • https://twitter.com/
  • https://t.me/
  • https://www.instagram.com/
  • https://youtube.com/
How-To GuidesJira

How to Set Up Jira Automation Rules in 2026: Complete Step-by-Step Guide

By Shaik KB
May 24, 2026 9 Min Read
0
⚡ Key Takeaways

  • Jira Automation is a no-code rule builder built into every Jira plan — no third-party apps required.
  • Every rule follows a Trigger → Condition → Action structure; smart values like {{issue.assignee}} make rules dynamic without a single line of code.
  • Free plan caps at 100 rule runs/month per user; Standard, Premium, and Enterprise unlock higher limits and cross-project Global Rules.
  • 150+ pre-built templates in the Automation Library let most teams ship their first rule in under five minutes.
  • Global Rules (Premium+) are the biggest competitive differentiator — one rule can govern dozens of projects simultaneously.
Quick Answer:

To set up a Jira automation rule, navigate to Project Settings → Automation → Create rule, choose a trigger (e.g., Issue Created), add optional conditions, then add an action (e.g., Assign Issue). Save and enable the rule. The entire process takes under five minutes using a pre-built template from the 150+ Automation Library.

Table of Contents

  1. Why Jira Automation Rules Matter for Your Team’s Velocity
  2. Understanding Plan Limits and Rule Run Quotas
  3. The Trigger → Condition → Action Framework Explained
  4. How to Create Your First Automation Rule (Step-by-Step)
  5. Mastering Smart Values for Dynamic Automation
  6. Top 6 Automation Rules Real Teams Use in 2026
  7. Global Rules: Cross-Project Automation for Enterprise Teams
  8. Troubleshooting Common Automation Rule Failures
  9. Verdict
  10. Frequently Asked Questions

Why Jira Automation Rules Matter for Your Team’s Velocity

Most teams treat Jira automation as a nice-to-have feature they’ll configure “when they have time.” That’s a mistake that costs real money. A 15-person engineering team spending an average of four minutes per ticket on manual status updates, re-assignments, and Slack pings accumulates over 40 hours of lost productivity per sprint. Automation eliminates that waste permanently after a one-time setup investment of about 20 minutes.

Jira Automation — formerly marketed as “Automation for Jira” before Atlassian baked it natively into the platform — is now the most underutilized feature across the Jira customer base. It’s no-code, built into every plan, and capable of handling everything from simple field updates to sophisticated cross-project workflows that would otherwise require a custom-built integration or a Zapier subscription costing hundreds of dollars per month.

The teams that get this right don’t just save time. They enforce process consistency at scale. When a rule auto-transitions every bug ticket to “In Review” the moment a linked pull request is merged, you eliminate the variance that makes sprint metrics unreliable. If you’re already thinking about how automation fits into your broader planning workflow, our guide to Jira sprint planning covers how these two capabilities compound each other.

Understanding Plan Limits and Rule Run Quotas

Before you build a rule library, you need to understand the quota system — getting blindsided by a run cap mid-sprint is a real operational risk on smaller plans.

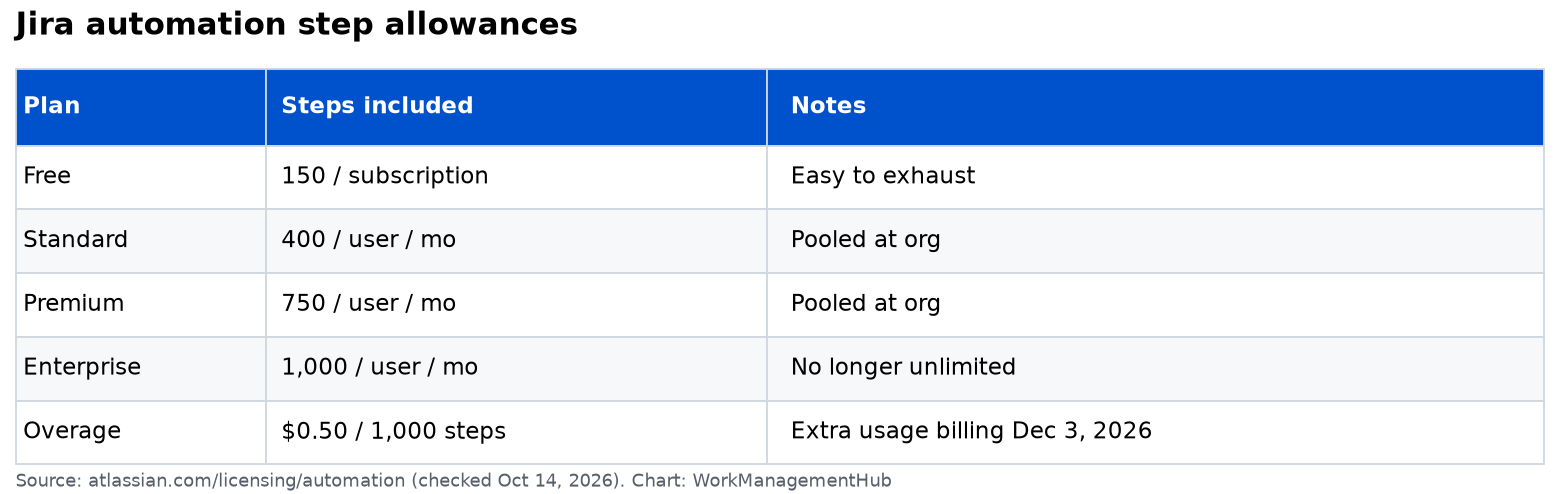
  • Free Plan: 100 rule runs per month, per user. For a 5-person team, that’s 500 total monthly runs. Sufficient for a handful of simple rules, but you’ll hit the ceiling fast if you automate comment notifications or field changes on high-velocity boards.
  • Standard Plan: 1,700 rule runs per user per month. This is the practical minimum for any team treating automation seriously. A 10-person team gets 17,000 monthly runs — enough for comprehensive project-level automation.
  • Premium Plan: Unlimited rule runs plus access to Global Rules, cross-project automation, and advanced branching logic. For teams managing 5+ projects, this is where ROI becomes undeniable.
  • Enterprise Plan: Everything in Premium, plus centralized governance, audit logs, and organization-wide automation management through the Atlassian Admin console.

One critical detail most documentation ignores: a “rule run” is counted each time an action executes, not each time a trigger fires. A rule with three actions counts as three runs per trigger event. Factor this into your rule design when you’re on a capped plan.

The Trigger → Condition → Action Framework Explained

Every Jira automation rule is built on three components. Understanding these precisely is what separates rules that work reliably from rules that fire on the wrong tickets or silently fail.

Triggers

Triggers define the event that starts the rule. The six most impactful triggers in production environments are:

  • Issue Created — Fires once when any new issue is logged. Ideal for auto-assignment and label standardization.
  • Issue Transitioned — Fires when an issue moves between workflow statuses. The workhorse trigger for most engineering teams.
  • Scheduled — Runs on a cron-style schedule (e.g., every Monday at 9am). Use for weekly stale-ticket reports or sprint health summaries.
  • Field Value Changed — Fires when a specific field is updated. Powerful for reacting to priority escalations or assignee changes.
  • Comment Added — Fires when any comment is posted. Use to sync information to external systems or notify stakeholders.
  • Webhook Received — Fires when Jira receives a payload from an external system. Essential for CI/CD pipeline integrations.

Conditions

Conditions are filters that must evaluate to true before the action fires. Without conditions, your rules are blunt instruments. With them, they become surgical. Common examples: Issue Type is Bug, Priority is High or Critical, Assignee is Empty, or Current User is not the Reporter. You can chain multiple conditions with AND/OR logic using the Condition Group component.

Actions

Actions are what the rule does when trigger + conditions are met. Key actions include: Assign Issue, Transition Issue, Send Email, Send Web Request (for Slack/Teams webhooks), Create Sub-task, Edit Fields, and Log Work. For Slack-specific notification setups, our Jira Slack integration guide walks through the webhook configuration in detail.

How to Create Your First Automation Rule (Step-by-Step)

The following walkthrough creates a practical rule: automatically assigning any new bug ticket to your QA lead and adding a “Needs Triage” label.

  1. Navigate to Project Settings — From your Jira project board, click Project Settings in the left sidebar (gear icon, bottom of the navigation).
  2. Open the Automation Tab — In the Project Settings menu, scroll to find Automation and click it. You’ll land on the rules list view.
  3. Click “Create rule” — Top-right corner of the Automation screen. This opens the rule builder canvas.
  4. Select Your Trigger: “Issue Created” — In the Add a trigger panel on the right side, click Issue Created to add it to your rule canvas.
  5. Add a Condition: Issue Type = Bug — Click the + button below the trigger, select New condition, choose Issue fields condition, set the field to Issue Type, operator to equals, value to Bug. Click Save.
  6. Add Action 1: Assign the Issue — Click + below the condition, select New action → Assign issue. Use the smart value {{project.lead}} to dynamically assign to the project lead. Click Save.
  7. Add Action 2: Edit the Label Field — Click + again, choose Edit issue fields → Labels, type Needs-Triage, set operation to Add. Click Save.
  8. Name and Save Your Rule — Click the rule name at the top and rename to something descriptive. Click Save top-right.
  9. Enable the Rule — Back on the Automation list view, toggle the status switch from Disabled to Enabled.
  10. Test with a Manual Run — Click the three-dot menu next to your rule and select Run rule. Choose a test issue to validate the rule fires correctly.

The Atlassian Automation documentation provides the full list of available actions including parameters and limitations for each action type.

Mastering Smart Values for Dynamic Automation

Smart Values are Jira Automation’s templating engine. They let you pull live data from the triggering issue, its linked issues, its epic, its sprint, and even custom fields — all without writing code. Smart Values are wrapped in double curly braces: {{value}}.

Smart ValueReturnsUse Case
{{issue.assignee.displayName}}Assignee’s full namePersonalized email notifications
{{issue.priority.name}}Priority labelDynamic Slack urgency signals
{{issue.sprint.name}}Active sprint nameAdding sprint context to sub-tasks
{{issue.epic.summary}}Parent epic’s titleAuto-populating sub-task descriptions
{{now.plusDays(3)}}Date 3 days from executionSetting automatic follow-up dates

For linked issues, Smart Values support traversal: {{issue.linkedIssues("blocks").first().status.name}} returns the status of the first issue that the current issue blocks. The full Atlassian Smart Values reference covers every available property path.

Top 6 Automation Rules Real Teams Use in 2026

1. Auto-Close Stale Tickets (Scheduled Trigger)

Trigger: Scheduled (every Friday at 4pm). Condition: Status is “Waiting for Reporter” AND last updated more than 14 days ago. Action: Transition to “Closed” + add comment using {{issue.reporter.displayName}}. This single rule cuts backlog noise by 20-30% for most teams within a month.

2. Auto-Assign Based on Component (Issue Created Trigger)

Trigger: Issue Created. Condition: Component equals “Payments”. Action: Assign to the payments team lead. For a 40-person engineering org with 8 components, this eliminates the daily triage meeting entirely.

3. PR Merge → Ticket Transition (Webhook Trigger)

Trigger: Incoming webhook from GitHub/GitLab on pull request merge. Condition: Issue status is “In Progress”. Action: Transition to “In Review”. This is the single highest-ROI rule for engineering teams.

4. Escalation Ping on Priority Change (Field Value Changed)

Trigger: Field Value Changed — Priority field. Condition: New value is “Critical”. Action: Send web request to Slack channel with message containing {{issue.summary}} and {{issue.assignee.displayName}}.

5. Sub-task Generator on Epic Move to “In Progress”

Trigger: Issue Transitioned to “In Progress”. Condition: Issue Type is “Epic”. Action: Create sub-task (3 times) — Design Review, QA Sign-off, Documentation. Each sub-task inherits the epic’s sprint via smart value.

6. Weekly Sprint Health Digest (Scheduled Trigger)

Trigger: Scheduled — every Monday at 9am. Condition: Issues in active sprint with “To Do” status and due date before sprint end. Action: Send email to project lead listing at-risk tickets using a For Each branch.

Global Rules: Cross-Project Automation for Enterprise Teams

Global Rules, available on Premium and Enterprise plans, are created at the organization level. Navigate to Atlassian Admin → Automation (not Project Settings) to access the global rule builder. Rules you create here can be scoped to run across all projects, specific projects by key, or all projects matching a label.

  • Organization-Wide Security Escalation: Any issue with label “security-vulnerability” in any project automatically gets Priority set to Critical and the CISO’s Jira account added as a watcher. One rule governs every project.
  • Cross-Project Dependency Notification: When an issue transitions to “Blocked” in any project, notify the assignees of all issues linked as “is blocked by.” Game-changing for cross-team dependency visibility.
  • New Project Bootstrapping: Trigger on project creation. Action: Create standard component labels, version entries, and a kickoff epic. Enforces naming standards that make portfolio reporting coherent.

See our Jira vs Linear comparison for how both tools handle automation at scale. And the Jira roadmap setup guide shows how automation and roadmap views work together for executive reporting.

Troubleshooting Common Automation Rule Failures

  1. Open Project Settings → Automation — Find the rule that’s misbehaving and click the rule name to open it in the editor.
  2. Click “Audit log” in the top right — Shows every execution with timestamps, trigger events, condition results, and action outcomes. Green = success. Yellow = condition not met. Red = action failed.
  3. Click any failed run — Expand to see which component failed. Common errors: “User does not have permission to transition this issue” (fix: check rule actor permissions) or “Invalid smart value — returned null” (fix: add null-check condition).
  4. Check the Rule Actor — In rule settings, the “Rule actor” determines permissions. Switching to a dedicated service account resolves most permission-related failures.

The most common logic error: stacking conditions without realizing they default to AND logic. Use a Condition Group set to Any (OR) for OR logic. The official Atlassian troubleshooting guide is the definitive reference for permission-related failures. If automation complexity becomes a barrier, see Jira alternatives in 2026.

🏆 Verdict

Jira Automation is the most underutilized feature in the Atlassian ecosystem. For Free plan teams, start with three rules: auto-assignment by issue type, stale ticket closure, and a priority-change Slack ping. For Standard and above, add the PR-merge-to-transition webhook immediately. For Premium teams managing multiple projects, Global Rules are non-negotiable. The one-time investment of an afternoon to build a solid rule library consistently returns 3-5 hours per person per month in eliminated manual work.

Frequently Asked Questions

How many automation rules can I create in Jira?

There is no hard cap on the number of rules you can create — the limit is on rule runs (executions), not rule count. Free plan gets 100 runs per user per month, Standard gets 1,700, and Premium/Enterprise plans have unlimited runs. Create as many rules as needed and manage quota by enabling only active rules.

Can Jira automation rules trigger other rules?

Yes, but actions performed by automation rules don’t re-trigger other rules by default (to prevent infinite loops). Enable rule chaining in the rule’s settings by toggling on “Allow rule trigger.” Test chained rules carefully in a sandbox — a poorly designed chain can exhaust your monthly run quota within hours.

What’s the difference between project-level and global automation rules?

Project-level rules are created in Project Settings → Automation and apply only to that project. Global rules are created in Atlassian Admin → Automation and can run across multiple or all projects from a single definition. Global rules require Premium or Enterprise and are the correct approach for organization-wide automation policies.

Do Jira automation rules work with Jira Service Management?

Yes. Jira Automation works across Jira Software and Jira Service Management projects on the same site. You can create cross-project rules that trigger in a JSM queue and create linked issues in a Jira Software project — a common pattern for escalating customer-reported bugs from support directly into the engineering backlog.

How do I test an automation rule without affecting real tickets?

Use the Manual trigger option in the rule builder to run the rule against a specific issue you select without waiting for a real event. Alternatively, create a dedicated test project with sample issues. Always check the Audit Log after a test run to verify each component executed as expected.

Author

Shaik KB

Follow Me
Other Articles
Previous

15 Best Trello Power-Ups in 2026: Free & Paid Integrations Ranked by Team Type

Next

How to Use Wrike for Marketing Teams in 2026: Campaign Management & Content Calendar Setup

No Comment! Be the first one.

    Leave a Reply Cancel reply

    Your email address will not be published. Required fields are marked *

    Sponsored Smartsheet Expert Services – Implementation, Automation, Training
    Sponsored Power BI & Tableau Analytics – Dashboards, Reporting, Insights
    Sponsored AI Agents for Work Management – Automate Tasks, Integrate Tools

    Categories

    • Airtable (10)
    • Alternatives (12)
    • Asana (32)
    • ClickUp (38)
    • How-To Guides (125)
    • Integrations (16)
    • Jira (25)
    • Monday.com (37)
    • Notion (24)
    • Pricing Guides (11)
    • Project Management (73)
    • Smartsheet (27)
    • Tool Comparisons (42)
    • Wrike (10)

    Recent Post

    • ClickUp Notifications Not Working? 7 Fixes for the Most Common Issues in 2026
    • Notion Charts 2026: How to Add Charts to Any Database View and Visualize Your Data
    • Linear vs ClickUp 2026: Which Is Better for Product and Dev Teams?
    • How to Use Smartsheet Dynamic View in 2026: Secure Data Sharing Without Exposing Your Sheet
    • How to Use Asana Forms for Project Intake in 2026: Complete Setup Guide
    Work Management Hub

    Independent expert reviews & comparisons of work management tools — helping 50,000+ teams choose the right software.

    Tools We Cover

    • Smartsheet
    • Monday.com
    • ClickUp
    • Asana
    • Notion
    • Jira
    • Wrike
    • Airtable

    Company

    • About Us
    • Contact Us
    • Privacy Policy
    Copyright 2026 — Work Management Hub. All rights reserved. Blogsy WordPress Theme