Skip to content
-
Subscribe to our newsletter & never miss our best posts. Subscribe Now!
Work Management Hub Work Management Hub

Expert Reviews, Comparisons & Guides for Smartsheet, Monday.com, Asana, ClickUp & More

Work Management Hub Work Management Hub

Expert Reviews, Comparisons & Guides for Smartsheet, Monday.com, Asana, ClickUp & More

  • Airtable
  • Asana
  • ClickUp
  • Jira
  • Monday.com
  • Notion
  • Smartsheet
  • Wrike
  • About
  • Contact
  • Airtable
  • Asana
  • ClickUp
  • Jira
  • Monday.com
  • Notion
  • Smartsheet
  • Wrike
  • About
  • Contact
Close

Search

  • https://www.facebook.com/
  • https://twitter.com/
  • https://t.me/
  • https://www.instagram.com/
  • https://youtube.com/
How-To GuidesWrike

How to Use Wrike for Marketing Teams in 2026: Campaign Management & Content Calendar Setup

By Shaik KB
May 24, 2026 20 Min Read
0

⚡ Key Takeaways

  • Wrike ships marketing-specific workspace templates — Campaign Management, Content Calendar, and Event Planning — that give a 10-person team a production-ready structure in under 20 minutes.
  • Request Forms let external stakeholders submit creative briefs directly into Wrike without requiring them to have a paid seat — the single highest-ROI feature most marketing teams never configure.
  • Wrike Proof (Business+ plans) moves image, PDF, and video approvals entirely out of email and into the asset itself — reviewers annotate on the file, not in a 40-reply thread.
  • Blueprints (project templates) let you launch every campaign from an identical folder structure with one click — the fastest way to enforce process consistency across a creative team.
  • Resource management views expose team capacity before you overpromise delivery dates — critical when one designer is covering three simultaneous campaigns.
  • Custom item types (“Campaign,” “Asset,” “Brief”) let you treat different record categories differently inside the same workspace, replacing the clunky workaround of nested folders by type.
Quick Answer:

To use Wrike for marketing teams in 2026, start with the Campaign Management workspace template, configure Request Forms for stakeholder intake, set up Wrike Proof for asset approvals, build Blueprints for repeatable campaign launches, and use resource views to manage creative capacity. The entire stack replaces email-based brief intake, approval chains, and ad-hoc status updates with a single, auditable workflow.

Table of Contents

  1. Why Wrike Works for Marketing Teams in 2026
  2. Setting Up Your Marketing Workspace with the Campaign Template
  3. Request Forms: Capturing Creative Briefs Without Giving Away Seats
  4. Building Your Content Calendar in Wrike
  5. Campaign Timeline Planning with Gantt Charts and Dependencies
  6. Wrike Proof: Running Asset Approval Workflows That Actually Close
  7. Blueprints: One-Click Campaign Launch from a Standard Structure
  8. Custom Item Types: Campaigns, Assets, and Briefs as Distinct Records
  9. Adobe Creative Cloud Integration: Syncing Assets Directly to Tasks
  10. Resource Management: Preventing Creative Team Burnout
  11. Verdict
  12. Frequently Asked Questions

How to Use Wrike for Marketing Teams in 2026: Campaign Management & Content Calendar Setup

Most marketing teams adopt Wrike, spend two days creating folders, and then revert to email for approvals and Slack for status updates — defeating the purpose entirely. The problem is not the tool. It is the setup. Wrike’s marketing capabilities in 2026 are deep enough to run a full campaign lifecycle — from stakeholder brief intake through asset approval and post-launch reporting — but that depth requires deliberate configuration. This guide covers exactly what to configure, in what order, and why it matters for a team operating real campaigns under real deadlines.

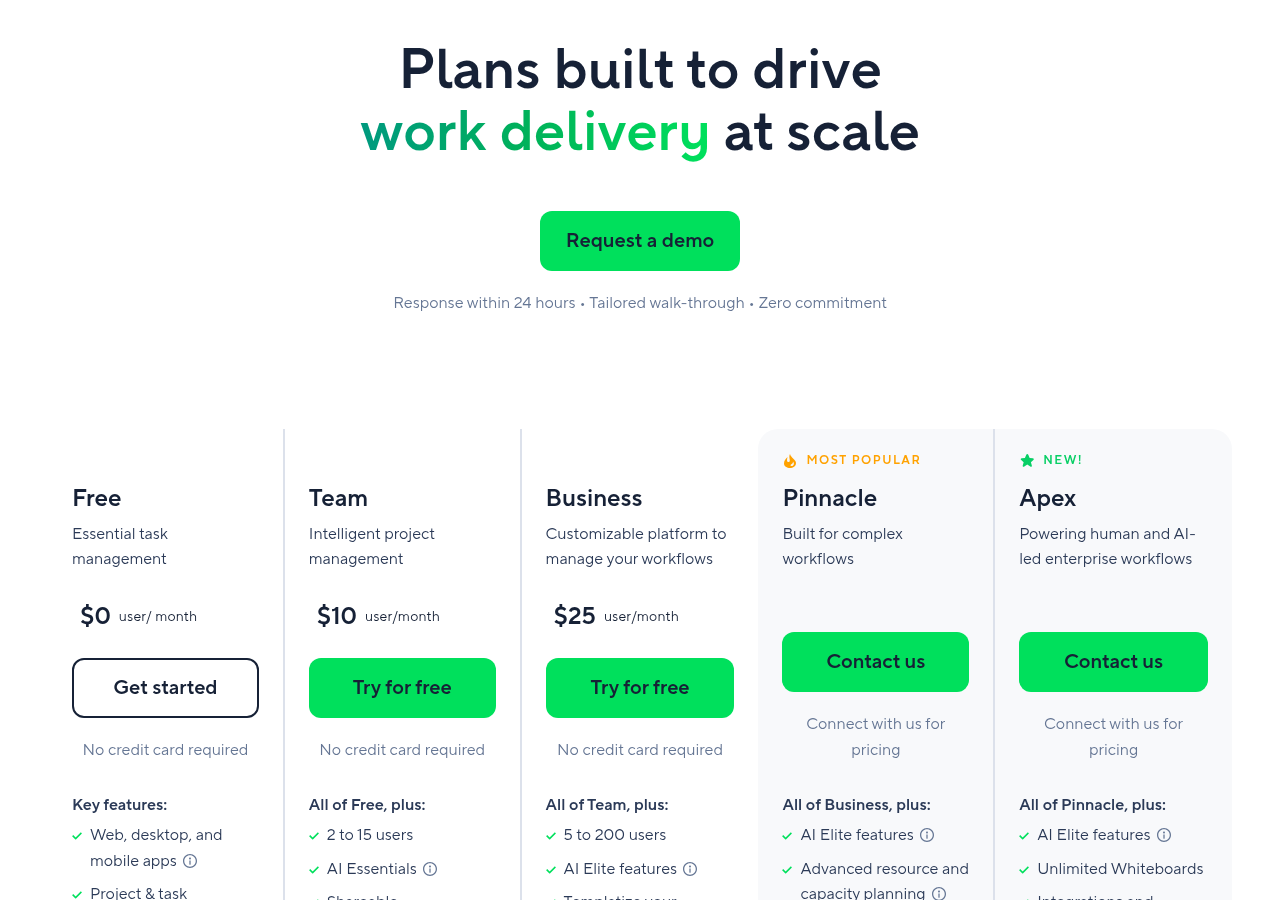
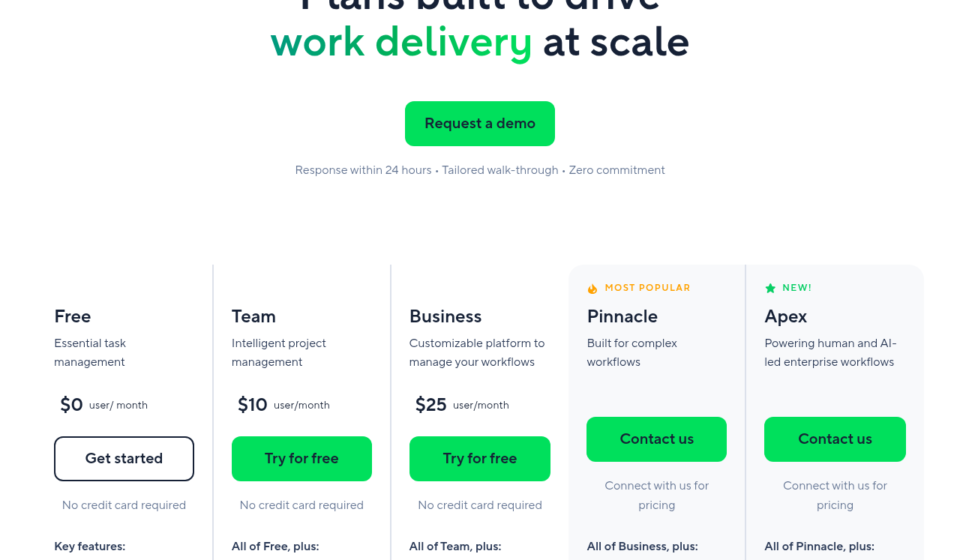
Before diving in, see our full Wrike review if you are still evaluating whether the platform fits your team’s workflow. For plan selection, our Wrike pricing plans breakdown shows which features — including Wrike Proof — land on which tiers.

Why Wrike Works for Marketing Teams in 2026

Work management tools built for software development teams routinely get adopted by marketing departments that then spend months fighting the tool’s mental model. Wrike avoids this because its marketing-specific features are first-class, not afterthoughts bolted onto a dev-centric core.

Three structural advantages drive this in 2026:

  • Request Forms with conditional logic — External stakeholders submit structured creative briefs without needing a Wrike login. The form auto-creates a task or project in the right folder. No manual intake admin work.
  • Wrike Proof integrated into the task layer — Asset approval happens on the asset, not in a separate tool. Annotations, version history, and approval status all live on the task itself.
  • Blueprints as campaign templates — Every campaign launches from the same folder structure, task list, and assignee defaults. Process consistency is enforced at the system level, not the manager level.

For a 5-person in-house team, these features reduce campaign setup time by roughly 60% after the first month. For a 30-person agency team running 15 simultaneous campaigns, they are the difference between controlled delivery and permanent reactive firefighting.

Setting Up Your Marketing Workspace with the Campaign Template

Wrike ships three marketing-specific workspace templates: Campaign Management, Content Calendar, and Event Planning. Start with Campaign Management — it contains the folder hierarchy and custom field set that the other two templates reference.

  1. Navigate to the Home screen — From the left sidebar, click the Home icon. In the upper-right area of the home dashboard, click + Create New and select Space.
  2. Select “Use a Template” — In the space creation modal, choose Use a Template rather than starting blank. A template library panel will open on the right.
  3. Filter by “Marketing” — In the template library, use the category filter on the left to select Marketing. You will see Campaign Management, Content Calendar, Event Planning, and a handful of additional marketing-adjacent templates.
  4. Select Campaign Management — Click Campaign Management to preview the template structure. Review the folder hierarchy and default custom fields before confirming.
  5. Click “Use Template” — Assign a Space name (e.g., “Marketing — 2026”) and click Create Space. Wrike will generate the full folder structure, including a Campaigns folder, an Assets folder, and a Briefs folder with pre-configured custom fields.
  6. Add your team members — Once the Space is created, click Space Settings (right-click the Space name in the sidebar) and navigate to Members. Add team members and assign roles — Full Members for your internal team, Collaborators for external stakeholders who need limited access.
  7. Customize default custom fields — Inside Space Settings, navigate to Custom Fields. The Campaign Management template ships with Campaign Status, Channel, Target Audience, and Launch Date fields. Add your organization-specific fields here before any campaigns are created — retrofitting custom fields after 50 tasks exist is painful.
Practical note for teams of 10+:

Before configuring custom fields, run a 30-minute working session with your team leads to agree on required vs. optional fields. The Campaign Management template’s defaults are solid, but teams that add 15+ custom fields in week one end up with task forms so long that contributors stop filling them in. Start with six to eight fields and add more only when a gap becomes painful in practice.

Request Forms: Capturing Creative Briefs Without Giving Away Seats

Request Forms are the most underused feature in Wrike’s marketing toolset. Every campaign brief that arrives via email or Slack represents a failure of your intake process — it means someone on the creative team is manually creating a task and transcribing brief details, which introduces errors and burns time. Request Forms eliminate this entirely.

The core mechanic: a stakeholder fills out a form (hosted on a Wrike-generated URL or embedded in an internal page), and Wrike automatically creates a task or project in the correct folder with all form data mapped to custom fields. The stakeholder never needs a Wrike account.

  1. Open the Space Settings menu — Right-click your Marketing Space name in the left sidebar and select Space Settings.
  2. Navigate to Request Forms — In the left panel of Space Settings, click Request Forms. Click + New Form in the upper right.
  3. Name the form — Use a name your stakeholders will recognize: “Creative Brief Submission” or “Campaign Request Form.” This name appears in the form’s browser tab and confirmation email.
  4. Add form fields — Click + Add Field for each piece of information you need. Essential fields for a creative brief: Campaign Name (Text), Campaign Goal (Dropdown: Awareness / Lead Gen / Retention), Target Audience (Text), Key Message (Paragraph), Desired Launch Date (Date), Requester Name (Text), Requester Email (Text). Use the Required toggle on fields that must not be blank — Wrike will block form submission until these are completed.
  5. Configure conditional logic — Click the branching icon on a Dropdown field to add conditional logic. Example: if Campaign Goal = “Lead Gen,” show an additional field for Lead Volume Target. This keeps the form short for simple requests and detailed only when needed.
  6. Map fields to a Wrike task — Scroll to the Task Creation Settings section of the form builder. Set the destination folder (e.g., Briefs > Incoming). Map each form field to its corresponding Wrike custom field. Campaign Name maps to the Task Title field. Set a default assignee for incoming briefs — typically your traffic manager or project coordinator.
  7. Set the form access level — Under Access, choose Anyone with the link if external stakeholders need to submit. Choose Space Members Only if intake is internal. Copy the shareable form URL.
  8. Distribute the form URL — Embed the URL in your internal intranet, share it in your Slack channel pinned message, or add it to your email signature as “Submit a creative request.” Communicate clearly to stakeholders that email briefs will no longer be actioned — all requests go through the form.

For a 15-person marketing team working with 5-8 internal business stakeholders, this setup typically eliminates 3-4 hours of intake admin work per week within the first month of adoption.

Building Your Content Calendar in Wrike

Wrike’s Content Calendar template gives you a folder structure optimized for editorial planning, but the real value comes from combining it with table view and custom fields — not from the folder structure alone.

  1. Add the Content Calendar template to your Space — Inside your Marketing Space, click the + icon next to the Space name and select Add Folder from Template. Find Content Calendar in the marketing category and click Use Template. This creates a Content Calendar subfolder inside your existing Space rather than a separate Space.
  2. Switch to Table View — Click the view switcher at the top of the Content Calendar folder (it defaults to List View). Select Table. This gives you a spreadsheet-style layout where each row is a content piece and each column is a custom field.
  3. Add content-specific custom fields — In Table View, click + Add Column on the right edge of the table. Add: Content Type (Dropdown: Blog / Social / Email / Video), Channel (Dropdown: LinkedIn / Instagram / Newsletter / YouTube), Status (Dropdown: Ideation / Draft / Review / Scheduled / Published), Publish Date (Date), Author (Member), Editor (Member), Word Count (Number).
  4. Create a Calendar View — Click the view switcher and select Calendar. Configure it to use Publish Date as the calendar date field. Now you can see your entire content calendar visually, color-coded by Status or Content Type using the Color Code by Field option in calendar settings.
  5. Set up a recurring tasks workflow — For content types published on a fixed cadence (weekly newsletter, monthly case study), right-click any task and select Set Recurrence. Wrike will auto-generate the next occurrence when the current one is marked complete, so your calendar always shows future obligations without manual entry.
  6. Pin the Calendar View for the team — Click the three-dot menu on the Calendar view tab and select Pin View. This makes it the default view anyone opening this folder sees — critical for keeping the whole team using the same interface rather than reverting to their personal preferences.

Campaign Timeline Planning with Gantt Charts and Dependencies

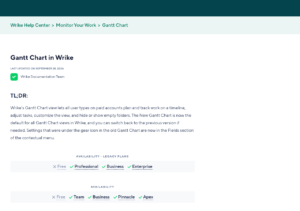
Gantt charts in Wrike are where campaign planning moves from “we think this will take two weeks” to “we can see exactly which tasks block each other and where the delivery date actually lands.” The Wrike Gantt chart features updated significantly in 2026, including improved dependency management and critical path highlighting.

  1. Open a campaign folder — Navigate to the folder for a specific campaign (e.g., Q3 Product Launch).
  2. Switch to Gantt View — Click the view switcher and select Gantt. Wrike renders all tasks as horizontal bars on a timeline. Tasks without start and due dates appear as undated items on the left — these need dates before the Gantt is useful.
  3. Set task durations — Click directly on a task bar to open the task detail panel. Set a Start Date and Due Date. For a typical campaign, map out: Creative Brief (2 days), Concept Development (3 days), Copy Draft (2 days), Design (4 days), Internal Review (2 days), Revisions (2 days), Legal/Compliance Review (3 days), Final Approval (1 day), Trafficking/Scheduling (1 day).
  4. Add task dependencies — In Gantt View, hover over the right edge of a task bar until a connection point appears. Click and drag to the start of the dependent task. This creates a Finish-to-Start dependency. For example, connect “Creative Brief” to “Concept Development” — the Gantt will prevent Concept Development from starting before the Brief is complete. For Start-to-Start or Finish-to-Finish dependencies, right-click the dependency line and change the relationship type.
  5. Enable Critical Path highlighting — Click the Critical Path toggle in the Gantt toolbar (top right). Wrike highlights in red all tasks whose delay would push the campaign launch date. This immediately shows where to focus management attention and where you have float.
  6. Set a campaign milestone — Right-click any task in Gantt view and select Convert to Milestone. Use this for your Launch Date — milestones appear as diamond shapes on the Gantt and are visible across multiple campaigns if you use a cross-project view.

Wrike Proof: Running Asset Approval Workflows That Actually Close

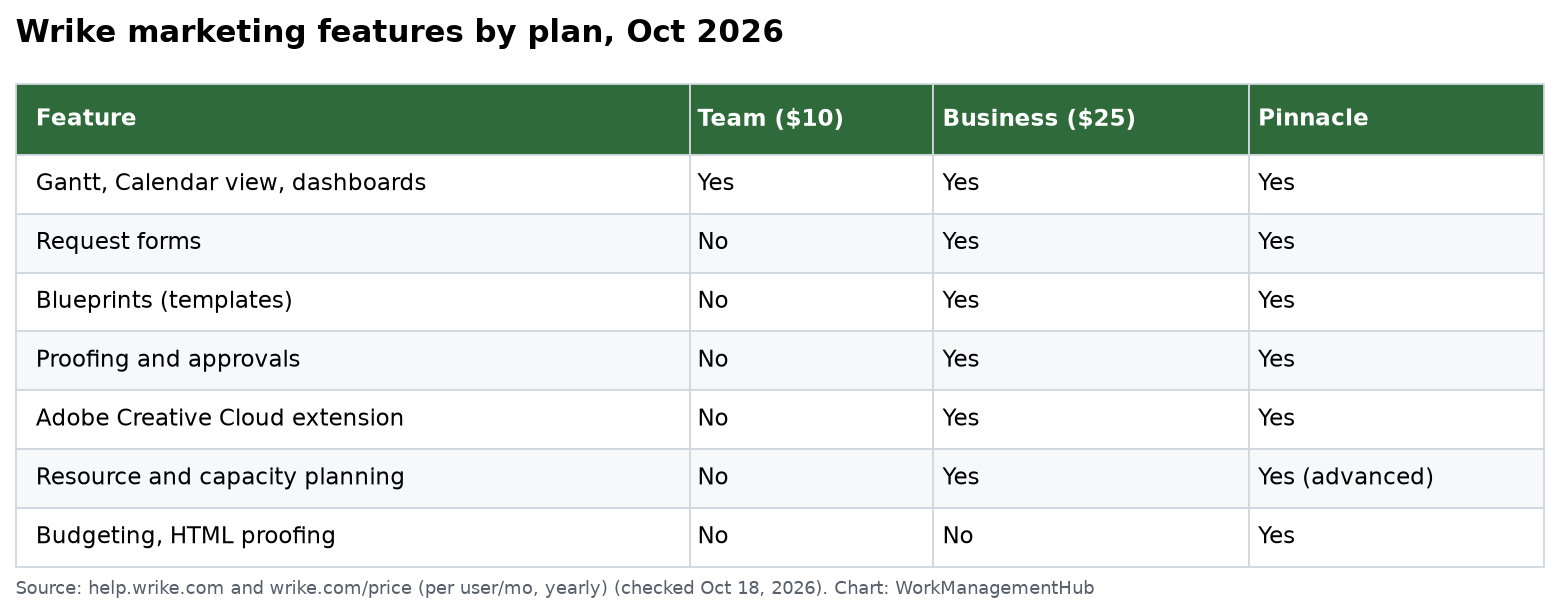
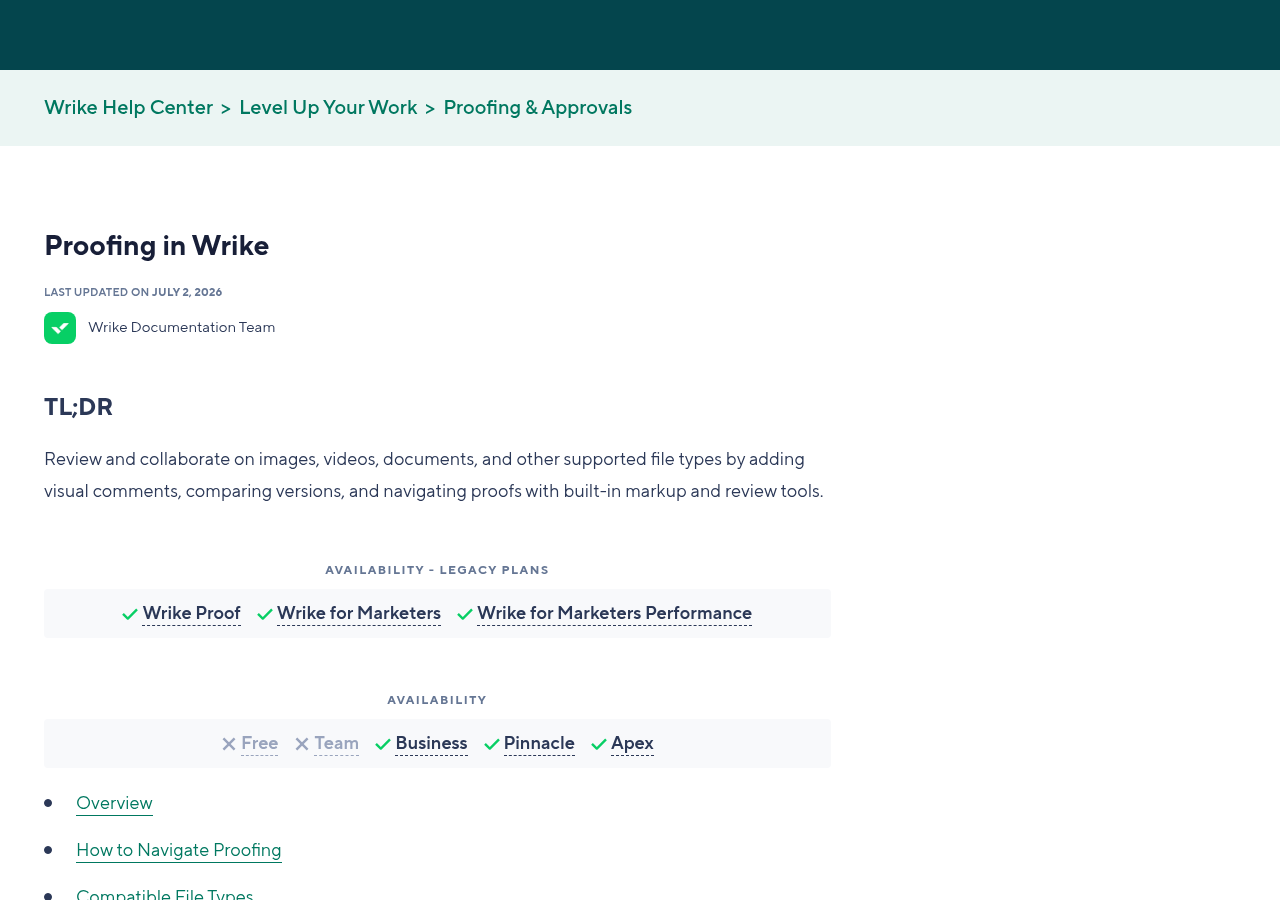
Wrike Proof is available on Business and higher plans (see Wrike pricing plans for the tier breakdown). It is the feature that most directly replaces the “review and annotate in email” pattern that makes creative approval cycles drag on for weeks. Reviewers annotate directly on images, PDFs, and videos — with their feedback pinned to exact locations on the asset, not buried in reply threads.

  1. Attach an asset to a task — Open the task for a specific asset (e.g., “Homepage Hero Banner — Q3 Campaign”). In the task detail panel, click the Attachments section and upload your file (PNG, JPEG, PDF, MP4, MOV, and several other formats are supported). Alternatively, if you have the Adobe Creative Cloud integration active, assets sync automatically — see the integration section below.
  2. Open Wrike Proof — Once an image or PDF is attached, a Proof button appears in the attachment thumbnail. Click it to enter the Wrike Proof interface. The asset opens in a full-screen annotator.
  3. Add reviewers to the proof — In the Proof panel, click Add Reviewers. Add internal team members (they must have Wrike accounts) or enter external email addresses for clients or stakeholders (external reviewers get a view-only annotate link without needing a full Wrike account).
  4. Set an approval deadline — In the Proof settings, set a Due Date for the review. Wrike sends automated reminder emails to reviewers as the deadline approaches. Without a deadline, approvals drift indefinitely.
  5. Reviewers annotate on the asset — Each reviewer opens the proof link, clicks directly on areas of the asset to drop a pin, and types their comment. Comments are numbered and pinned to exact pixel locations — “the logo in the bottom left” is no longer ambiguous. Reviewers mark themselves as Approved or Request Changes when finished.
  6. Upload a revised version — After addressing feedback, upload the revised file using Upload New Version in the Proof interface. Wrike maintains a version history — all previous versions and their annotations are accessible, so you can always trace what changed between rounds and why. The revision counter increments (v1, v2, v3) automatically.
  7. Mark the proof approved — When all reviewers have clicked Approved, the Proof status updates to Approved and the parent task can be moved to the next stage. If any reviewer clicks Request Changes, the status shows Changes Requested and the creative team is notified.

For a marketing team running 8-10 assets per campaign across 3 simultaneous campaigns, Wrike Proof typically cuts approval cycle time by 40-50% in the first quarter of use. The reduction comes entirely from eliminating “what was the latest feedback?” searches and “which version are we reviewing?” confusion. For more on Wrike’s review features, the official Wrike Proof documentation covers advanced options including guest reviewer access.

Blueprints: One-Click Campaign Launch from a Standard Structure

A Blueprint is Wrike’s term for a reusable project template — a pre-built folder with tasks, assignees, custom field values, and dependencies already configured. For marketing teams, Blueprints solve the problem of “we agree on how campaigns should be structured but every campaign gets set up differently because whoever creates it does it their own way.”

  1. Build your ideal campaign folder first — Before creating a Blueprint, run one campaign through your full workflow and refine the folder structure until it genuinely reflects how your team works. Include all standard tasks, with estimated durations and assignees where they are always the same (e.g., “Legal Review” is always assigned to your legal coordinator). Do not include campaign-specific details like copy or asset files.
  2. Convert the folder to a Blueprint — Right-click the campaign folder in the left sidebar and select Save as Blueprint. Give the Blueprint a descriptive name: “Standard Product Campaign — 2026” or “Social Media Campaign Launch.” Add a description that explains when to use this Blueprint vs. others you may create later.
  3. Configure Blueprint date offsets — Open the Blueprint (find it under Space Settings > Blueprints). Each task in the Blueprint has a relative date offset rather than a fixed date. Set these relative to the campaign Launch Date milestone: “Legal Review” might be set to “Launch Date minus 5 days,” “Copy Draft” to “Launch Date minus 12 days.” When you launch a campaign from the Blueprint, Wrike asks for the target Launch Date and calculates all task dates automatically.
  4. Add Blueprint-specific custom field defaults — Inside the Blueprint, set default values for custom fields that are the same across all campaigns of this type. For a social media campaign Blueprint, set Channel = “Social” and Content Type = “Campaign” as defaults. Individual campaign folders can override these values after launch.
  5. Launch a campaign from the Blueprint — To start a new campaign, click + Create in the left sidebar and select From Blueprint. Choose your Blueprint, enter the campaign name, set the launch date, and click Create. Wrike generates the complete folder structure — typically 20-30 tasks — in under 30 seconds. Your team sees a fully populated project with correct task dates and assignees from day one.

Teams with more than three active campaigns simultaneously should consider maintaining two or three Blueprint variants — for example, a “Full Campaign” Blueprint for multi-channel launches and a “Fast Track” Blueprint for single-channel executions under two weeks. The overhead of maintaining two Blueprints is minimal; the time saved on project setup compounds over every campaign.

Custom Item Types: Campaigns, Assets, and Briefs as Distinct Records

Custom item types — available on Wrike Business plans and above — let you define “Campaign,” “Asset,” and “Brief” as distinct record types inside your workspace, each with its own icon, custom fields, and workflow. This is more than cosmetic. When every record type looks and behaves differently, the team knows immediately what kind of work item they are looking at and what information is expected.

  1. Access Custom Item Types — Navigate to Account Settings (click your profile icon in the upper right > Account Management). Select Custom Item Types from the left panel.
  2. Create a “Campaign” item type — Click + Add Item Type. Name it “Campaign.” Assign a distinct icon (Wrike offers a library of icons — a megaphone or flag icon works well for campaigns). Select a color that will appear in list views as a visual differentiator.
  3. Add Campaign-specific fields — In the custom item type configuration, add the fields that belong specifically to a Campaign record: Campaign ID, Campaign Theme, Target Audience Segment, Total Budget, Primary Channel, Launch Date, Campaign Status. These fields only appear on Campaign records — they do not clutter Brief or Asset records.
  4. Create an “Asset” item type — Repeat the process for “Asset.” Asset-specific fields: Asset Type (Image / Video / Copy / Email Template), Format (dimensions or specs), Usage Rights, Version Number, Final Approval Date.
  5. Create a “Brief” item type — Brief-specific fields: Requester, Business Objective, Key Message, Target Audience, Success Metrics, Deadline Requested, Budget Estimate, Priority (High / Medium / Low).
  6. Apply item types in your workspace — Open any task or project and click the item type label (it defaults to “Task” or “Project”). Select the custom item type from the dropdown. The record immediately shows only the fields relevant to that type. Existing tasks can be converted to custom item types at any time.

Adobe Creative Cloud Integration: Syncing Assets Directly to Tasks

For teams where designers work in Adobe Illustrator, Photoshop, or InDesign, the Adobe Creative Cloud integration removes the “export, find the Wrike task, upload, notify” friction from every asset handoff.

  1. Install the Wrike for Adobe Creative Cloud plugin — In Adobe Creative Cloud, open the Creative Cloud Desktop app. Navigate to Marketplace > Plugins and search for “Wrike.” Install the official Wrike Adobe CC integration. The plugin is free — it requires a Wrike Business or higher account.
  2. Connect your Wrike account — In the plugin panel (accessible from Window > Extensions > Wrike in Adobe apps), log in with your Wrike credentials. Grant the requested permissions.
  3. Browse tasks from inside Photoshop or Illustrator — The Wrike panel shows your assigned tasks. Click any task to open the task detail view — brief description, custom fields, and attached files are visible without leaving your Adobe app.
  4. Upload directly to a task — When an asset is ready for review, click Save to Wrike in the plugin panel. Select the destination task from the search field. The asset uploads directly to that task’s attachment section and a comment is auto-posted notifying the task assignee. If Wrike Proof is active, the upload triggers a proof creation prompt.
  5. Download existing versions for reference — If a designer needs to work from an approved version of an asset stored in Wrike, they can download it directly from the plugin without opening Wrike in a browser.

Resource Management: Preventing Creative Team Burnout

Resource management views are where Wrike transitions from a task tracker to an actual capacity planning tool. For marketing teams where one designer is commonly allocated across five campaigns simultaneously, this view is the difference between catching an overallocation problem on Monday and discovering it when a deadline blows on Friday.

  1. Open the Resource Management view — In the left sidebar, click Resource Management (appears under the analytics section on Business+ plans). If you do not see it, navigate to Account Settings > Features and confirm it is enabled.
  2. Set working hours for team members — Click Team Settings inside Resource Management. Set each team member’s working hours per day (typically 8 hours), working days, and any planned leave. Wrike uses these values to calculate available capacity. Without this configuration, the view is not meaningful.
  3. Assign time estimates to tasks — For resource data to populate correctly, tasks need time estimates. Open any task, click Effort in the task detail panel, and enter an estimate in hours. For campaign tasks, rough estimates (2h for brief review, 8h for design) are sufficient — you are planning at the capacity level, not invoicing at the minute level.
  4. Read the capacity heatmap — The resource view shows a heatmap per team member — green cells indicate available capacity, yellow shows approaching overallocation, red shows overallocated dates. Before committing to a new campaign deadline, check whether the relevant designers and copywriters have capacity in the required week. This view makes overcommitment visible before it becomes a delivery problem.
  5. Rebalance workloads — If a team member is overallocated, click their cell to see which tasks are driving the overload. Drag tasks to a different time slot or reassign to an available team member directly from the resource view. Changes sync immediately to the task level — the task’s assignee and dates update in real time.

Resource management is also the conversation tool for pushback when leadership adds campaigns to an already full schedule. “The designer is at 140% capacity in weeks 3 and 4” is a data point that carries weight in a way that “the team is overloaded” does not. For comparisons with how other tools handle resource management, see our Wrike vs Asana analysis, which covers capacity planning differences in detail.

Comment threading and @mentions: keeping feedback on the asset

One operational habit worth enforcing from day one: all feedback on tasks and assets goes through Wrike’s comment threading with @mentions, not email. When a reviewer posts a comment on a task and @mentions the designer, the designer receives an in-app notification and the feedback is permanently attached to that task’s activity log. Searching “what did the client say about the hero image?” returns an answer in seconds. Searching “what did the client say about the hero image?” in your email inbox returns a string of conversational threads where the actual feedback is buried in reply number seven. The tooling supports this behavior natively — the team habit is the only configuration required.

If you are considering alternatives before fully committing to Wrike, our Wrike alternatives guide covers the tools most commonly evaluated alongside it for marketing use cases.

🏆 Verdict

Wrike is the right choice for marketing teams whose main pain points are stakeholder brief intake, multi-round asset approvals, and campaign launch consistency — and it is measurably better than its competitors on all three. The combination of Request Forms (zero-seat stakeholder intake), Wrike Proof (in-asset annotation and approval tracking), and Blueprints (one-click campaign launch) addresses the three biggest process failures in most marketing operations. The setup investment is real — plan for two to three weeks to configure Request Forms, establish Blueprint templates, and get your team using Wrike Proof consistently. But the return — eliminated approval email chains, structured intake, and predictable campaign launches — compounds with every subsequent campaign. Teams that fully implement the workflow described in this guide consistently report that their campaign delivery cycle shortens by 25-35% within the first quarter. The resource management capability is the feature that separates sustainable growth from burnout. Use it from day one.

Frequently Asked Questions

Does Wrike have a content calendar feature?

Yes. Wrike includes a dedicated Content Calendar workspace template and a Calendar view that can display tasks on a date-based timeline. The most effective setup combines the Content Calendar template with a custom Publish Date field and Wrike’s Calendar view configured to use that field. You can color-code calendar entries by Content Type or Status, and set recurring task rules for cadence-based content like weekly newsletters. The native Calendar view is sufficient for most editorial teams; it is not a dedicated editorial calendar tool like CoSchedule, but for teams already managing campaigns in Wrike, it eliminates the need for a separate editorial calendar tool.

Can external stakeholders submit creative briefs without a Wrike account?

Yes, this is exactly what Request Forms are designed for. You configure a form in Space Settings, generate a shareable URL, and stakeholders complete the form in any browser without any Wrike login. Form submissions automatically create tasks in the folder you specify, with all form data mapped to the appropriate custom fields. Conditional logic lets you show different fields based on earlier answers, keeping the form concise for simple requests. This is one of Wrike’s strongest differentiators — most competing tools require a paid seat even for stakeholders who only need to submit requests.

What plan do I need for Wrike Proof?

Wrike Proof is available on Business plans and above. It is not included on the Free or Team plans. Business plan includes proof on images and PDFs; Enterprise plans add video proofing capability. External reviewers (clients, external stakeholders) can annotate on a proof via a shareable link without needing a paid Wrike seat — only the internal team members managing the approval workflow require Business plan seats. Check the current plan breakdown on our Wrike pricing plans page, as Wrike adjusts feature-tier mapping periodically.

What is a Blueprint in Wrike and how is it different from a template?

In Wrike, a Blueprint is a saved project or folder structure — including tasks, assignees, custom field values, and relative date offsets — that you can use to launch new projects with a single click. The key difference from a generic template is the relative date system: Blueprint tasks are dated relative to a launch milestone, so when you launch a campaign from a Blueprint and specify a launch date, all task dates calculate automatically. Wrike’s standard workspace templates (like the Campaign Management template) are starting-point structures; Blueprints are your team’s own operationalized version of how you actually run campaigns, saved and repeatable across every future campaign.

How does the Adobe Creative Cloud integration work with Wrike?

The Wrike Adobe Creative Cloud integration is a plugin installed through the Adobe Creative Cloud Desktop app. Once connected, designers see their assigned Wrike tasks in a panel inside Photoshop, Illustrator, InDesign, and other Adobe CC apps. They can download asset files attached to tasks, view brief details and custom fields, and upload completed assets directly to a Wrike task — triggering automatic comment notifications and, if Wrike Proof is configured, initiating the proof review workflow. The integration eliminates the export-and-manually-upload step that adds friction to every design handoff. It works on Wrike Business plans and above.

Author

Shaik KB

Follow Me
Other Articles
Previous

How to Set Up Jira Automation Rules in 2026: Complete Step-by-Step Guide

Next

Jira vs Trello 2026: Which Atlassian Tool Is Right for Your Team?

No Comment! Be the first one.

    Leave a Reply Cancel reply

    Your email address will not be published. Required fields are marked *

    Sponsored Smartsheet Expert Services – Implementation, Automation, Training
    Sponsored Power BI & Tableau Analytics – Dashboards, Reporting, Insights
    Sponsored AI Agents for Work Management – Automate Tasks, Integrate Tools

    Categories

    • Airtable (10)
    • Alternatives (12)
    • Asana (32)
    • ClickUp (38)
    • How-To Guides (125)
    • Integrations (16)
    • Jira (25)
    • Monday.com (37)
    • Notion (24)
    • Pricing Guides (11)
    • Project Management (73)
    • Smartsheet (27)
    • Tool Comparisons (42)
    • Wrike (10)

    Recent Post

    • ClickUp Notifications Not Working? 7 Fixes for the Most Common Issues in 2026
    • Notion Charts 2026: How to Add Charts to Any Database View and Visualize Your Data
    • Linear vs ClickUp 2026: Which Is Better for Product and Dev Teams?
    • How to Use Smartsheet Dynamic View in 2026: Secure Data Sharing Without Exposing Your Sheet
    • How to Use Asana Forms for Project Intake in 2026: Complete Setup Guide
    Work Management Hub

    Independent expert reviews & comparisons of work management tools — helping 50,000+ teams choose the right software.

    Tools We Cover

    • Smartsheet
    • Monday.com
    • ClickUp
    • Asana
    • Notion
    • Jira
    • Wrike
    • Airtable

    Company

    • About Us
    • Contact Us
    • Privacy Policy
    Copyright 2026 — Work Management Hub. All rights reserved. Blogsy WordPress Theme