How to Use Asana Forms for Project Intake in 2026: Complete Setup Guide
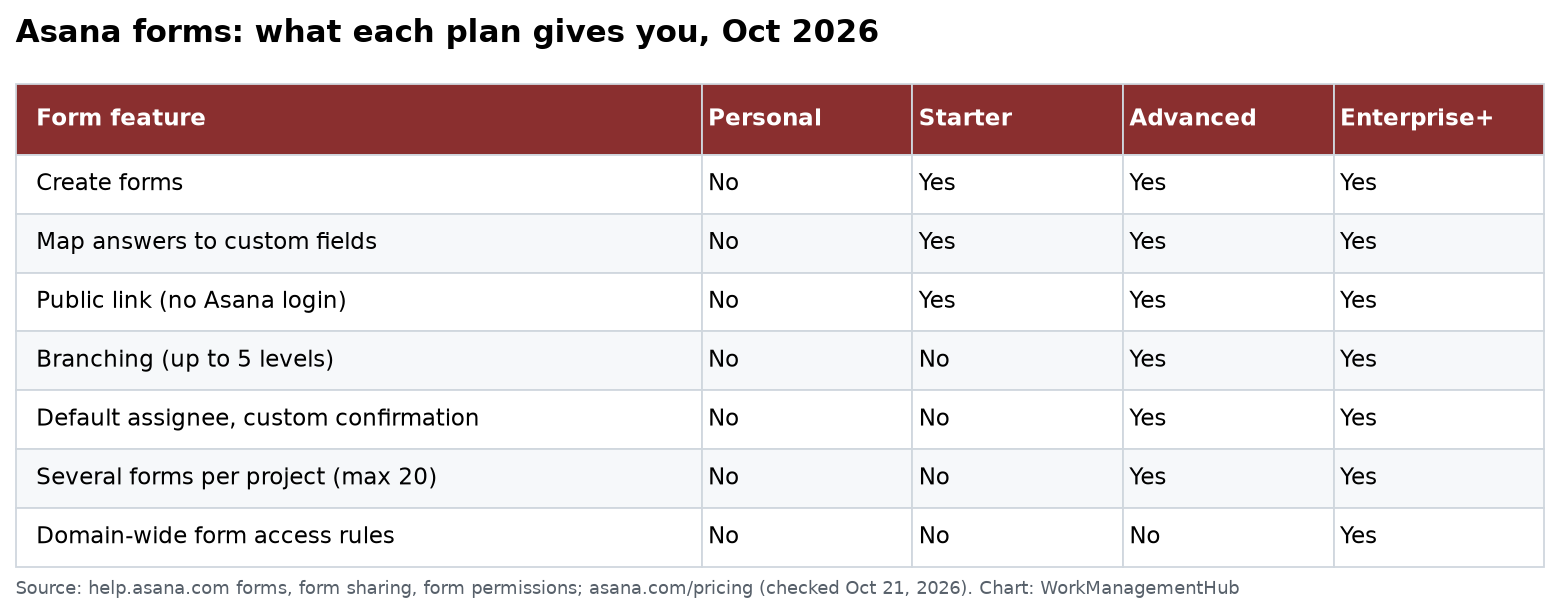
- Asana Forms are available on Premium, Business, and Enterprise plans — not the Free tier.
- Conditional logic (branching questions) requires a Business or Enterprise plan and dramatically reduces form abandonment by showing only relevant fields.
- Every form submission auto-creates a task in your designated project section, with responses mapped directly to custom fields.
- You can combine Forms with Asana Rules to trigger approval workflows, auto-assign tasks, and route requests to the right team — zero manual triage.
- New in 2026: AI-assisted field suggestions analyze your project type and recommend the most relevant intake fields automatically.
- Forms can be shared via a public link or embedded directly on your intranet or website — no Asana account required for submitters.
To set up Asana Forms for project intake, open your project, click Customize → Add Form, add custom fields and conditional logic, then share the link with requesters. Each submission creates a task automatically. Pair with Rules to auto-route, assign, and trigger approvals without manual triage.
- Why Project Intake Forms Are a Business-Critical Workflow
- Plan Requirements and What You Get at Each Tier
- How to Create Your First Asana Intake Form (Step-by-Step)
- Configuring Custom Fields and Field Types
- Setting Up Conditional Logic (Business+ Plans)
- Using AI-Assisted Field Suggestions in 2026
- Sharing and Embedding Your Form
- Connecting Forms to Approval Workflows with Rules
- Real-World Intake Use Cases: Ops, Marketing, and IT
- Best Practices and Common Mistakes to Avoid
- Verdict
- Frequently Asked Questions
Why Project Intake Forms Are a Business-Critical Workflow
Most teams absorb new requests through a slow, leaky funnel: a Slack message here, an email there, a hallway conversation that someone was supposed to turn into a ticket but didn’t. The result is misaligned priorities, duplicated work, and projects that start without the information needed to scope them properly. That is not a communication problem — it is a systems problem, and Asana Forms is the fix.
When a structured intake form sits between a requester and your team’s project queue, several things happen simultaneously: requesters are forced to provide the information you actually need (not just what they feel like typing), every submission lands in the same place in the same format, and your team can triage, prioritize, and assign without chasing anyone for details. At scale — think a marketing ops team handling 50+ creative briefs per month, or an IT helpdesk managing cross-departmental software requests — this compounds into hours saved per week and a measurable reduction in rework.
The 2026 version of Asana Forms has matured significantly. AI-assisted field suggestions, tighter Rules integration for post-submission automation, and improved embedding options make it the most capable version of the feature to date. If you are still running intake via email or shared spreadsheets, this guide will show you exactly what you are leaving on the table.
Plan Requirements and What You Get at Each Tier
Before building anything, confirm your plan supports Forms. Here is the breakdown:
| Plan | Forms Available? | Conditional Logic? | AI Field Suggestions? |
|---|---|---|---|
| Free | No | No | No |
| Premium (Starter) | Yes | No | No |
| Business (Advanced) | Yes | Yes | Yes |
| Enterprise / Enterprise+ | Yes | Yes | Yes |
If you are on Premium and wondering whether conditional logic is worth upgrading for — yes, for any team handling more than 20 requests per month, it is. The ability to show a “Creative Brief Details” section only when the requester selects “Creative” as the request type eliminates the most common complaint about intake forms: irrelevant questions that cause form abandonment.
How to Create Your First Asana Intake Form (Step-by-Step)
These steps assume you already have a project set up to receive intake submissions. If you have not structured your intake project yet, create a dedicated project (e.g., “Marketing Requests Intake”) before proceeding — the form will be attached to and feed into that project.
- Open your intake project — Navigate to the project in the left sidebar. This is the project where submitted tasks will land.
- Click “Customize” in the top-right toolbar — This opens the Customize panel on the right side of the screen. You will see options for Fields, Rules, Apps, and Forms.
- Select “Forms” from the Customize panel — Click the Forms tab, then click the “+ Add Form” button. Asana generates a blank form shell tied to this project.
- Set your form title and description — Click on the default form title to edit it. Add a clear, requester-facing title (e.g., “Submit a New Marketing Request”) and a short description that sets expectations about response time or what information is needed.
- Enable or disable the confirmation message — Scroll to the bottom of the form builder. Customize the confirmation message requesters see after submitting. This is a good place to set expectations: “Your request has been received. Expect a response within 2 business days.”
- Set the destination section — In the form settings (gear icon), choose which project section incoming submissions land in. Use a dedicated “New Requests” or “Triage” section so nothing gets lost in a general task list.
- Save and preview — Click “Preview” in the top-right of the form builder to see the requester-facing view before going live. Test it by submitting a dummy entry and confirming the task appears in the right section.
For a deeper look at how the resulting tasks can be managed and tracked once they land in your project, the guide on Asana reporting dashboards covers how to build visibility across your intake pipeline.
Configuring Custom Fields and Field Types
The power of Asana Forms lies in how form questions map directly to task fields. Every answer a requester provides becomes structured data attached to the resulting task — not a blob of text in the task description. Here is how to configure fields correctly:
- Click “+ Add Question” in the form builder — Each question you add corresponds to either a standard task field or a custom field in your project.
- Select the field type from the dropdown — Available types include: Short text, Paragraph, Single select (dropdown), Multi-select, Date (date picker), Number, Email, URL, and File attachment. Choose the type that enforces the format you need — use Date for deadline requests, Single select for priority level, File attachment for asset uploads or creative briefs.
- Map to an existing custom field using “Connect to field” — Below each question’s settings, click “Connect to field” and select the matching custom field from your project. This ensures the answer populates the correct field on the task, not just the form response log. Unmapped questions still appear in a “Form responses” section on the task, but mapped fields are far more useful for filtering and reporting.
- Mark required fields — Toggle “Required” on for any field that, if left blank, would make the request impossible to process. Common required fields: Request Name, Requester Name, Department, Deadline, and Request Type.
- Add a file attachment question for supporting documents — Click “+ Add Question,” select File attachment, and label it something like “Attach supporting documents or briefs (optional).” Attachments upload directly to the resulting task.
- Reorder questions by dragging — Drag questions into a logical flow. Start with identifying information (name, team, request type), then get into specifics. Requesters read forms top to bottom — front-load the questions that help with triage.
For teams using Asana for HR processes — onboarding requests, equipment provisioning, PTO approvals — the principles here translate directly. See the Asana for HR teams guide for tailored intake configurations for people operations workflows.
Setting Up Conditional Logic (Business+ Plans)
Conditional logic is the single highest-impact feature in Asana Forms for any team handling diverse request types. Instead of showing every possible field to every requester, you branch the form based on their answers — showing only the questions relevant to their specific request. This reduces form length, improves completion rates, and produces cleaner data.
- Add your branching trigger question first — Conditional logic branches from a Single select question. Create your “Request Type” question (e.g., with options: Creative Asset, Campaign Brief, Data Request, Event Support) and add it early in the form.
- Click the branch icon on a downstream question — Select a question you want to show conditionally. Click the branch/logic icon (two diverging arrows) that appears when you hover over the question.
- Set the condition in the logic panel — In the logic panel that opens on the right, set: “Show this question when [Request Type] is [Creative Asset].” You can set multiple conditions using AND/OR logic for more complex branching.
- Create question groups for each request type — Build a cluster of questions for each branch: Creative Asset submissions might ask for dimensions, file format, and brand guidelines reference; Data Requests might ask for the data source, required date range, and output format. Each cluster only appears for the relevant request type.
- Test every branch path in Preview mode — Use the “Preview” button and walk through each branch manually. It is easy to mis-set a condition that accidentally hides a required field. Test with at least one submission per branch before making the form live.
- Use “Always show” for universal fields — Fields like “Requested By,” “Department,” and “Deadline” should appear regardless of branch. Leave these without conditional logic applied.
Official guidance on Asana’s conditional form logic is covered in Asana’s Forms Help Center documentation.
Using AI-Assisted Field Suggestions in 2026
The most significant update to Asana Forms in 2026 is AI-assisted field suggestions. When you create a new form — or when you have added a form title and a few initial questions — Asana’s AI analyzes your project type, the questions already present, and your organization’s existing custom fields to recommend additional intake fields you are likely to need.
- Look for the “Suggested fields” panel in the form builder — After naming your form and adding at least one question, a “Suggested fields” section appears in the right-hand builder panel. This is AI-generated based on your project context.
- Review suggestions in context — Suggestions are labeled with the field type and a brief rationale. For an IT Request intake form, you might see suggestions like “Urgency Level (Single select),” “Affected Systems (Multi-select),” and “Number of Users Impacted (Number).” Each suggestion shows a preview of how the question will appear to the requester.
- Accept, modify, or dismiss each suggestion — Click “Add to form” to accept a suggestion as-is, click the pencil icon to customize the label or options before adding, or click “Dismiss” to skip it. Dismissed suggestions do not reappear.
- Use suggestions as a checklist, not a final answer — AI suggestions are a strong starting point, but they do not know your team’s specific triage criteria. Always review with the person who will process submissions before publishing the form.
This feature is available on Business and Enterprise plans and requires that Asana AI features are enabled for your organization by your admin. If you do not see suggestions, check with your Asana admin to confirm AI features are toggled on in Admin Console → AI Settings.
Sharing and Embedding Your Form
A form no one can find is a form that does not get used. Asana gives you two primary distribution methods — a shareable link and an embed code — and neither requires the submitter to have an Asana account.
- Copy the shareable link — In the form builder, click “Share form” in the top-right corner. Copy the public link. This link can be shared in Slack, pinned in a team channel, added to a Notion page, or included in an email signature. Anyone with the link can submit — no Asana login required.
- Get the embed code for your intranet or website — Click “Share form” → “Embed”. Asana generates an iframe snippet. Paste this into your company intranet, a Confluence page, a SharePoint site, or any web page that accepts HTML. The form renders inline, making it frictionless for requesters who are already in those tools.
- Restrict form access if needed — For sensitive intake forms (HR, legal, finance), toggle on “Require Asana account to submit” in the form settings. This restricts submissions to authenticated Asana users in your organization.
- Test the link in an incognito browser — Always verify the form is publicly accessible by opening the link in an incognito window before distributing it. Confirm the confirmation message appears after a test submission and that the resulting task lands in the correct project section.
- Pin the form link in Slack channels where requests currently happen — This is the highest-leverage distribution move. Go to your #marketing-requests or #it-help Slack channel, pin the form link, and update the channel description. You will see a rapid shift in how requests arrive.
Connecting Forms to Approval Workflows with Rules
Form submission is not the end of the intake workflow — it is the beginning. The real operational value comes from what happens next: automatic routing, assignment, and approval triggering based on what the requester submitted. This is where Asana automation rules integrate with Forms to create a zero-manual-triage intake pipeline.
- Open the Rules panel in your intake project — Click Customize → Rules → + Add Rule. You can build custom rules or use templates.
- Set the trigger to “Task added to project” — Since every form submission creates a task, this trigger fires on every new intake. You can further scope it with conditions.
- Add a condition based on a form field value — Click “Add condition” and select the custom field that maps to your “Request Type” or “Priority” question.
- Set the action: assign to a specific person or team — Use “Assign task” as the action and select the appropriate assignee for each request type.
- Add an approval step using the “Assign approver” action — For requests that require sign-off before work begins, add an “Add approver” action. The assigned approver receives a notification and sees an Approve/Reject button on the task.
- Set a due date rule for time-sensitive requests — Add a “Set due date” action that automatically assigns a due date based on a relative offset (e.g., “3 business days from task creation”).
- Test the full pipeline end-to-end — Submit a test entry through the live form, then watch the resulting task. Check the Rules Activity Log in the project to confirm rules fired as expected.
For teams managing capacity across multiple concurrent projects, the Asana workload management guide covers how to ensure auto-assigned intake tasks do not overload individual team members.
Full documentation on building Rules in Asana is available at Asana’s Rules Help Center.
Real-World Intake Use Cases: Ops, Marketing, and IT
The abstract setup steps above become concrete when you see how different teams apply them. Here are three configurations that consistently deliver the highest ROI from Asana Forms.
Marketing Operations — Creative Request Intake: A marketing ops team replaces ad hoc Slack requests with a single “Creative Request” form. Required fields: Campaign Name, Asset Type (dropdown: Social, Display, Video, Print), Dimensions, Brand Guidelines Reference (file upload), Copy (paragraph text), Deadline (date picker), and Priority (dropdown: Standard, Rush). Conditional logic reveals a “Rush Justification” field only when Priority equals Rush. Rules auto-assign based on asset type and flag Rush requests to the creative director for immediate review. Monthly request volume tracked via a dashboard — team reports 40% reduction in back-and-forth.
IT Helpdesk — Support Ticket Intake: IT teams use Forms to replace email-based ticket submission. The form captures: Issue Type (Hardware, Software, Access, Network), Description (paragraph), Affected User(s) (text), Urgency (Critical, High, Normal), and Attachments (screenshot of error). Conditional logic reveals a “Number of Users Affected” field only when Issue Type is Network. Rules route Critical tickets to a senior engineer immediately and create a follow-up task for status updates at 24 hours.
Operations — Vendor Onboarding Intake: An ops team standardizes vendor onboarding by capturing: Vendor Name, Services Provided, Contract Value (number), Contract Start Date (date picker), Primary Contact (text), and W-9 Upload (file attachment). A Rule triggers an approval workflow that routes to Finance and Legal in sequence — Finance approves first, then Legal, using Asana’s multi-step approval capability.
Best Practices and Common Mistakes to Avoid
Keep the form under 10 questions for standard requests. Form completion rates drop sharply above 10 questions. Use conditional logic to show extended question sets only for complex request types.
Map every question to a custom field. Unmapped questions land in a freeform “Form responses” section on the task, which means they cannot be filtered, sorted, or reported on. Take the extra 30 seconds to map each question to its corresponding custom field.
Create a dedicated intake project, not a section in an active project. Intake submissions should land in a clean triage space. Use Rules to move approved/triaged tasks to the appropriate active project after intake review.
Audit your form quarterly. Request types evolve. A form built in Q1 may have options that no longer reflect your strategy by Q3. Set a calendar reminder to review form fields every quarter.
Do not rely on the confirmation message as your SLA communication. The confirmation message is a good start, but send a formal acknowledgment from your project management tool or a connected Slack automation so requesters have a record with an actual timeline.
Common mistake — building the form before the project structure. Every form submission creates a task in your project. If your project’s sections, custom fields, and Rules are not configured before you publish the form, the first wave of submissions will require manual cleanup. Always build the project first, form second.
Verdict
Asana Forms for project intake is one of the highest-leverage features in the Asana platform — and one of the most underutilized. For any team processing more than 15 requests per month across any function (marketing, IT, ops, HR), a properly configured intake form with conditional logic, custom field mapping, and Rules-based routing will pay back its setup time within the first two weeks of use. The 2026 AI field suggestion feature meaningfully accelerates setup for new forms. The one honest limitation: conditional logic requires Business plan or above, which is a real cost consideration for smaller teams. Start with one intake form for your highest-volume request type, wire up two or three automation rules, and measure the reduction in manual triage time over 30 days. The data will make the case for expanding it across your organization.
Frequently Asked Questions
Can external users (outside my organization) submit Asana Forms?
Yes. By default, Asana Forms are publicly accessible via a shareable link — no Asana account is required to submit. This makes them ideal for collecting requests from external clients, vendors, or freelancers. If you need to restrict submissions to internal Asana users only, toggle on “Require Asana account to submit” in the form settings. This is recommended for sensitive intake processes like HR requests or financial approvals where you need a verified submitter identity.
How many forms can I attach to one Asana project?
You can attach multiple forms to a single project, and each form can route submissions to a different section within that project. This is useful when a single intake project handles multiple request types — for example, a Marketing Requests project might have one form for Creative Requests and a separate form for Campaign Briefs. Each form maintains its own question set, field mapping, and sharing link, but all submissions land in the same project for unified tracking and reporting.
Do Asana Form responses update existing tasks, or always create new ones?
Every form submission creates a brand-new task — forms do not update existing tasks. If you want to collect additional information on an existing task, you would need a separate form and then manually link or merge the resulting task. For ongoing updates to existing tasks, Asana’s native task comments, custom fields, and approvals are the right mechanism.
Can I use Asana Forms to replace my Jira service desk or ticketing tool?
For small-to-medium request volumes with straightforward routing, yes — Asana Forms combined with Rules can replicate the core functionality of a basic service desk: structured intake, automatic assignment, SLA-based due dates, and approval workflows. For high-volume IT environments requiring SLA reporting, automated escalation chains, or deep integration with monitoring tools, a dedicated ITSM tool remains the better choice. The sweet spot for Asana Forms as a ticketing replacement is non-IT teams — marketing ops, creative services, and operations — where Jira or ServiceNow is overkill but email intake is clearly broken.
What happens to form submissions if I change a custom field after the form is live?
Changing a custom field that is mapped to an active form question can disrupt that mapping. If you rename a dropdown option in a custom field, future form submissions will reflect the new option values. If you delete a custom field, the form question loses its mapping and responses will fall back to the freeform “Form responses” section on tasks. Best practice: before modifying a custom field that is mapped to a live form, open the form builder and verify the mapping is still intact after the change.