Skip to content
-
Subscribe to our newsletter & never miss our best posts. Subscribe Now!
Work Management Hub Work Management Hub

Expert Reviews, Comparisons & Guides for Smartsheet, Monday.com, Asana, ClickUp & More

Work Management Hub Work Management Hub

Expert Reviews, Comparisons & Guides for Smartsheet, Monday.com, Asana, ClickUp & More

  • Airtable
  • Asana
  • ClickUp
  • Jira
  • Monday.com
  • Notion
  • Smartsheet
  • Wrike
  • About
  • Contact
  • Airtable
  • Asana
  • ClickUp
  • Jira
  • Monday.com
  • Notion
  • Smartsheet
  • Wrike
  • About
  • Contact
Close

Search

  • https://www.facebook.com/
  • https://twitter.com/
  • https://t.me/
  • https://www.instagram.com/
  • https://youtube.com/
ClickUpHow-To Guides

How to Use ClickUp Whiteboards for Visual Project Planning in 2026

By Shaik KB
May 23, 2026 20 Min Read
0

⚡ Key Takeaways

  • ClickUp Whiteboards give teams a real-time multiplayer canvas — shapes, sticky notes, freehand drawing, connectors, and image embedding — that lives inside the same workspace as your tasks, not in a separate tool.
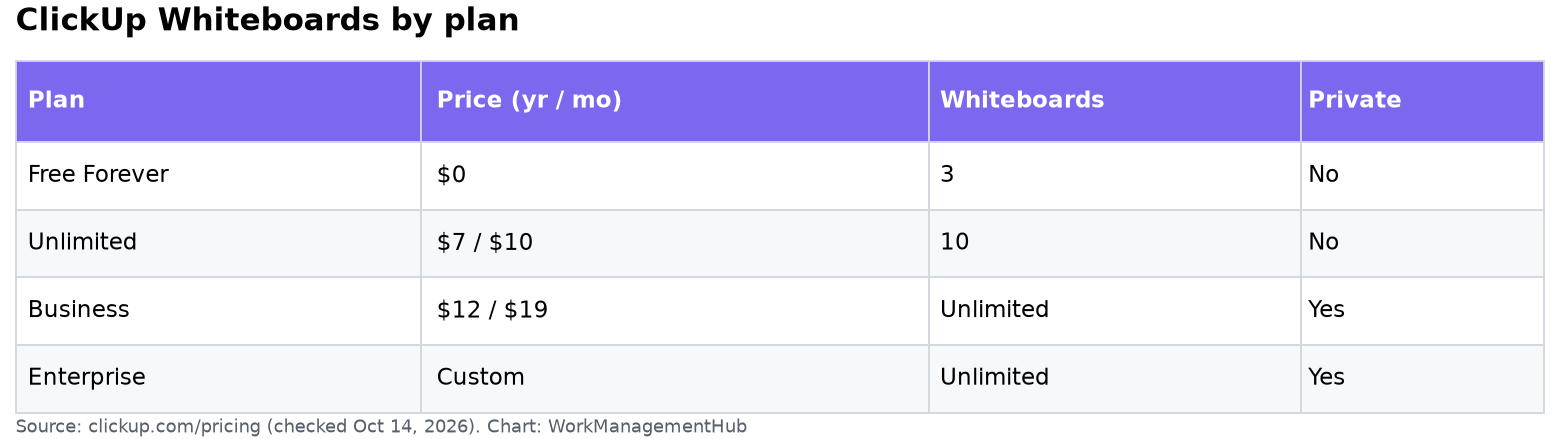
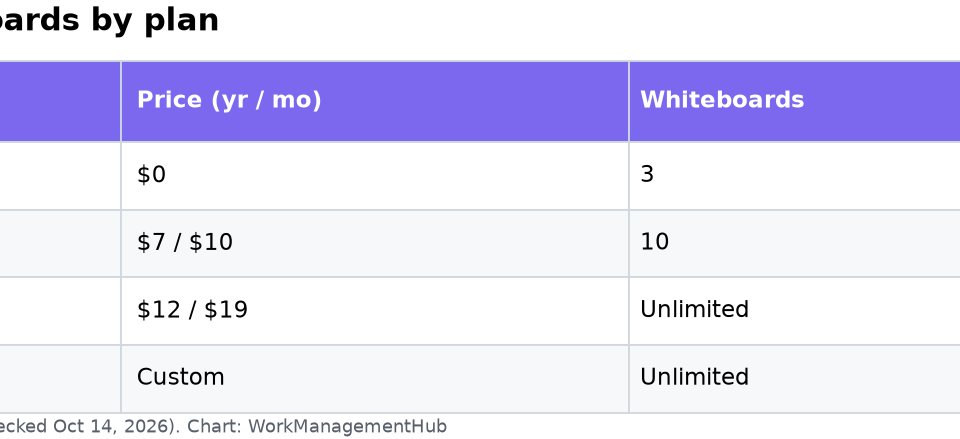
  • Free Forever plans are capped at 3 whiteboards per workspace; Unlimited plans allow 10; Business ($12/user/month billed annually) and above unlock unlimited whiteboards.
  • Any sticky note, shape, or text block on a whiteboard converts to a real ClickUp task in one click — inheriting the assignee and due date you set on the canvas — so brainstorms go directly into execution without copy-paste.
  • Built-in ClickUp AI can generate visual structures from a text prompt and convert brainstorm content into full project hierarchies, collapsing the gap between ideation and planning.
  • Whiteboards export to PDF and embed directly into ClickUp Docs, making them a living artifact in project documentation rather than a one-off diagram that gets lost in a file share.
Quick Answer:

To use ClickUp Whiteboards, open any Space or Folder, click + View, and select Whiteboard. Use shapes, sticky notes, and connectors to map your project visually, then right-click any element and choose Convert to Task to push it directly into your ClickUp workflow with assignee and due date intact.

Table of Contents

  1. Why ClickUp Whiteboards Change How Teams Plan Projects
  2. Plan Access and Whiteboard Limits: What You Get at Each Tier
  3. How to Create Your First ClickUp Whiteboard
  4. Core Whiteboard Tools and What Each One Is For
  5. Four Visual Planning Frameworks You Can Build on a Whiteboard
  6. Converting Whiteboard Items to ClickUp Tasks
  7. Using ClickUp AI to Generate and Expand Whiteboards
  8. Real-Time Collaboration: Cursor Presence and Multiplayer Editing
  9. Exporting to PDF and Embedding in ClickUp Docs
  10. Real Team Use Cases by Size and Department
  11. Verdict
  12. Frequently Asked Questions

How to Use ClickUp Whiteboards for Visual Project Planning in 2026

The most expensive part of any project is the gap between what the team imagined in a kickoff meeting and what actually got built. That gap is almost always a communication failure, and it almost always starts on a whiteboard — or rather, the absence of one that everyone can see, edit, and act on. ClickUp Whiteboards close that gap by putting the visual planning canvas inside the same system where work gets done, so a sticky note from Tuesday’s brainstorm can become a tasked, assigned, and due-dated deliverable by Tuesday afternoon without any copy-paste, screenshots, or “can you email me that Miro link?”

This guide is a complete operational walkthrough — plan requirements, tool-by-tool breakdown, every major planning framework you can build, the task conversion workflow that makes whiteboards worth using, and the AI generation features that compress a two-hour planning session into fifteen minutes. Whether you are a five-person startup or a forty-person marketing department, the playbook here applies directly to your next planning cycle.

Why ClickUp Whiteboards Change How Teams Plan Projects

Most teams use two separate categories of software: planning tools (whiteboards, mind-mapping apps, slide decks) and execution tools (task managers, project trackers). The handoff between them is where context dies. A beautifully structured brainstorm in Miro becomes a text-only Jira ticket that loses the relational thinking, the visual hierarchy, and the “we decided X because of Y” reasoning that informed it.

ClickUp Whiteboards collapse this two-tool model into one. The canvas is not a separate app you link to — it is a view type inside your existing ClickUp Space or Folder, with full access to your task data, members, assignees, and due dates. When you draw a flowchart on a ClickUp Whiteboard, you are not producing a diagram that lives outside your project management system. You are producing a diagram that is your project management system, with the ability to convert any node into a task at any moment.

For teams that already live in ClickUp, this means planning happens in context. You can reference existing tasks, link whiteboards to ClickUp Docs, and let ClickUp Brain AI help you expand a rough idea into a structured plan — all without leaving your workspace. For teams evaluating the platform, the whiteboard capability is often the deciding factor over point solutions like Miro or FigJam, because it eliminates an entire category of tool and the subscription cost that comes with it.

Plan Access and Whiteboard Limits: What You Get at Each Tier

Before building your workflow around ClickUp Whiteboards, confirm your plan covers the volume of whiteboards your team needs. The limits are per workspace, not per user, which matters for larger teams sharing a single workspace.

  • Free Forever — 3 whiteboards per workspace. Sufficient for solo freelancers or very small teams running one or two projects at a time. At three whiteboards, you will need to delete old canvases to create new ones once you hit the cap.
  • Unlimited — 10 whiteboards per workspace. Better for small agencies or startups with a handful of concurrent projects, but you will hit the ceiling quickly if your team uses a whiteboard per project or per sprint.
  • Business ($12 per user per month, billed annually) — unlimited whiteboards. This is the tier where whiteboards become a genuine team-wide planning infrastructure rather than an occasional tool. At this tier there is no reason to consolidate, archive, or delete canvases based on storage pressure.
  • Business Plus and Enterprise — also unlimited whiteboards, with the additional administrative and permission controls those plans carry.

If your team is on Free Forever and hitting the 3-whiteboard cap, the practical workaround is to use one whiteboard per active project phase and archive completed phases by exporting to PDF before clearing the canvas. That workflow is covered in the export section below.

How to Create Your First ClickUp Whiteboard

Whiteboards are created as view types, which means they live inside a Space, Folder, or List — the same hierarchy as your Board, List, and Gantt views. You can also create standalone whiteboards from the sidebar if you want a canvas that is not tied to a specific project hierarchy.

  1. Open a Space or Folder — navigate to the Space or Folder where you want the whiteboard to live using the left sidebar. If you want a project-level canvas, open the Folder for that project. If you want a workspace-level brainstorm canvas, navigate to a top-level Space.
  2. Click + View in the view tab bar — the view tab bar runs horizontally at the top of the content area. The + View button sits at the right end of your existing view tabs.
  3. Select Whiteboard from the view picker — the picker panel slides open on the right side. Scroll down or search for “Whiteboard” in the search field at the top of the picker.
  4. Name your whiteboard — use a specific, project-anchored name. “Q3 Campaign Planning” or “API Integration Flow — v1” is more useful than “Whiteboard 1” when you have multiple canvases in a workspace. The name appears in the view tab bar and in any Docs where you embed the whiteboard.
  5. Click Add View — the whiteboard canvas opens immediately. You will see an infinite-scroll canvas with a floating toolbar on the left side and a zoom/pan control in the bottom right.
  6. Set canvas permissions if needed — click the Share button in the top-right corner to control who can view or edit the whiteboard. By default, whiteboard access inherits from the Space or Folder permissions already set for the workspace.

Alternatively, you can create a standalone whiteboard from the left sidebar by clicking the + icon next to “Whiteboards” in the sidebar navigation and selecting New Whiteboard. Standalone whiteboards are accessible from the Whiteboards hub and are not tied to a specific Space or Folder view, making them useful for company-wide planning sessions or cross-department brainstorms that do not belong to a single project. See the official ClickUp Whiteboards introduction for a full breakdown of standalone versus view-linked whiteboards.

Core Whiteboard Tools and What Each One Is For

The ClickUp Whiteboard toolbar gives you a focused set of planning primitives. Every tool has a specific use case in project planning; understanding what each one is optimized for prevents the most common mistake teams make, which is using the wrong element type and then wondering why the canvas looks chaotic.

  • Shapes — rectangles, circles, diamonds, and other geometric shapes are the backbone of flowcharts, org charts, and process diagrams. Use shapes when you need to represent a stage, decision, or system component that has a defined role in a structured diagram. Shapes can be labeled with text, color-coded by category, and connected with connector lines.
  • Connectors — directional lines and arrows that link shapes or sticky notes. In flowcharts, connectors represent the sequence of steps. In system architecture diagrams, they show data flow. In org charts, they show reporting lines. Connectors in ClickUp Whiteboards auto-route around other elements, so repositioning a shape does not break the connector.
  • Sticky Notes — color-coded squares designed for brainstorming, affinity mapping, and kanban-style layouts. Sticky notes are the fastest element to create (double-click the canvas to place one) and the most natural candidate for task conversion. Use sticky notes when content is still in draft or brainstorm state and shapes when it is finalized into a process or structure.
  • Text Blocks — free-floating text for labels, section headers, annotations, and context notes. Text blocks do not have a border or fill by default, making them ideal for labeling sections of the canvas without adding visual clutter. They can also be converted to tasks, which is useful for high-level planning items that are more like project objectives than execution steps.
  • Freehand Drawing — a pressure-sensitive pen tool for sketching rough diagrams, circling problem areas, or annotating over embedded images. Most useful in tablet or touchscreen environments, but also valuable on desktop for quickly circling a cluster of sticky notes during a review session (“these three items belong together — let’s make this a task group”).
  • Image Embedding — drop in screenshots, mockups, reference photos, or exported charts directly onto the canvas. Images can be resized, repositioned, and annotated with freehand drawing or sticky note overlays. This is particularly powerful for UX teams who want to plan feature work directly over a wireframe, or for marketing teams building campaign plans around visual references.

Four Visual Planning Frameworks You Can Build on a Whiteboard

The canvas is flexible enough to support any visual structure, but four frameworks account for the majority of high-value planning work teams actually do in ClickUp Whiteboards. Each one maps naturally to the tool’s element types and the task conversion workflow that follows.

Mind Maps for Scope Discovery

Start with a central shape or text block representing the project objective. Branch outward with connector lines to sub-topics, then to action items. Mind maps on a ClickUp Whiteboard are particularly effective for scope discovery sessions because every leaf node — every granular action item — can be converted to a task the moment the session ends, with assignees and due dates set right on the canvas before conversion. There is no post-session transcription step.

Flowcharts for Process and Approval Workflows

Use shapes (rectangles for process steps, diamonds for decisions) and directional connectors to map approval chains, onboarding sequences, or client delivery workflows. Flowcharts built in ClickUp Whiteboards can be embedded in ClickUp Docs to serve as the visual SOP companion to a written procedure. When you update the whiteboard, the embedded version in the Doc reflects the change automatically. Pair this with ClickUp automations to trigger actions when a task moves from one flowchart stage to the next.

Kanban-Style Sticky Note Layouts for Sprint Planning

Arrange sticky notes in vertical swim lanes — “Backlog,” “This Sprint,” “In Progress,” “Done” — for a low-friction sprint planning session. Color-code sticky notes by team member or priority. The advantage of doing sprint planning on a whiteboard rather than directly in the Board view is that the whiteboard stage is explicitly exploratory: you can move items around, cluster them, and debate them visually before they become formal tasks. Once the plan is finalized, convert the “This Sprint” column sticky notes to tasks in batch and they land in the Board view ready to track.

Org Charts for Team Structure and RACI Mapping

Use hierarchical shapes and connectors to build reporting structures or RACI (Responsible, Accountable, Consulted, Informed) matrices for complex cross-functional projects. Org charts on a ClickUp Whiteboard are more useful than static slide deck versions because they can be updated in real time as team structure changes and shared via a persistent link rather than a versioned file attachment.

Converting Whiteboard Items to ClickUp Tasks

This is the feature that makes ClickUp Whiteboards worth the investment over standalone whiteboarding tools. The ability to convert any canvas element to a real ClickUp task — with assignee, due date, and List placement — eliminates the most friction-heavy part of the planning process: the post-session transcription of decisions into the task management system.

  1. Select the element you want to convert — click any sticky note, shape, or text block on the canvas. A selection handle appears around the element.
  2. Right-click to open the context menu — the context menu appears with element-level options. Look for Convert to Task in the menu list. Alternatively, click the three-dot menu icon (ellipsis) that appears in the element’s floating action bar when it is selected.
  3. Choose the destination List — a picker dialog opens. Select the Space, Folder, and List where you want the task to live. This is where the whiteboard’s position in the project hierarchy pays off: if your whiteboard is inside the “Q3 Campaign” Folder, that Folder’s Lists are pre-surfaced in the picker for fast selection.
  4. Set assignee and due date before confirming — the conversion dialog lets you assign the task and set a due date directly. Doing this in the dialog, rather than after the task is created, means the task lands in the List already actionable. Do not skip this step — tasks created without an assignee and due date are planning theater, not execution.
  5. Click Convert — the whiteboard element now has a task icon badge on it, indicating it is linked to a real ClickUp task. Clicking that badge from the canvas opens the task detail panel without leaving the whiteboard view.
  6. Repeat for batch conversion — hold Shift and click multiple elements to select them all, then right-click and choose Convert to Tasks to process a batch. This is the workflow for converting an entire “This Sprint” swim lane to tasks in one action at the end of a sprint planning session.

Once an element is converted, it stays linked. If the task is updated — the due date changes, it gets reassigned, it moves to a different status — the badge on the whiteboard reflects the live task data. This bidirectional connection is what separates ClickUp Whiteboards from a static diagram tool: the canvas is always a live representation of where your project stands, not a snapshot of where it was the day you built it.

For teams that want to automate what happens after a task is created from a whiteboard element — for instance, triggering a notification to a Slack channel or auto-assigning a template checklist — see our guide to setting up ClickUp automations in 2026.

Using ClickUp AI to Generate and Expand Whiteboards

The AI integration in ClickUp Whiteboards is the highest-leverage capability most teams have not yet activated. It operates in two modes: generating visual structures from a text prompt, and converting existing brainstorm content on the canvas into a structured project hierarchy.

Generating a Whiteboard from a Text Prompt

  1. Open an empty whiteboard — or navigate to a section of the canvas with available space. The AI generation feature places its output at the cursor position on the canvas.
  2. Click the AI button in the whiteboard toolbar — in ClickUp 4.0, the AI button appears as a sparkle icon in the left-side floating toolbar. Clicking it opens the AI prompt panel.
  3. Type a natural language prompt describing what you want — be specific. “Generate a mind map for a B2B SaaS product launch with branches for go-to-market, technical readiness, content, and sales enablement” produces a more useful output than “product launch plan.” The AI uses your prompt to construct a multi-node visual structure with labeled shapes and connectors already in place.
  4. Review the generated structure — the AI places the generated whiteboard content on the canvas. Every node is a full whiteboard element, which means you can move, resize, edit, and delete individual nodes immediately after generation. Nothing is locked.
  5. Refine with follow-up prompts — click the AI button again and ask it to expand a specific branch, add a decision point, or reorganize the structure. The AI reads the existing canvas and makes targeted edits rather than replacing everything.

For marketing teams specifically, this workflow collapses a campaign planning session from two hours to twenty minutes. A prompt like “generate a campaign launch flowchart for a product email series with stages for audience segmentation, copy drafting, design review, QA, and send schedule” produces a working planning canvas that the team edits rather than builds from scratch. For more on AI-powered project planning in ClickUp, our guide to ClickUp Brain Autopilot agents covers the full scope of what the AI layer can do across your workspace.

Converting Brainstorm Content to a Project Structure

After a freeform brainstorm session — where the canvas is filled with scattered sticky notes, rough connector lines, and freehand annotations — ClickUp AI can analyze the content and propose a structured project hierarchy. Select a cluster of sticky notes, invoke the AI from the context menu, and choose Convert to Project Structure. The AI groups related items, suggests a task hierarchy, and proposes which elements should become parent tasks versus subtasks. You review the proposed structure, edit the groupings, and then convert to tasks with the standard task conversion workflow.

This feature effectively turns a chaotic ideation session into an organized project plan without a human moderator spending an hour after the session cleaning up notes. It is most valuable for discovery workshops, retrospectives, and early-stage project scoping sessions where the raw material is present but unstructured.

Real-Time Collaboration: Cursor Presence and Multiplayer Editing

ClickUp Whiteboards support real-time multiplayer editing, which means multiple team members can be on the same canvas simultaneously, each making changes that appear instantly for everyone else. This is the standard for modern whiteboarding tools, but ClickUp’s implementation has one feature worth calling out specifically: cursor presence.

When a teammate is active on the whiteboard, you see their cursor moving in real time, labeled with their name. This is not just a cosmetic feature. In a live planning session, cursor presence tells you who is looking at what part of the canvas, which prevents the collision where two people try to edit the same sticky note at the same time and only one edit survives. It also surfaces where attention is concentrated during a review — if five cursors are clustered around the same section of the flowchart, that section probably needs more discussion.

For distributed teams running planning sessions across time zones, the combination of cursor presence and real-time editing means the whiteboard session can replace a synchronous meeting. A team lead builds the initial framework, drops a Loom or voice note on the canvas explaining each section, and team members iterate asynchronously — and the result is the same planning artifact that a synchronous session would have produced, without scheduling a meeting across a 9-hour time zone gap.

To invite external stakeholders — a client, a contractor, or a cross-company partner — to a whiteboard session without giving them access to the broader workspace, use the Share → Invite with Link option and set the permission to Comment only or View only. Commenters can add sticky notes and text but cannot edit existing elements or convert items to tasks.

Exporting to PDF and Embedding in ClickUp Docs

A whiteboard that only lives on a canvas is useful during planning but becomes an orphan artifact by the time the project moves into execution. ClickUp solves this with two output options: PDF export for archiving and sharing, and Docs embedding for live project documentation.

Exporting a Whiteboard to PDF

  1. Open the whiteboard you want to export — make sure the canvas is in the final state you want to capture. The PDF export is a snapshot; it does not maintain live links.
  2. Click the three-dot menu in the top-right corner of the whiteboard view — this opens the whiteboard settings menu with options including Rename, Duplicate, and Export.
  3. Select Export — then choose Export as PDF from the sub-menu. ClickUp renders the entire canvas content at the current zoom level and packages it as a PDF file.
  4. Save or share the PDF — the file downloads to your local machine. Attach it to the project’s ClickUp task, upload it to the Docs attachment panel, or share it directly with a stakeholder who does not have ClickUp access.

PDF export is the right workflow for Free Forever and Unlimited plan teams hitting their whiteboard limits. Export the completed whiteboard, clear the canvas, and start the next project — the PDF serves as the permanent record while the canvas is recycled.

Embedding a Whiteboard in ClickUp Docs

For teams using ClickUp Docs as their project documentation hub, whiteboard embedding is the most powerful integration between the two features. An embedded whiteboard in a Doc is not a static image — it is a live view of the current canvas state, updated automatically whenever the whiteboard changes.

  1. Open the ClickUp Doc where you want to embed the whiteboard — navigate to the Doc in the Docs hub or via the sidebar.
  2. Type / in the Doc body — this opens the slash command menu. Type “whiteboard” or scroll to find Embed Whiteboard in the command list.
  3. Select the whiteboard from the picker — a search panel opens showing your available whiteboards. Select the one you want to embed. The whiteboard renders inline in the Doc as an interactive, scrollable canvas panel.
  4. Resize the embedded panel as needed — drag the bottom edge of the embedded whiteboard block to adjust its height in the Doc. Wider panel = more canvas visible without scrolling inside the embed.

The practical use case for this is project kickoff documentation. Your kickoff Doc includes the project brief, team roster, timeline summary — and an embedded whiteboard showing the scope map or process flow agreed to in the planning session. Anyone reading the Doc at any point in the project sees the current state of the whiteboard, not a stale screenshot from week one. For marketing teams managing content calendars and campaign workflows, see our breakdown of ClickUp for marketing teams in 2026 for whiteboard workflows specific to content and campaign planning.

Real Team Use Cases by Size and Department

The best indicator of whether a tool will stick is whether it fits the actual shape of the work. Here is how different team profiles are using ClickUp Whiteboards in production environments, not in demos.

5-Person Startup on the Free Plan

A five-person team with 3 whiteboard slots typically runs one for roadmap planning, one for the current sprint brainstorm, and one for a permanent process diagram (onboarding flow or client delivery workflow). The sprint brainstorm whiteboard gets cleared at the end of each sprint after exporting to PDF, making room for the next cycle. Task conversion is used heavily — every sticky note from sprint planning becomes a task before the session ends. ClickUp AI generates the initial sprint framework from a prompt like “two-week sprint plan for a SaaS product with engineering, design, and QA swim lanes,” and the team edits from there.

15-Person Agency on the Business Plan

An agency team with unlimited whiteboards creates one canvas per client project — typically a scope map built during the kickoff call, populated collaboratively while the client is on the call. Real-time cursor presence means the client sees changes as they happen, which replaces the traditional “we’ll send you the recap notes” workflow. The scope map whiteboard is embedded in the client’s project Doc and shared via a view-only link in the client onboarding email. When scope changes mid-project, the whiteboard is updated and the embedded Doc reflects the change immediately — no version control headaches.

40-Person Marketing Team on the Business Plan

At this scale, whiteboards are used primarily for campaign planning sessions and content calendar mapping. A campaign brief becomes a whiteboard with the campaign theme at the center, branches for each channel (email, paid, organic, PR), and sticky notes for individual content pieces under each branch. Each sticky note is converted to a task assigned to the relevant channel owner. The ClickUp AI feature is used to generate initial campaign structures from a one-paragraph brief, saving the planning team approximately ninety minutes per campaign cycle. For the full framework on how marketing teams integrate whiteboards with the rest of ClickUp, see our ClickUp for marketing teams guide.

Engineering Team Running Sprint Ceremonies

Engineering teams use whiteboards for three ceremonies: sprint planning (kanban sticky note layout), retrospectives (Start/Stop/Continue columns with team-wide concurrent sticky note drops), and architecture diagramming (shapes and connectors for system design). The architecture diagram use case is particularly valuable because embedding the system diagram in the relevant ClickUp Doc means any engineer reading the technical spec can see the current architecture without switching to a separate diagramming tool. When the architecture changes, the whiteboard is updated in the same workspace where the engineering tasks live — no Confluence page update required.

🏆 Verdict

ClickUp Whiteboards are the strongest argument for consolidating your planning and execution tooling into a single platform. The one-click task conversion, live Docs embedding, and AI generation features are not marketing copy — they measurably reduce the time between ideation and execution, and they eliminate the context loss that happens every time a planning artifact lives in a separate tool from the task manager. For teams on the Business plan where whiteboards are unlimited, there is no reason to maintain a Miro or FigJam subscription alongside ClickUp. For Free and Unlimited plan teams, the whiteboard limits require a small archive discipline (export and clear), but the core workflow still delivers significant value. The one gap worth noting: ClickUp Whiteboards are not a replacement for specialized vector design tools or complex technical diagramming software — if your team produces production-quality system diagrams with dozens of element types, you will still want a dedicated tool for that specific output. For everything else that happens in planning — brainstorms, sprint ceremonies, scope maps, approval flows, org charts, and retrospectives — ClickUp Whiteboards are the right canvas.

Frequently Asked Questions

How many whiteboards can I have in ClickUp?

The number of whiteboards depends on your plan. Free Forever accounts get 3 whiteboards per workspace, Unlimited plans allow 10 per workspace, and Business ($12/user/month billed annually), Business Plus, and Enterprise plans all include unlimited whiteboards. The limits apply to the entire workspace, not per user, so a team of ten on the Unlimited plan shares a pool of 10 whiteboards across all projects.

Can I convert whiteboard items to tasks in ClickUp?

Yes. Any sticky note, shape, or text block on a ClickUp Whiteboard can be converted to a ClickUp task in one click. Right-click the element and select Convert to Task, then choose the destination List, set the assignee and due date, and confirm. The whiteboard element retains a task badge that links back to the live task, so updates to the task are reflected on the canvas. You can also select multiple elements and convert them in batch. See the ClickUp Whiteboards help documentation for a full walkthrough of the conversion workflow.

Does ClickUp Whiteboard support real-time collaboration?

Yes. ClickUp Whiteboards support real-time multiplayer editing with cursor presence, meaning you can see your teammates’ cursors labeled with their names as they move around and edit the canvas simultaneously. Changes made by any collaborator appear instantly for everyone else on the whiteboard without needing to refresh the page. External stakeholders can be invited via a share link with view-only or comment permissions, keeping sensitive workspace data protected while still allowing collaborative review sessions.

Can I use ClickUp AI on a whiteboard?

Yes. ClickUp’s built-in AI can generate visual structures on the whiteboard canvas from a text prompt — type a description of what you need (a mind map, a flowchart, a sprint planning layout) and the AI places a multi-node structure on the canvas ready to edit. The AI can also analyze existing brainstorm content on the canvas and convert it into a structured project hierarchy, grouping related sticky notes into parent tasks and subtasks. This feature is available on plans that include ClickUp Brain access. For a complete breakdown of what ClickUp AI can do across the platform, see our ClickUp Brain AI complete guide for 2026.

How do I export a ClickUp Whiteboard?

Click the three-dot menu in the top-right corner of the whiteboard view and select Export → Export as PDF. ClickUp renders the full canvas content as a PDF file that downloads to your local machine. This export captures everything visible on the canvas at the current state. For teams on plans with limited whiteboard counts, the export-and-clear workflow allows the canvas to be recycled for a new project while the PDF serves as the permanent record. Whiteboards can also be embedded live in ClickUp Docs, which provides a persistent, auto-updating view of the canvas without needing to export.

Author

Shaik KB

Follow Me
Other Articles
Previous

How to Set Up Asana Reporting and Dashboards in 2026: Complete Guide

Next

Linear vs Asana 2026: Which Is Better for Engineering Teams?

No Comment! Be the first one.

    Leave a Reply Cancel reply

    Your email address will not be published. Required fields are marked *

    Sponsored Smartsheet Expert Services – Implementation, Automation, Training
    Sponsored Power BI & Tableau Analytics – Dashboards, Reporting, Insights
    Sponsored AI Agents for Work Management – Automate Tasks, Integrate Tools

    Categories

    • Airtable (10)
    • Alternatives (12)
    • Asana (32)
    • ClickUp (38)
    • How-To Guides (125)
    • Integrations (16)
    • Jira (25)
    • Monday.com (37)
    • Notion (24)
    • Pricing Guides (11)
    • Project Management (73)
    • Smartsheet (27)
    • Tool Comparisons (42)
    • Wrike (10)

    Recent Post

    • ClickUp Notifications Not Working? 7 Fixes for the Most Common Issues in 2026
    • Notion Charts 2026: How to Add Charts to Any Database View and Visualize Your Data
    • Linear vs ClickUp 2026: Which Is Better for Product and Dev Teams?
    • How to Use Smartsheet Dynamic View in 2026: Secure Data Sharing Without Exposing Your Sheet
    • How to Use Asana Forms for Project Intake in 2026: Complete Setup Guide
    Work Management Hub

    Independent expert reviews & comparisons of work management tools — helping 50,000+ teams choose the right software.

    Tools We Cover

    • Smartsheet
    • Monday.com
    • ClickUp
    • Asana
    • Notion
    • Jira
    • Wrike
    • Airtable

    Company

    • About Us
    • Contact Us
    • Privacy Policy
    Copyright 2026 — Work Management Hub. All rights reserved. Blogsy WordPress Theme