How to Set Up Smartsheet Control Center in 2026: Automate Project Provisioning for Enterprise Teams
- Smartsheet Control Center is gated behind the Advance bundle or Advanced Work Management package — it is not included in standard Business plans and requires a separate purchase starting at roughly $7,000–$15,000/year for 30 configurations.
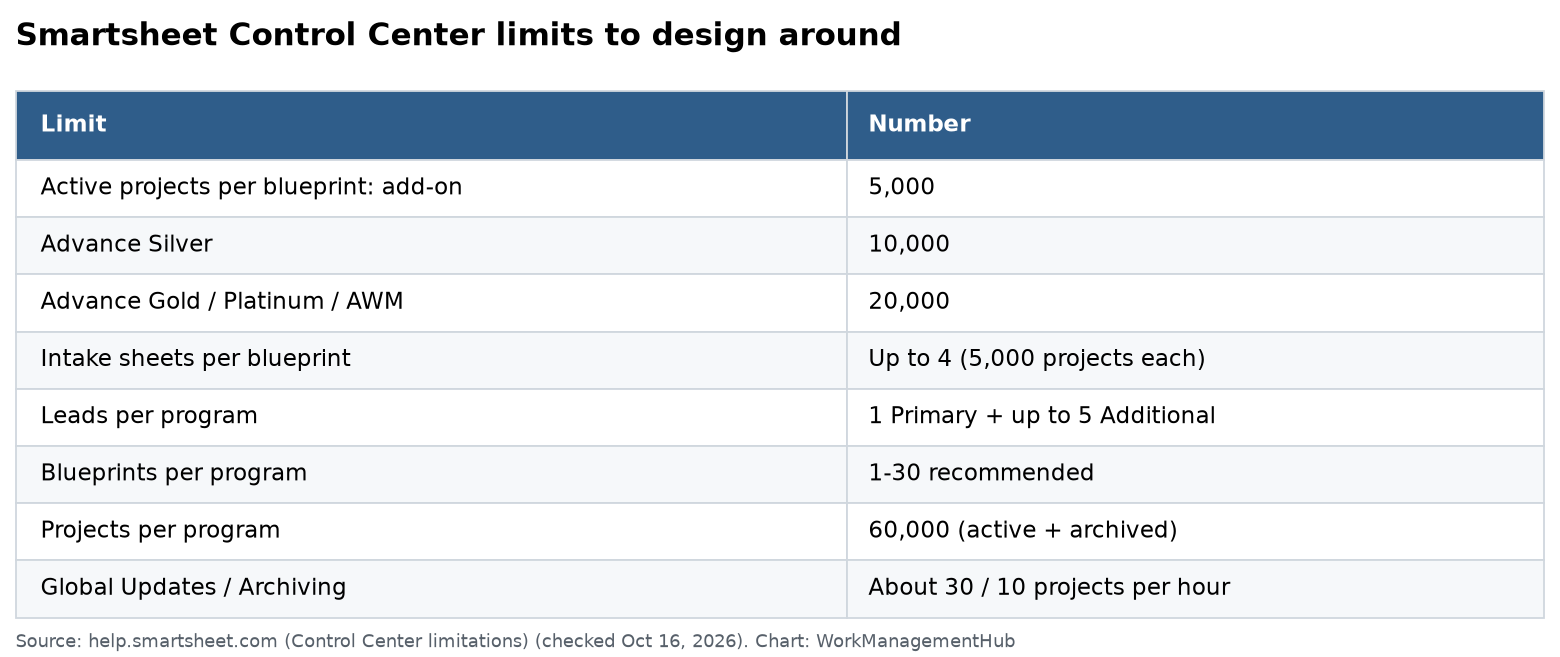
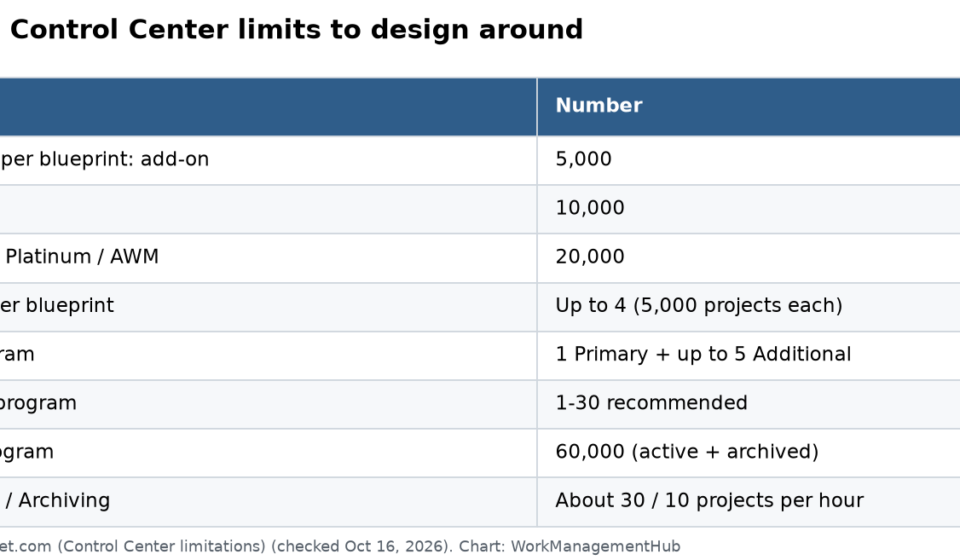
- Each blueprint supports a hard ceiling of 5,000 active provisioned projects per intake sheet, 50 reports per blueprint, and up to 90 WorkApps pages — limits that must drive your architecture before you build a single template.
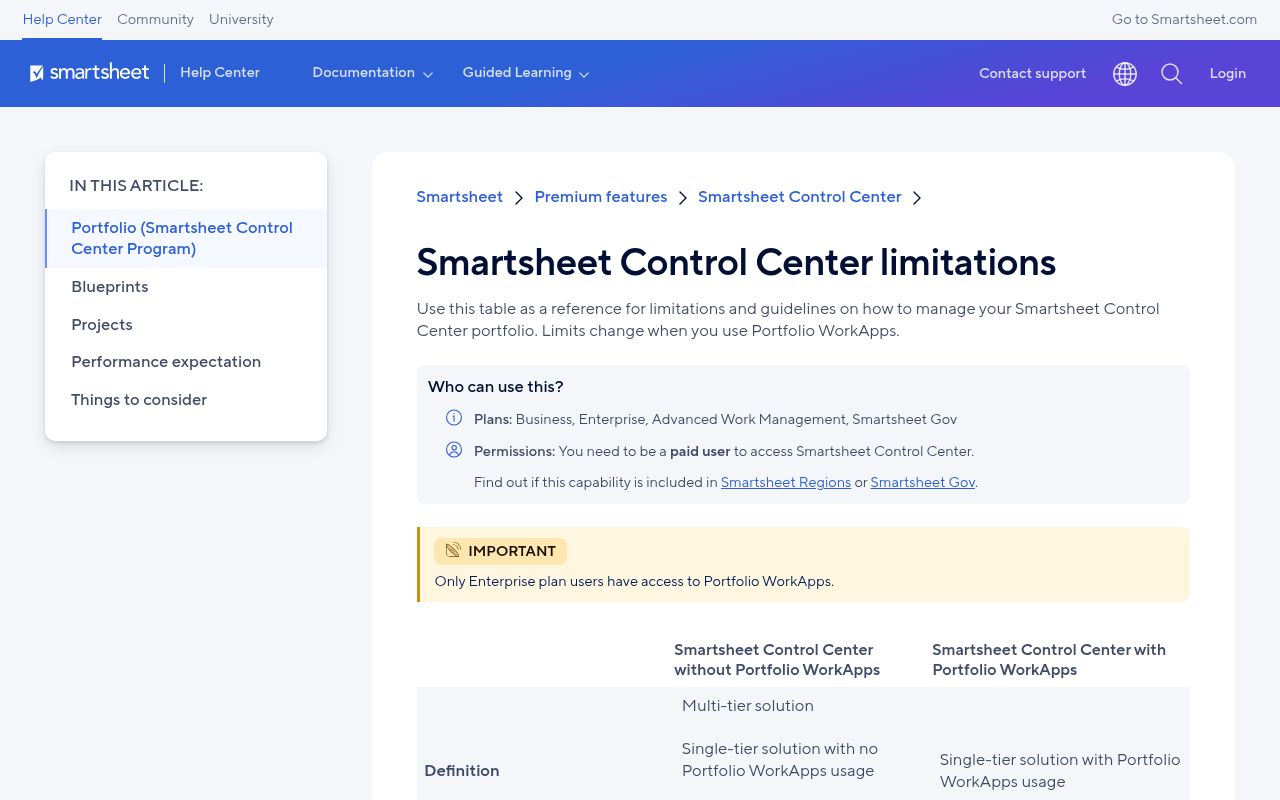
- Automated provisioning is triggered by an approval-column value on an intake sheet; the automation is configured under Automations > New Automation inside Control Center, not inside standard Smartsheet automations.
- On Enterprise plans, a Portfolio WorkApp is created automatically for every new program — understanding this behavior prevents duplicate workspace clutter.
- Blueprint architecture decisions — single vs. multiple blueprints, how many intake sheets, report design — made early save hundreds of hours of rework at scale.
To complete a smartsheet control center setup, navigate to the Control Center app from the Smartsheet launcher, create a blueprint with a template set and an intake sheet, configure an approval-column trigger under Automations > New Automation, and publish the blueprint. Provisioning then fires automatically whenever the approval column is updated on the intake sheet.
- What Is Smartsheet Control Center (and Who Actually Needs It)?
- Plan Requirements and Licensing: The Gate Most Guides Skip
- Hard Capacity Limits You Must Plan Around
- Blueprint Architecture: Single vs. Multiple Blueprints
- Smartsheet Control Center Setup: Step-by-Step
- How to Configure Automated Provisioning
- The Portfolio WorkApp: What Gets Created Automatically
- Smartsheet Control Center Setup: Advanced Configuration Tips
- Verdict
- Frequently Asked Questions
How to Set Up Smartsheet Control Center in 2026: Automate Project Provisioning for Enterprise Teams
If your PMO is manually creating project workspaces, copying templates, and updating portfolio rollup sheets every time a new engagement kicks off, you are leaving significant operational efficiency on the table. Smartsheet Control Center setup is the solution Smartsheet built specifically for this problem — and after implementing it for enterprise clients across professional services, IT, and construction, I can tell you that it is both more powerful and more complex than any existing guide suggests.
This walkthrough covers every step of the smartsheet control center setup process: licensing reality checks, hard capacity limits that will bite you if you ignore them, blueprint architecture decisions, and the exact provisioning automation configuration that makes the whole system run without human intervention.
What Is Smartsheet Control Center (and Who Actually Needs It)?
Smartsheet Control Center is a project provisioning engine that lives on top of your standard Smartsheet environment. Its core value proposition: when a new project, client engagement, or initiative is approved, Control Center automatically generates a complete, standardized workspace — sheets, reports, dashboards, cross-sheet formulas, folder structure, and sharing permissions — from a master blueprint, with zero manual assembly.
For organizations running fewer than 20 simultaneous projects, the overhead of configuring Control Center likely exceeds its benefit. But once you cross into territory where project managers are spending meaningful time on workspace setup rather than actual project management — typically 30+ active projects at any moment — Control Center delivers measurable ROI. One client reduced new-project setup time from 4 hours to under 8 minutes after implementation. At 60 project launches per year, that is 234 hours returned to the business.
Control Center is purpose-built for: professional services firms managing client delivery at scale, IT departments with repeatable implementation or onboarding workflows, construction and facilities teams running parallel project portfolios, marketing operations teams managing campaign launches across business units, and any enterprise PMO that needs consistent project structure enforced across hundreds of PMs.
It integrates tightly with Smartsheet WorkApps and Smartsheet resource management to create a complete project delivery ecosystem rather than just a document store.
Plan Requirements and Licensing: The Gate Most Guides Skip
Here is the piece of information that saves you from wasting two weeks configuring something you cannot actually use: Smartsheet Control Center setup requires the Advance bundle or Advanced Work Management package — it is not included in standard Business or Pro plans.
To access Control Center, your organization needs one of the following:
- Smartsheet Advance bundle — starts at approximately $7,000–$15,000/year for 30 blueprint configurations.
- Advanced Work Management package — Smartsheet’s premium bundled offering that includes Control Center alongside Resource Management, Dynamic View, Data Shuttle, and other add-ons.
- Enterprise plan with the Advance add-on — some large Enterprise agreements include Control Center as part of a negotiated package. Verify your contract explicitly before assuming it is included.
Standard Business plan subscribers cannot access Control Center. If you log in and do not see the Control Center icon in the application launcher grid, your plan does not include it. See Smartsheet’s official Control Center product page for current pricing.
Hard Capacity Limits You Must Plan Around
Every implementation guide glosses over the system limits that will force painful architectural rework if you hit them mid-deployment. Burn these numbers into your planning process before you design a single blueprint:
| Limit | Value | Practical Implication |
|---|---|---|
| Active provisioned projects per intake sheet | 5,000 | High-volume transactional workflows can approach this within 18 months |
| Maximum intake sheets per blueprint | 4 | Maximum theoretical throughput per blueprint is 20,000 active projects |
| Reports per blueprint | 50 | Design report architecture carefully; portfolio-level rollup reports count against this limit |
| WorkApps pages per blueprint | 90 | Each provisioned project WorkApp counts; aggressive design hits this faster than expected |
The 50-report limit is the one that catches enterprise teams by surprise. If your blueprint template includes 8 reports per project, you are at capacity with just 6 provisioned projects before portfolio-level reporting is even considered. Trim project-level reports to the absolute minimum and use cross-sheet formulas with a single consolidated report wherever possible.
Blueprint Architecture: Single vs. Multiple Blueprints
The most consequential design decision in any smartsheet control center setup: how many blueprints to create.
Use a single blueprint when: all project types share 80%+ of the same template structure, variation can be handled with conditional column logic, your total expected active projects stays well under 20,000, and you have a single PMO owning blueprint maintenance.
Use multiple blueprints when: project types have fundamentally different template structures (construction vs. IT vs. marketing campaigns), different business units need separate governance, you need more than 4 intake sheets, or report structures differ enough that a shared 50-report limit creates conflicts.
A practical rule: if you would build these as separate Smartsheet templates without Control Center, they should be separate blueprints with Control Center.
Smartsheet Control Center Setup: Step-by-Step
Before beginning, confirm you have System Administrator access in Smartsheet and that your account has the Advance bundle active. You will also need your blueprint template sheets and folder structure built in Smartsheet before you create the blueprint in Control Center.
Phase 1: Prepare Your Template Assets
- Create a dedicated Template folder in your Smartsheet workspace — name it clearly (e.g., “CC Blueprint Templates — [Program Name]”). This folder will hold every sheet, report, and dashboard that Control Center copies when provisioning a new project.
- Build your project template sheets — build every sheet the provisioned project workspace will need (project plan, RAID log, budget tracker, status report) as fully-formatted templates with column structures, conditional formatting, and cross-sheet formula references stubbed out.
- Build your blueprint-level (global) sheets — portfolio summary, resource allocation rollup, executive dashboard source sheet. These are not copied per project; they aggregate data across all provisioned projects.
- Set up cross-sheet formula references — use cell-linking placeholders in your template sheets that Control Center will remap to the correct provisioned-project sheets at provisioning time.
- Create your intake sheet — needs at minimum: a project name column, metadata columns (client name, project type, budget), and an approval column (checkbox or dropdown) that will serve as the provisioning trigger.
Phase 2: Access Control Center and Create a New Blueprint
- Open the application launcher — click the grid/waffle icon in the top-left corner of Smartsheet to open the launcher panel.
- Click “Control Center” to open the Control Center management interface in a new tab.
- Click “New Blueprint” in the upper-right corner of the Control Center home screen.
- Name your blueprint — use a name that reflects the program or project type (e.g., “Client Delivery — Professional Services”).
- Select your blueprint folder — click “Select Folder” and navigate to the Template folder you created in Phase 1.
Phase 3: Configure Blueprint Settings
- Open “Blueprint Settings” from the left navigation panel inside your new blueprint.
- Set the project folder naming convention under “Project Folder Name” — use column references from your intake sheet (e.g.,
{{Project Name}} — {{Client Name}}). - Configure the destination workspace — under “Project Destination,” select the parent workspace or folder where provisioned project workspaces will be created.
- Set sharing permissions under “Sharing” — define who gets access to newly provisioned workspaces. You can use intake sheet column values (e.g., a “Project Manager” column) to dynamically share each project with the assigned PM.
- Map your global sheets under “Global Sheets” — add the portfolio rollup and program-level sheets. Control Center will update cross-sheet references automatically.
Phase 4: Add and Map Your Intake Sheet
- Click “Intake Sheet” in the left navigation of your blueprint settings.
- Click “Add Intake Sheet” and select the intake sheet you created in Phase 1.
- Map intake columns to blueprint profile data fields — Control Center uses “Profile Data” to inject intake sheet values into provisioned project sheets.
- Designate the approval column — select the checkbox or dropdown column that will trigger provisioning. This is the most important field mapping in the entire setup.
- Test the intake sheet mapping by clicking “Preview” — Control Center shows you a preview of how a provisioned workspace will look given sample intake data.
How to Configure Automated Provisioning
Manual provisioning works, but it is not what Control Center is designed for at enterprise scale. The real operational leverage comes from automated provisioning triggered by the approval column on the intake sheet. Note that this automation is configured inside Control Center, not inside the standard Smartsheet automations panel on the intake sheet.
- Navigate to your blueprint in the Control Center interface and click “Automations” in the left navigation panel.
- Click “New Automation” in the upper-right of the Automations panel.
- Select “Automated Provisioning” as the automation type from the dropdown menu.
- Set the trigger condition under “Trigger” — select your approval column and set the trigger value. For a checkbox column, set trigger to “is checked.” For a dropdown, set trigger to “is equal to” the approval value (e.g., “Approved”).
- Configure the intake sheet under “Source” — confirm the automation is pointed at the correct intake sheet if your blueprint has multiple intake sheets.
- Set the run frequency under “Schedule” — for most enterprise deployments, “Run immediately when triggered” (real-time via webhook) is the correct choice. Scheduled runs introduce provisioning lag that frustrates requestors.
- Enable the automation toggle at the top of the configuration panel — the automation does not activate until this toggle is switched on, even after saving.
- Click “Save” to publish the automation.
- Test the automation by adding a test row to your intake sheet, populating all required fields, and checking the approval column. Verify that a new project workspace appears in the destination workspace within the expected time window.
For guidance on designing the Smartsheet automations that feed into and out of your intake sheet (notifications, approval workflows, column update triggers), that configuration lives in standard Smartsheet automation — separate from the Control Center provisioning trigger covered above.
The Portfolio WorkApp: What Gets Created Automatically
On Enterprise plans, Control Center automatically generates a Portfolio WorkApp for each program when the blueprint is first published. The auto-generated Portfolio WorkApp consolidates all provisioned project data for the program into a single interface: executive summary dashboards, portfolio-level reports, resource views, and navigation to individual project workspaces.
Key things to know: it is created in the same workspace as your blueprint’s destination folder; it is updated automatically as new projects are provisioned; structural changes to the blueprint do not automatically propagate to the WorkApp; and the 90-page limit applies to the WorkApp as a whole across the blueprint.
For a detailed walkthrough of WorkApp configuration beyond what Control Center generates automatically, the Smartsheet WorkApps guide covers page types, role-based visibility, and navigation design in depth. For client-facing portals, Smartsheet Dynamic View widgets can be embedded inside the Portfolio WorkApp pages.
Smartsheet Control Center Setup: Advanced Configuration Tips
Profile Data and Dynamic Content Injection
Use Profile Data fields aggressively — not just for the project name, but for client names in dashboard titles, budget targets in conditional formatting thresholds, and project manager names in automated notification templates. Every piece of intake data you fail to map through Profile Data becomes a field someone has to manually update in each provisioned workspace.
Archiving and the Active Project Count
The 5,000-project limit applies to active projects. Control Center’s archive function moves completed project rows on the intake sheet to an archive sheet, removing them from the active count. Build an archiving workflow before you launch. Organizations that skip this end up hitting the active limit on projects that closed two years ago.
Data Shuttle Integration for Intake Automation
For organizations where project requests originate in external systems (Salesforce opportunities, ServiceNow tickets, Jira epics), Smartsheet Data Shuttle can automate the population of the Control Center intake sheet from those external sources — removing the manual intake step entirely and creating the highest-ROI architecture for professional services firms.
Smartsheet Control Center is the most capable project provisioning tool in the Smartsheet ecosystem, but it demands disciplined upfront architecture work. The licensing gate (Advance bundle required, not included in standard Business plans) and the hard capacity limits (5,000 projects per intake sheet, 50 reports per blueprint, 90 WorkApps pages) are non-negotiable constraints that must shape your blueprint design before you write a single template formula. Organizations that do this planning work before implementation achieve the 80-90% reduction in project setup time that makes the investment defensible. Calculate your current annual hours spent on manual project workspace setup across all PMs, multiply by fully-loaded labor cost, and compare to the ~$7,000 entry price. For most PMOs managing 40+ project launches per year, the math closes comfortably in year one.
Frequently Asked Questions
Can I use Smartsheet Control Center on a Business plan without the Advance bundle?
No. Control Center is exclusively available on the Smartsheet Advance bundle, the Advanced Work Management package, or Enterprise agreements that explicitly include the Advance add-on. Standard Business and Pro plans do not include Control Center access regardless of the number of users on the plan. If you do not see the Control Center tile in your application launcher, your plan does not include it. The Advance bundle starts at approximately $7,000–$15,000 per year for 30 blueprint configurations.
What is the difference between a blueprint template and a global sheet in Control Center?
Blueprint template sheets are the assets that get copied and provisioned as a new workspace for each approved project — your project plan, RAID log, budget tracker. Global sheets, by contrast, are blueprint-level sheets that persist at the program level and aggregate data across all provisioned projects through cross-sheet references that Control Center maintains automatically. Your portfolio summary sheet and executive dashboard source are global sheets.
How do I push template changes to existing provisioned projects after a blueprint update?
Control Center’s “Update Projects” feature allows you to push changes from an updated blueprint to some or all already-provisioned projects. However, certain structural changes may require manual reconciliation in individual project sheets. Always test blueprint updates on a representative sample of 5-10 projects before pushing to the full portfolio.
Why is my provisioning automation not firing even though the approval column is checked?
The most common cause is that the automation toggle inside Control Center was not switched on after saving. The second most common cause is that the intake sheet row does not have all required Profile Data fields populated — Control Center will silently skip provisioning if required fields are blank. Check the Control Center activity log for error entries indicating which field validation is failing.
How does Control Center interact with Smartsheet Resource Management?
When your blueprint template includes the required Resource Management columns (Assigned To, Allocated %, Estimated Days), every Control Center-provisioned project automatically becomes visible in the Smartsheet resource management portfolio view without any manual configuration. Configure the Resource Management column structure in your blueprint template before launch, as retrofitting requires the “Update Projects” workflow across your entire portfolio.
Sources: Smartsheet Control Center Overview — Smartsheet Help Center | Smartsheet Advance: Control Center — Smartsheet.com