Skip to content
-
Subscribe to our newsletter & never miss our best posts. Subscribe Now!
Work Management Hub Work Management Hub

Expert Reviews, Comparisons & Guides for Smartsheet, Monday.com, Asana, ClickUp & More

Work Management Hub Work Management Hub

Expert Reviews, Comparisons & Guides for Smartsheet, Monday.com, Asana, ClickUp & More

  • Airtable
  • Asana
  • ClickUp
  • Jira
  • Monday.com
  • Notion
  • Smartsheet
  • Wrike
  • About
  • Contact
  • Airtable
  • Asana
  • ClickUp
  • Jira
  • Monday.com
  • Notion
  • Smartsheet
  • Wrike
  • About
  • Contact
Close

Search

  • https://www.facebook.com/
  • https://twitter.com/
  • https://t.me/
  • https://www.instagram.com/
  • https://youtube.com/
How-To GuidesWrike

Wrike Blueprints 2026: How to Create Project Templates That Launch Instantly

By Shaik KB
May 26, 2026 20 Min Read
0

⚡ Key Takeaways

  • Wrike Blueprints are reusable project templates — build the folder, tasks, assignees, dependencies, and custom fields once, then launch identical projects in seconds from any start date.
  • Relative dates are the feature that makes Blueprints genuinely useful: set “Task A due 5 days after project start, Task B due 10 days” and every launch auto-adjusts — no manual date editing required.
  • As of 2026, Blueprints can be triggered automatically when a client submits a Request Form — eliminating the manual step of launching a project after intake (Business plan and above).
  • Dynamic assignee tokens let blueprint tasks auto-assign to whoever submitted the request form or to a defined team role — no post-launch reassignment needed.
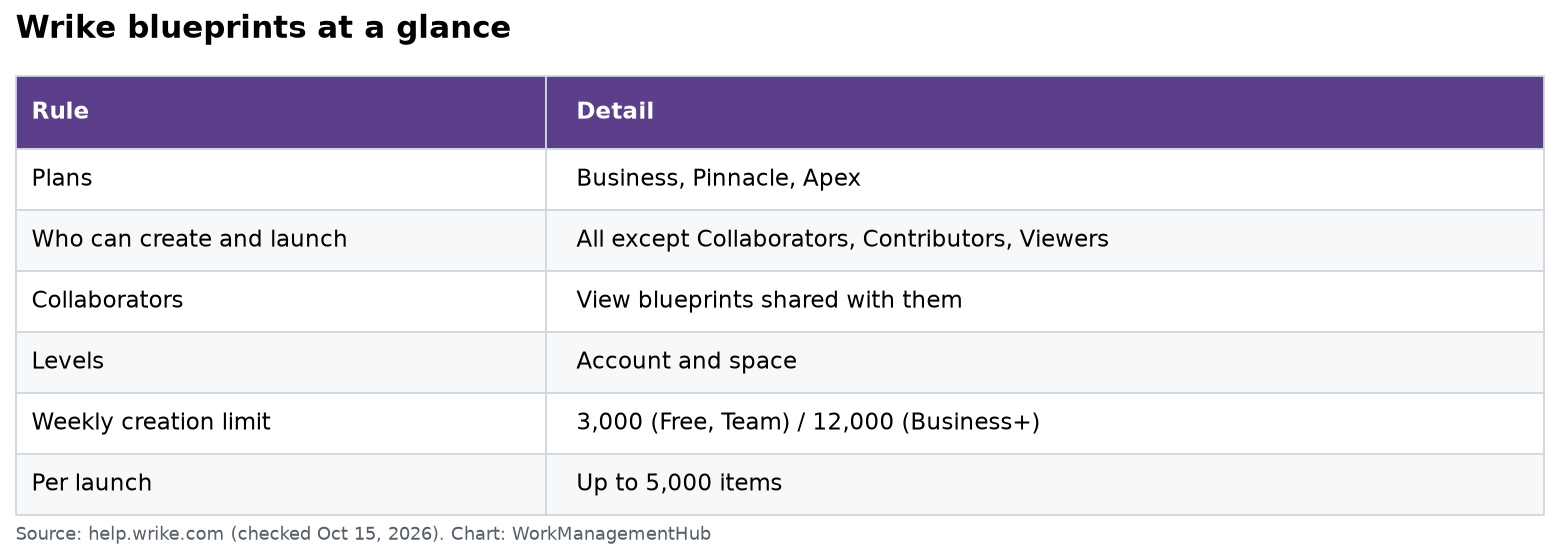
  • Blueprints are available on Professional, Business, and Enterprise plans — not on Free or Team. The form-triggered launch requires Business or above.
  • The most common blueprint mistake: using fixed calendar dates instead of relative dates. Your entire template will break on every subsequent launch if you do this.
Quick Answer:

Wrike Blueprints are reusable project templates that auto-adjust all task dates from a chosen start date when launched. To create one, navigate to the Blueprints section in the left sidebar, build your folder and task structure with relative dates, set assignees, and click Launch. On Business plans and above, a Request Form can trigger a blueprint launch automatically when submitted.

Table of Contents

  1. What Are Wrike Blueprints and Why Do They Matter?
  2. Plan Availability: Which Plans Get Blueprints?
  3. How to Create a Wrike Blueprint: Step-by-Step
  4. Relative Dates: The Feature That Makes Blueprints Actually Work
  5. What to Include in Your Blueprint Structure
  6. Form-Triggered Blueprint Launch: The 2026 Game-Changer
  7. Dynamic Assignee Tokens: Auto-Assign on Launch
  8. How to Launch a Blueprint Manually
  9. Blueprint Permissions and Sharing
  10. Common Blueprint Mistakes and How to Avoid Them
  11. When Blueprints Deliver ROI — and When They’re Overkill
  12. Verdict
  13. Frequently Asked Questions

Wrike Blueprints 2026: How to Create Project Templates That Launch Instantly

Every operations team eventually hits the same wall: the same project type runs every month — a product launch, a client onboarding, a quarterly report — and someone still spends an hour rebuilding it from scratch. Folders get named wrong, tasks get missed, dates get set based on whoever was running the last project, and the PM who did it best six months ago has since left the company. This is the problem Wrike Blueprints solve, and in 2026 they solve it substantially better than competitors — particularly with the addition of form-triggered launches that eliminate the human bottleneck between a client request and a project starting.

This guide covers everything: what Blueprints actually are, how to build one that survives repeated use, the relative date system that most guides skip, the new Request Form trigger, and the permission model that determines who can use your templates. If you are evaluating Wrike alongside competing platforms, our Wrike 2026 full review covers the broader feature picture. For marketing teams specifically, our Wrike for marketing teams guide shows Blueprints in the context of a campaign launch workflow.

What Are Wrike Blueprints and Why Do They Matter?

A Wrike Blueprint is a saved project template — a folder structure, task list, subtasks, assignees, custom fields, custom statuses, dependencies, and time tracking configuration — that can be launched as a new live project at any time. When you launch a blueprint, Wrike creates a full copy of the structure and — critically — recalculates all task dates from the new project start date you specify at launch.

This is the core distinction between a blueprint and simply duplicating a folder. When you duplicate a folder, Wrike copies the folder as-is, including whatever dates were in the original tasks. You then have to manually update every date to match the new project timeline. On a 40-task project, that is a 20-minute administrative chore that introduces errors and breaks dependencies. A blueprint avoids this entirely: you define dates as offsets from the project start (“Day 5”, “Day 10”, “Day 21”), and every launch calculates real calendar dates automatically.

The business impact is not trivial. Teams that systematically template their repeatable projects report 40–60% reduction in project setup time, near-zero “missed task” errors on standard deliverables, and significantly better onboarding for new project managers who inherit a standardized structure from day one.

Blueprints support the full Wrike task model: tasks and subtasks, all task fields including descriptions and custom fields, assignees and followers, dependencies (finish-to-start and start-to-start), custom statuses, time tracking, and folder hierarchy. You can build multi-level folder structures inside a blueprint — useful for agencies managing client projects with consistent subfolder organization.

Plan Availability: Which Plans Get Blueprints?

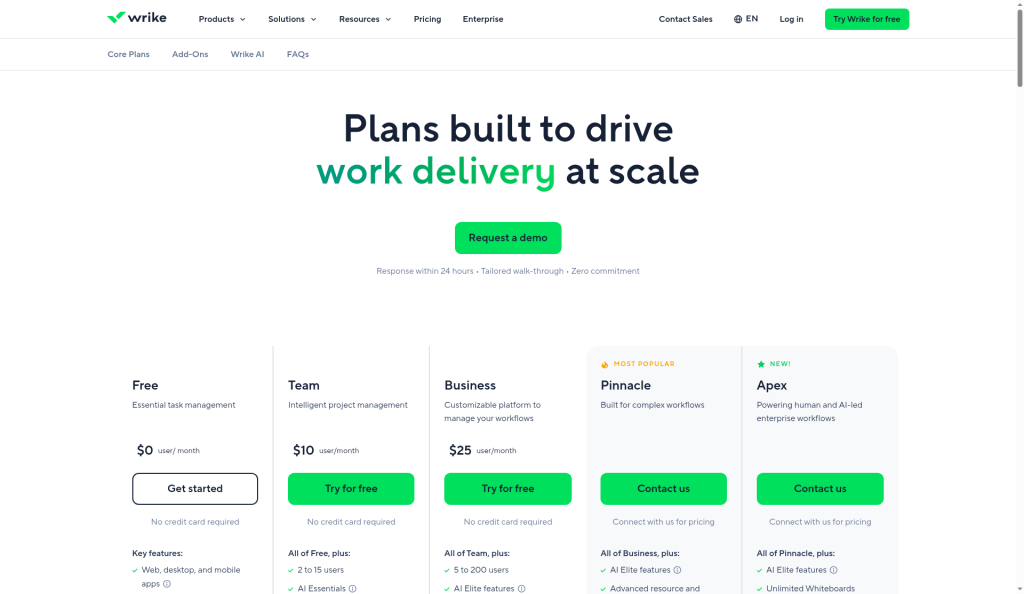
Wrike Blueprints are available on Professional, Business, and Enterprise plans. They are not available on the Free or Team plans.

The form-triggered launch — where a submitted Request Form automatically fires a blueprint — requires the Business plan or above. Professional plan users can create and manually launch blueprints but cannot connect them to Request Forms for automatic triggering.

If you are currently on the Team plan and evaluating an upgrade, our Wrike pricing guide for 2026 breaks down the per-seat cost differences and lists every feature that gates to Business and above. Blueprints alone justify the upgrade for teams running five or more repeatable project types per month — the time recovered from manual project setup quickly exceeds the incremental plan cost.

How to Create a Wrike Blueprint: Step-by-Step

Building a blueprint takes 15–45 minutes depending on project complexity. Invest this time once; every future launch takes under two minutes.

  1. Navigate to Blueprints in the left sidebar — In your Wrike workspace, look for “Blueprints” in the left navigation panel. If you do not see it, click the “More” option at the bottom of the sidebar. Blueprints live as a separate section from your active projects and folders.
  2. Click “Create Blueprint” — This opens a blank blueprint editor. Give it a clear, descriptive name that reflects the project type (e.g., “Client Onboarding — Standard”, “Product Launch — 30-Day”, “Monthly Report — Finance”). Naming conventions matter: your team will see this list when launching and needs to identify the right blueprint quickly.
  3. Build the folder structure — Inside the blueprint editor, add subfolders as needed. A client onboarding blueprint might have subfolders for “Discovery,” “Setup,” and “Handoff.” Create this hierarchy the same way you create folders in a normal project — the blueprint editor mirrors the standard Wrike interface.
  4. Add tasks and subtasks — Create tasks inside the blueprint’s folders. Add descriptions, checklists, and custom field values. For subtasks, hover over the parent task and click the “Add Subtask” option. The task editor inside a blueprint is identical to the standard task editor.
  5. Set relative dates on every task (critical — see the next section) — For each task, set the start and due dates as offsets from the project start date. Do not enter calendar dates here. Set “Day 1,” “Day 5,” “Day 10,” etc. This is the step most users get wrong and the one that determines whether your blueprint will be usable six months from now.
  6. Assign task owners — Add assignees to each task. You can assign to specific named users, to a team role, or use dynamic tokens (covered in the Dynamic Assignees section below). For tasks that should always go to the same person regardless of who launches the project, assign them directly by name.
  7. Configure dependencies — Set finish-to-start or start-to-start dependencies between tasks. These dependencies are preserved on launch and interact correctly with the relative date system — if Task B depends on Task A finishing, Wrike calculates Task B’s start date in relation to Task A’s calculated completion date.
  8. Add custom fields and custom statuses — If your project type uses specific custom fields (client name, budget, priority tier, service type), add them to the blueprint now. Custom statuses configured in your workspace carry over to blueprint tasks without additional configuration.
  9. Save the blueprint — Click “Save” in the upper right. Your blueprint is now available for launch. It does not create any live project or send any notifications until you explicitly launch it.

Refer to Wrike’s official Blueprints help documentation for the latest UI specifics, as the interface has been refined through 2025 and into 2026.

Relative Dates: The Feature That Makes Blueprints Actually Work

If there is one thing to understand about Wrike Blueprints, it is the relative date system. This is the killer feature — and the feature most teams misconfigure, causing their blueprints to be useless on every launch after the first.

Here is the core problem with fixed dates in a blueprint: if you build a blueprint for a 30-day client onboarding and set Task A due on June 15 and Task B due on June 25, those dates are locked into the template. When you launch that blueprint in August for a new client, every date is two months wrong. You have to manually edit 20, 30, or 40 dates — which is exactly what Blueprints are supposed to eliminate.

Relative dates solve this by storing task dates as offsets from the project start date rather than as calendar dates:

  • Task A: Due 5 days after project start
  • Task B: Due 10 days after project start
  • Task C: Due 21 days after project start
  • Final Delivery: Due 30 days after project start

When you launch this blueprint and specify “Project Start: August 1,” Wrike calculates: Task A due August 6, Task B due August 11, Task C due August 22, Final Delivery due August 31. Every date is correct, zero manual editing required.

To set relative dates in the blueprint editor, click on a task’s date field. Instead of a standard calendar picker showing absolute dates, you will see offset fields. Enter the number of days from project start for both the start date and the due date. Wrike respects your workspace’s working day settings — if your team works Monday through Friday, a “5 business days” offset will skip weekends automatically when calculating the actual calendar date.

Dependencies interact with relative dates correctly. If Task B depends on Task A finishing, and Task A has a 5-day relative due date, Wrike will not schedule Task B to start before Task A’s calculated completion date. This dependency chain is fully preserved through launch — you do not have to re-wire dependencies on every launched project.

The rule is simple and non-negotiable: never enter a calendar date in a blueprint task. If you find yourself typing a month or year into a task date field inside the blueprint editor, stop. Convert it to a day offset. This single discipline is the difference between a blueprint library that runs reliably for two years and a template folder that breaks every time someone new uses it.

What to Include in Your Blueprint Structure

Not every detail belongs in a blueprint. Over-engineered templates become brittle and take longer to configure after launch than they save. Under-engineered templates miss the tasks that actually get forgotten under deadline pressure. Here is the practical line between the two:

Always include in your blueprint:

  • Every task that must happen on every instance of this project type — no exceptions, no assumptions that “everyone knows to do this”
  • Relative dates for every task with a deadline
  • Dependencies between tasks that have a real sequential relationship
  • Standard assignees for tasks that always go to the same role or person
  • Custom field configurations that apply to every instance (the field definitions, not project-specific values)
  • Folder structure that reflects how the project’s work is actually organized
  • Time tracking and effort estimates for tasks with known scope (enables resource management views from day one)

Leave out of your blueprint:

  • Tasks that only appear in some instances — handle these with a post-launch checklist or maintain a separate variant blueprint
  • Project-specific details in task descriptions (client names, specific deliverable names, contract numbers)
  • File attachments that are project-specific — attach at launch or during the project, not in the template itself
  • Custom field values that vary per project — include the field definition but leave the value blank for post-launch entry

For complex workflows, maintain multiple blueprint variants: a “Standard” version and a “Fast-Track” version with compressed timelines and fewer review cycles. Wrike’s blueprint library handles this cleanly — you can have as many blueprints as needed and organize them by project type, client tier, or team.

Form-Triggered Blueprint Launch: The 2026 Game-Changer

The most significant addition to Wrike Blueprints in the 2026 cycle is form-triggered launching: a client or internal stakeholder submits a Wrike Request Form, and Wrike automatically launches a blueprint based on that submission — no human intermediary required between intake and project kickoff.

Previously, the workflow was: client submits form → PM receives notification → PM reviews form → PM manually launches blueprint → PM tags assignees → project begins. On a high-volume team running 30–50 client requests per month, the manual launch step creates a queue, introduces delays of hours or days, and depends on a specific person being available and on top of their inbox. Form-triggered launching eliminates this bottleneck entirely.

With the 2026 implementation, the workflow becomes: client submits form → blueprint launches automatically → tasks are assigned via dynamic tokens → project is live and active. The PM receives a notification that a new project has been created from the form submission and can review and adjust in parallel rather than as a prerequisite gate before work begins.

To configure form-triggered blueprint launching (Business plan or above):

  1. Open the Request Form editor — Navigate to your workspace’s Request Forms section (accessible under Space Settings or via the sidebar’s “+” menu). Open an existing form or create a new one for this project type.
  2. Scroll to the “On Submission” section — At the bottom of the form configuration, find the submission action settings. In 2026, this section includes a “Launch Blueprint” option alongside the standard “Create Task” and “Create Project” actions.
  3. Select “Launch Blueprint” as the submission action — Click the option and choose which blueprint to launch from your library. The picker shows all blueprints your account has permission to access.
  4. Map form fields to blueprint parameters — Wrike will prompt you to define how form fields map to the blueprint launch settings: which form field becomes the project name, which field value sets the start date, which field or static value sets the destination folder for the launched project.
  5. Configure the project naming pattern — Set the naming formula for auto-launched projects. A pattern like “[Client Name] — [Project Type] — [Submission Date]” keeps your project list readable when 20 projects launch in a week without manual naming intervention.
  6. Test with a sample submission — Use the form preview to submit a test entry. Verify that the blueprint launches correctly into the right folder, that all dates calculate accurately from the specified start date, and that dynamic assignees resolve to the correct people.
  7. Publish the form — Once tested, publish the form. The link can be shared with clients directly, embedded on a client portal page, or sent via email auto-responder. Every subsequent submission triggers a blueprint launch without requiring any action from your team.

This feature is documented in Wrike’s official Request Forms documentation, including the latest configuration options added through 2026.

For a deeper look at how Gantt chart views integrate with Blueprint-launched projects for immediate timeline visualization, see our guide on Wrike’s new Gantt chart features in 2026 — particularly useful when blueprint projects need stakeholder-facing timeline views from day one.

Dynamic Assignee Tokens: Auto-Assign on Launch

Static assignees in a blueprint work well when the same person always owns a given task type — a specific developer always handles technical setup, for instance, or the same account manager always owns the client kickoff call. But many projects have tasks that should automatically route to whoever submitted the intake form, or to whoever is designated as project lead at launch time. Dynamic assignee tokens handle these scenarios without requiring post-launch reassignment.

In 2026, Wrike supports the following dynamic assignment options inside blueprints:

  • Form Submitter: Tasks tagged with this token auto-assign to whoever submitted the linked Request Form. Useful for “review your deliverable,” “approve this phase,” or “provide feedback on the draft” tasks that should always route back to the client or internal requestor.
  • Project Owner at Launch: Assigns to whoever manually launches the blueprint or whoever is designated as project owner in the form submission. Useful for oversight and escalation tasks that belong to the PM running the project.
  • Team Role: Assigns to a named role defined in your workspace (e.g., “Account Manager,” “Lead Developer,” “QA Lead”). The actual person currently holding that role receives the task. When roles change — someone transfers teams or a new hire takes over — you update the role assignment once in workspace settings and every future blueprint launch reflects it automatically.

To set a dynamic assignee in the blueprint editor, open a task, click the assignee field, and look for the token options — represented by a variable picker or bracket notation depending on your Wrike version and plan. Select the appropriate token rather than a named user. On launch, Wrike resolves the token to an actual person and assigns accordingly.

Dynamic tokens significantly reduce post-launch administration overhead. On a 40-task blueprint where 15 tasks should route to the form submitter, those 15 assignments happen automatically on launch — no one has to open the new project and tag the client on each task individually after the fact.

How to Launch a Blueprint Manually

When a blueprint is not connected to a form trigger, or when you want to launch it on demand outside of a form submission workflow, the manual launch process is fast and straightforward:

  1. Navigate to the Blueprints section in the left sidebar — Open your Wrike workspace and click “Blueprints.” You will see the full library of saved blueprints available to your account.
  2. Locate the blueprint to launch — Browse or use the search field to find the right blueprint. Clear naming conventions pay off here — a well-named library lets any team member find the right template without guidance.
  3. Click the three-dot menu on the blueprint card and select “Launch” — Alternatively, some Wrike configurations show a direct “Launch Blueprint” button on the card. Both paths open the same launch dialog.
  4. Set the project start date — This is the anchor date from which all relative dates calculate. Enter the date the project officially begins — typically today or a specific future date agreed with the client. Wrike will display calculated due dates for key milestone tasks if you hover over the calendar preview.
  5. Name the new project — The blueprint name is a template identifier; the launch name is the actual project name your team and clients will see. Example: blueprint is “Client Onboarding — Standard,” launched project is “Acme Corp Onboarding — June 2026.”
  6. Choose the destination folder or space — Select where in your workspace the launched project will live. This is typically a client-specific folder, a team space, or an organized year/quarter folder depending on your workspace structure.
  7. Review and confirm — Click “Launch.” Wrike creates the full project structure, calculates all dates from the start date you specified, applies all assignees, and makes the project immediately active and visible to all assignees. The entire process takes seconds regardless of project complexity.

Blueprint Permissions and Sharing

Blueprints in Wrike are controlled by folder-level permissions — not a separate blueprint-specific permission system — which has practical implications for how you share and protect your template library.

By default, a blueprint you create is accessible to anyone with access to the Blueprints section of your workspace. If you want to restrict a blueprint — for instance, a blueprint for a sensitive client tier that only specific team leads should launch — you control access through folder permissions on the blueprint itself, the same way you set sharing on any Wrike folder.

Key permission considerations for managing a blueprint library:

  • Workspace-wide blueprints: Blueprints accessible to all members with workspace-level access. Appropriate for standard process templates that apply across the full organization — onboarding checklists, weekly report structures, recurring review cycles.
  • Team-specific blueprints: Share blueprints only with specific teams or spaces. Members without folder access cannot see or launch the blueprint. This is the right model for blueprints tailored to a specific department or client category.
  • Blueprint editing rights: Only users with edit permission on the blueprint can modify it. Restrict editing to process owners or team leads. Open editing rights on a shared blueprint turn a reliable standard into a moving target that breaks when someone “improves” it without coordination.
  • Launch-only access: Grant most team members the ability to launch a blueprint without edit rights. This is the appropriate access level for the majority of users: they can use the template but cannot inadvertently change the template structure for everyone else.

Treat your blueprint library like any other process documentation: owned by a specific person, reviewed on a regular cadence (quarterly works for most teams), and versioned with change notes when it is updated.

Common Blueprint Mistakes and How to Avoid Them

After seeing how teams implement Blueprints across different industries and team sizes, the failure patterns are consistent. Avoiding these five mistakes separates a blueprint library that runs reliably for years from one that gets quietly abandoned after a month:

1. Using fixed calendar dates instead of relative dates. This is the most common and most destructive mistake. Every task should have a day-offset, not a specific date. If any task in your blueprint shows a specific month and year, fix it before the first launch. A blueprint with even one fixed date will require manual editing on every subsequent use — which defeats the purpose entirely.

2. Building the blueprint by duplicating an existing project folder rather than using the blueprint editor. When you duplicate an active project and try to use the copy as a template, you inherit fixed dates, project-specific task content, completed task states, and often client-specific file attachments. Build blueprints in the dedicated blueprint editor from scratch, modeling the ideal repeatable process rather than copying a specific past instance of it.

3. Over-assigning to named users instead of roles or tokens. When the specific person who owns a task changes — through role changes, departures, or team restructuring — every blueprint task assigned to them becomes a problem. Named user assignments require manual cleanup across every future launch. Use roles or dynamic tokens wherever the work could reasonably be done by any qualified member of a team, and reserve named user assignments only for tasks where one specific person is truly the only appropriate owner.

4. Not testing the blueprint with a full launch before rolling it out to the team. Launch the blueprint into a test folder, verify that all dates calculated correctly from your test start date, check that dependencies held as expected, confirm that assignees resolved to the right people, and review the folder structure looks correct. Delete the test project. Then roll the blueprint out to your team. Skipping this step means the first real client launch is also the debugging session — a poor experience for everyone involved.

5. Never updating the blueprint after the process changes. Blueprints reflect the process at the time they were built. When your team adopts a new review step, adds a required deliverable, or changes a standard timeline, update the blueprint the same week. An outdated blueprint creates the same friction — “this isn’t how we actually do this project” — that causes teams to stop using templates entirely and revert to building every project from scratch.

When Blueprints Deliver ROI — and When They’re Overkill

Blueprints are not a universal improvement to every project type. They deliver strong ROI in specific conditions and add unnecessary overhead in others. Take a clear-eyed view of where to apply them.

Blueprints are high-ROI when:

  • You run the same project type more than four to five times per month — the setup investment is recovered within the first month
  • The project has 15 or more tasks with defined sequencing and clear ownership
  • Multiple people are involved and task ownership across roles is predictable
  • Missed steps create real client, compliance, or business risk — the blueprint enforces completeness
  • Project managers vary across instances — templates enforce process consistency regardless of who is running the project
  • New PMs or team members regularly take on this project type — a blueprint is better onboarding than a verbal briefing

Blueprints are overkill when:

  • A project type runs once per quarter or less — the setup cost outweighs the time recovered from manual rebuilding
  • Every instance is significantly different from the last — the template provides false confidence while requiring constant post-launch customization that takes as long as building from scratch
  • The project is small (under 10 tasks) — a simple task list or checklist in a standard folder accomplishes the same result with less configuration overhead
  • The team is highly experienced with the process and executes consistently without template support — blueprints in this context add constraint without delivering value

The honest benchmark: if setting up a new instance of a project type takes more than 20 minutes and that project type repeats at least monthly, a blueprint will save meaningful time and reduce errors within the first two weeks of use. Below that threshold, the investment is marginal.

For teams using AI-assisted project planning features that interact with Blueprint-launched structures, our guide on Wrike’s updated Gantt and planning features in 2026 covers how these capabilities work together for immediate timeline visibility after launch.

🏆 Verdict

Wrike Blueprints deliver clear, measurable ROI for any team running repeatable project types at volume — particularly with the 2026 addition of form-triggered launches that remove the human bottleneck between client intake and project kickoff. The relative date system is the non-negotiable feature that makes blueprints reusable rather than decorative: configure it correctly from day one or the entire library becomes a maintenance problem rather than a productivity asset. For teams on Business plan and above, the combination of Request Forms, dynamic assignee tokens, and automatic blueprint launching represents a genuinely mature project operations capability that most competing platforms have not matched at this level of integration. For teams on Professional plan, manual blueprints still save 30–60 minutes per launch on any complex project type — a strong return even without the form automation. The one honest caveat: Blueprints are overkill for infrequent or highly variable projects. Apply them where the process is genuinely repeatable, the team has the discipline to maintain the template over time, and the volume of launches justifies the upfront build investment. When those conditions are met, a well-built blueprint library is one of the highest-leverage operational improvements a project team can make.

Frequently Asked Questions

Can I edit a blueprint after it has been launched?

Yes. Editing a blueprint does not affect projects that have already been launched from it — those launched projects are fully independent copies that operate on their own. Changes to the blueprint only apply to future launches. This means you can safely improve and refine your blueprint library at any time without disrupting active projects that are already in flight. Best practice is to document what changed and when in the blueprint description, especially on teams where multiple leads are launching blueprints regularly.

How many blueprints can I create in Wrike?

Wrike does not publish a hard limit on blueprint count, and teams with dozens of blueprint variants report no platform issues. However, an unmanaged library of 50 or more blueprints becomes genuinely difficult to navigate and maintain. Organize blueprints with consistent naming conventions and archive or delete outdated templates quarterly. A well-curated library of 10–15 high-quality blueprints typically serves most teams better than a sprawling collection of 60 inconsistently maintained ones — quality over quantity applies directly here.

What happens to blueprint tasks if I change a custom field definition after launch?

Custom field definition changes made after a blueprint launch apply to new tasks going forward but do not retroactively update tasks already created by prior launches. If you add a new required custom field to your standard workflow, update the blueprint to include it and note that existing in-flight projects from prior launches will not have that field populated automatically — those will require manual updates or a bulk edit. Plan custom field changes carefully if you have many active blueprint-launched projects simultaneously.

Can I use Wrike Blueprints with the API to trigger launches programmatically?

Yes. Wrike’s REST API supports blueprint operations, including launching blueprints programmatically with specified start dates, project names, and destination folders. This is particularly valuable for teams integrating Wrike with external CRM or contract management systems — when a deal closes in Salesforce or a contract is signed in DocuSign, an API call can launch the corresponding client onboarding blueprint automatically. API access requires an appropriate Wrike plan and a developer resource to design and maintain the integration logic.

Do Wrike Blueprints support time tracking and effort estimates?

Yes. You can configure planned effort in hours on blueprint tasks at build time. When the blueprint launches, these effort estimates carry over to the new project, giving Wrike’s resource management views accurate capacity data from the moment the project is created — rather than requiring PMs to populate estimates after launch. For teams using Wrike’s workload views to prevent overallocation, building effort estimates into blueprints rather than entering them post-launch is a significant operational improvement that ensures no project starts without resource visibility.

Author

Shaik KB

Follow Me
Other Articles
Previous

Airtable vs Jira 2026: Which Is Better for Product and Dev Teams?

Next

Airtable Formulas Not Working? 8 Fixes for Common Formula Errors in 2026

No Comment! Be the first one.

    Leave a Reply Cancel reply

    Your email address will not be published. Required fields are marked *

    Sponsored Smartsheet Expert Services – Implementation, Automation, Training
    Sponsored Power BI & Tableau Analytics – Dashboards, Reporting, Insights
    Sponsored AI Agents for Work Management – Automate Tasks, Integrate Tools

    Categories

    • Airtable (12)
    • Alternatives (12)
    • Asana (33)
    • ClickUp (39)
    • How-To Guides (133)
    • Integrations (16)
    • Jira (27)
    • Monday.com (38)
    • Notion (25)
    • Pricing Guides (11)
    • Project Management (74)
    • Smartsheet (28)
    • Tool Comparisons (44)
    • Wrike (11)

    Recent Post

    • ClickUp Sprints Not Working? Here’s How to Fix It (2026)
    • Notion Formulas 2.0: The Complete Guide to Functions and Syntax (2026)
    • Linear vs GitHub Issues: Which Should Your Team Use in 2026?
    • Smartsheet WorkApps: How to Build No-Code Apps in 2026
    • Asana Custom Fields: Complete Setup Guide for 2026
    Work Management Hub

    Independent expert reviews & comparisons of work management tools — helping 50,000+ teams choose the right software.

    Tools We Cover

    • Smartsheet
    • Monday.com
    • ClickUp
    • Asana
    • Notion
    • Jira
    • Wrike
    • Airtable

    Company

    • About Us
    • Contact Us
    • Privacy Policy
    Copyright 2026 — Work Management Hub. All rights reserved. Blogsy WordPress Theme